

What's the Best Way to Plant Your Garden? Direct Sowing vs Transplanting
Find out how to choose the best planting method for your garden!
What’s the Best Way to Plant Your Garden? Direct Sowing vs Transplanting
You’ve been dreaming for years about planting a cut flower garden… and decided THIS IS THE YEAR!
So you head to your nearest garden center, fill your basket with seed packs, then rush home in excitement and eager expectation.
As you begin reading the back of the seed packs, you see all sorts of words like…
“Transplant after last spring frost”
“Direct sow after last spring frost”
…and sometimes “Transplant OR Direct Sow”
Huh?
Don’t worry.
I’ll help you make sense of these words and figure out the best way to plant YOUR garden.
FROST DATES
Many growing locations, like mine in Michigan, USA, can only grow plants part of the year before frost, snow and cold arrive to kill the plants or make them go dormant.
If you live in a climate that receives frost or snow, you need to know your “Frost Dates”. The space on the calendar between these 2 dates is your “frost free growing season”, which means it’s safe to plant during this time. Heavy frost will kill many plants, so I call this a “killing frost”.
You can easily find your “Frost Dates” by searching online. Just enter the name of where you live and the words “frost dates”.
Average Last Spring Frost: Approximate date (2 week swing either in either direction) of when you can expect to get the last “killing frost” of the spring. Remember this date is an '“average”, so it means if you plant your seedlings on your Average Last Spring Frost Date, there is still a 50% chance that you could lose your plants to frost. IT HAPPENS! Ask me how I know ;)
Average First Autumn Frost: Approximate date (2 week swing either in either direction) of when you can expect to get the first “killing frost” of the fall. Again, this is an average, so there is 50% chance it could come sooner (boo!!!) or later (yay!).
Direct Sowing vs. Transplanting
When it comes to planting your cut flower garden, you have 2 options:
1. DIRECT SOWING: This means you directly sowing the seed into your garden. You are…
literally walking out to your garden
plunking the seed in the ground
2. TRANSPLANTING: This means you are…
sowing the seeds into containers indoors (egg cartons, seed trays, yogurt cups, etc)
growing them indoors for a few weeks
gradually acclimating them to outdoor conditions (“hardening off”)
planting them in your garden
As you can see, Direct Sowing is easier, faster and more beginner friendly.
But unfortunately, not all cut flower types perform best when they are Direct Sown.

Which Method Should I Choose?
The answer to this question is determined by YOUR needs and the PLANT’S needs. Here are a few questions to consider:
1. When do you want your flowers to bloom? How long is your growing season?
Most seed packs will tell you approximately how many days it takes for the plant to grow from seed to bloom. I find many cut flowers average 100 days from seed to bloom. People who live in climates with a longer growing season are able to Direct Sow more types of plants, than those of us living in climates with short seasons.
EXAMPLE: If I Direct Sow seeds on May 15 (my Average Last Spring Frost), it means those flowers won’t bloom until late August. That’s a long time to wait!
If I want blooms earlier in the season, I can start them indoors a few weeks earlier then transplant them on May 15 to get blooms in July instead of August.
2. What does the seed pack recommend?
It’s wise to follow the recommendation on the seed pack. Some plants are quite slow growing (like Snapdragons) and must be started indoors weeks or months before being transplanted in order to harvest the blooms in time.
If the seed pack suggests you can try EITHER method, read on!
3. Do you have the time, space and dedication to start seeds indoors?
To learn more about starting seeds, read my blog post “How to Start Seeds”. It does require an investment of time, space and money to start seeds indoors.
WARNING: Once you decide to start seeds indoors, you cannot leave them unattended for more than 24-48 hours. Yup, they are little babies that need constant tending or they will die.
You would not believe the amount of frantic emails I get from people when they realize they are leaving for Spring Break and they don’t know what to do about their seedlings! Yes, you are going to have to hire a “Plant Sitter”. ;)
I hold off on starting seeds as long as possible, because once I start, I can’t go away for the next 6 months (I start seeds from Feb-July) unless I hire someone to take care of my babies.

The Pros and Cons of Direct Sowing vs Transplants
Still not sure which method is best for you? Here are some things to consider to help you decide.
DIRECT SOWING
Pros:
Easy
Inexpensive
Cons:
You’ve got to water the area often to make sure the seeds germinate
Weeds. Can you tell the difference between weeds and the flower you’re trying to grow?
Longer wait for blooms
TRANSPLANTING
Pros:
More predictable results
Earlier blooms
Tangible results - you get to “go plant your garden” and see results at the end of the day
Cons:
Need to be “babied”. Transplants need to be cared for every.single.day.
Transplants need to be “hardened off” before transplanting (acclimate the seedlings to living outdoors by bringing them outside for 1 hour per day, gradually increasing by an hour each day until they are used to being outdoors 24 hours per day). Plants that are not hardened off may experience “transplant shock” and die
Supplies can be costly
Not everyone has good space for growing transplants
Time consuming
List of Plants to Direct Sow vs Plants to Transplant
Here’s a list of SUGGESTIONS for some of the most popular cut flowers. These are not hard and fast rules. Be sure to experiment to find out which method works best for YOUR garden. What works well for one garden might not be the best method for YOURS. I cannot stress this enough!
*Some plants are on both lists. If you have time, space and inclination to start them as transplants, go for it. If you don’t, simply direct sow them instead.
P.S. I almost exclusively Direct Sow all of my Cosmos, Sunflowers and Zinnias. On my farm, these plants perform MUCH BETTER when I Direct Sow them as opposed to Transplanting them. This saves me so much time, space and effort!
Other people have the most success growing these flowers as Transplants, but that has not been the case for my farm.
Again, different methods work best in different situations. Don’t be afraid to experiment!
Happy planting!
Transplant
Ammi*
Black-Eyed Susan (Rudbeckia)
Delphinium
Yarrow
QUESTIONS?
Questions or comments? Leave them below and I’ll get back to you!
READY FOR MORE?
If you’re serious about growing the garden of your dreams this year, register for my online course, “Backyard Cutting Garden 101”. You’ll find everything you need to plan, grow, harvest and arrange your stunning blooms. I can’t WAIT to help you grow! Click on the button below for all the details.

How to Choose the Best Cut Flowers to Grow in YOUR Garden
Want to start a cut flower garden, but not sure what to grow? Start here!
How to Choose the Best Cut Flowers to Grow in YOUR Garden
If you want to grow a cut flower garden this year, but you’re confused and don’t even know how to begin choosing what to grow…
I’ve got you, friend.
In this blog post, you will learn:
What IS a cut flower garden?
What qualities are we looking for in a “Good” cut flower?
What are the different types of cut flowers/foliage for making bouquets?
I’ve helped hundreds of people create the garden of their dreams, so let’s dive right in and start at the very beginning.
What IS a cut flower garden?
A cut flower garden is an area dedicated to the sole purpose of growing and harvesting/cutting blooms to be displayed in a vase.
I’ll be completely honest. Many cut flowers plants are unattractive! In fact, I often recommend that people keep their “Cutting Garden” separate from their landscaping.
Cutting gardens are utilitarian. They are working spaces, not display gardens.
The whole point of a cutting garden is to CUT ALL THE FLOWERS!!!! The blooms are meant to be enjoyed in a VASE, not blooming on the plant. This can be difficult for landscape/bedding flower lovers to embrace.
For example, our Dahlia field is quite ugly. It’s full of rusty t-posts, twine, stakes and fabric pathways. It’s not very picturesque… and that’s OK because we do not care how the flowers look in the field - we care how they look in the vase!

Not all flowers are good candidates for "Cut Flowers". Many of the flowers grown and sold at your local garden are designed for landscapes and flower beds ("landscape plants" and "bedding plants").
These are plants that have often been bred to be low growing and compact (which is the opposite of what we’re looking for in cut flowers!). Some of these may also work as cut flowers... but not always.
Thankfully, plant breeders have been hard at work creating new plant varieties designed specifically for "Cut Flowers".
There may be some crossover between the flower groups (landscape/ bedding plants vs. cut flower plants), but if you want to grow flowers for cutting, it's best to buy seeds/plants that are bred exclusively for that purpose.
2. What qualities are we looking for in a “Good” cut flower?
Good cut flower meets the following requirements:
LONG STEMS
For cut flowers, the stems are a minimum of 12"-18", preferably closer to 24".
Trying to create arrangements with flowers with short stems is frustrating. You can ALWAYS cut stems shorter... but you can't make them grow longer!
It’s VITAL that you read seed packets and plant tags carefully to check the plant height. I will not grow plants that are less than 18” tall.
Long stems give you lots of options when arranging. Short stems are limiting.

LONG VASE LIFE
Every flower has its own “vase life”. This is a rough estimation of how long you can expect the bloom to last in the vase when displayed properly.
Vase life can vary wildly, from 1 day to 2+weeks.
5-7 days is considered a "good" vase life. Most cut flowers can last 5+ days with proper harvesting and care.
Some popular cut flowers, such as Poppies and Dahlias, have less than optimal vase lives (2-3 days for Poppies, 3-5 days for Dahlias), but they are still often used in arrangements.
It’s best to consider these flowers "Event Flowers".
This means they are best suited for arrangements where they only need to look spectacular for 1 day (like a wedding bouquet or a dinner party).

Dahlias
3. LONG(er) GROWING/BLOOMING SEASON:
Does the plant bloom for at least 2 weeks during the season? If you’re short on space, you may want to focus on plants that have a longer growing/blooming season.
For example, Peonies are beautiful, but they only produce blooms for about 2 weeks of the year. The other 50 weeks, they are taking up valuable space in the cutting garden. The same could be said of many other Perennial flowers.
Perennials might not be the best choice for a small cutting garden, where every square inch matters. It may be more useful to fill that space with a flower that will bloom consecutively for at least 4 weeks.

Peony
3. What are the different types of cut flowers/foliage for making bouquets?
There are several types of plants that make good cut flower material.
Be sure to pay attention and read the plant information carefully, so you know what type of plant you are dealing with.
If you’re a beginner, I recommend planting a garden of Annual cut flowers for your first season.
Annuals are:
Generally easy to grow from seed.
Inexpensive. Seeds are very affordable and have a spectacular ROI (Return on Investment). I don’t know anything else on earth that brings as much joy, happiness and delight for such a small price!
Low maintenance. They grow, bloom and die in one season, so you don’t have to keep taking care of them.
As you gain skill over the years, you can begin adding other types of cut flowers to your garden.
*We have a great selection of seeds for cut flower gardens. These are the “tried and true” favorites on our farm that meet all the high standards for our bouquets and arrangements!

Zinnia
2. Biennials:
Plants require 2 seasons to set blooms. The first year, the plant grows and establishes itself. The second year, it will bloom in the spring, then die back.
Biennials are tricky to grow in a small cutting garden because they take up space for 2 years, but only provide cutting material for 1 year.
To solve this problem, plant them in late summer/early fall. You'll likely have an empty place to fill in your garden by then, as some annuals stop blooming and are removed.
Examples:
Columbine
Foxglove
Sweet William

Foxglove
3. Bulbs (including Tubers and Corms):
Plants that have underground, fleshy structures. These plants are usually propagated (multiplied) by their bulbs/tubers/corms, not their seeds.
Examples:
Daffodil (bulb)
Ranunculus (corm)

Dahlia
4. Hardy Annuals:
Annual flowers (1 year life cycle) that have more "frost-hardiness" than typical annuals.
Hardy Annuals do not like heat and thrive in cool weather. They generally bloom in the spring/early summer and die back in the heat of the summer.
The seeds should be planted either in the fall OR in late winter/early spring, as soon as the ground has thawed enough for you to work the top few inches of soil.
Examples:
Bells of Ireland
Larkspur
Nigella (Love-in-a-Mist)

Larkspur
5. Perennials:
Plants that live for more than 2 years (seasons). Perennials can be slow-growing and some are difficult to start from seed.
If you can find the plant at your local garden center/nursery, it's worth buying from there so you don't have to wait a few years for them to bloom.
Perennials can make beautiful cut flowers, but they often have a short bloom time of only a few weeks out of the year, so they take up valuable space for little output.
Examples:
Daisy
Rudbeckia (Black-Eyed Susan)
Veronica

Veronica
6. Shrubs/Trees:
Some of the plants you have growing in your landscaping can be lovely additions to your cutting garden.
They can be expensive and take a long time to grow, so unless you happen to have them growing on your property already, most beginners skip these the first few years.
Examples:
Hydrangea
Lilac
Viburnum

Lilac
Ready for more?
If you’re serious about growing the garden of your dreams this year, register for my online course, “Backyard Cutting Garden 101”. You’ll find everything you need to plan, grow, harvest and arrange your stunning blooms. I can’t WAIT to help you grow! Click on the button below for all the details.

How to Grow Salpiglossis
How to Grow Salpiglossis
How to Grow: Salpiglossis (Salpiglossis sinuata)
Pronunciation: sal-pi-gloss-us
INTRODUCTION
Never heard of Salpiglossis before? Join the club!
It goes by many names, including “Painted Tongue Flower”, “Velvet Trumpet Flower” and even “Stained Glass Flower”.
Salpiglossis is an unusual flower with an unusual name… and it’s perfect for people who like to grow things that are a bit, well… unusual!

Superbissimia

Superbissimia
I’ve grown hundreds of different types of flowers on my farm, but Salpiglossis wins the award for the most people saying “Oh my gosh, WHAT IS THAT?!? It’s STUNNING!!!”
Yes, indeed, they ARE stunning. There’s no other flower quite like them! Each bloom looks like it was hand-painted with the utmost care and precision.
Salpiglossis is native to South America (Chile and Argentina) and it’s actually related to Petunias. Once you grow it, you’ll notice it has slightly sticky stems and the flowers are similar to Petunias. But unlike Petunias, Salpiglossis grows tall, long stems that work in cut flower arrangements.

Royale Mix
Let’s look at the Pros and Cons of growing Salpiglossis for cut flower use.
PROS
They are unique and delightful.
They add a special touch to bouquets.
They are a wonderful addition to the cutting garden or flower garden
They are easy to grow.
CONS
They have slightly sticky stems, which can be a turn-off to some people.
They are not particularly long-lasting in the vase.
They don’t handle heat well. On our farm, they bloom in early summer, then fade during the heat of summer (however, if cut back in mid-summer, they may rebloom in the fall!)

Superbissimia
CHOOSING SEEDS
Here is my favorite Salpiglossis to grow for cut flower use:
“Royale Mix”
“Superbissima” (this color combination was my favorite for cut flower use)
I’ve tried other varieties but found the colors too difficult to incorporate into bouquets. However, they would be lovely in a display garden!

Superbissimia
HOW TO SOW
How to grow Salpiglossis seems to be a bit of a mystery! Every source I’ve combed over seems to offer contradictory information. To me, that simply indicates there are LOTS of different ways to grow it ;) So be willing to experiment!
Over the years, I’ve noticed that Salpiglossis tends to act like a Hardy Annual in my growing climate, and shows some frost-tolerant qualities. In the future, I may experiment with Winter Sowing the seeds or overwintering them in our unheated hoophouse.
Transplants or Direct Sow?
Salpiglossis seeds are tiny (like dust!), so I don’t recommend direct sowing.
Start seeds indoors 6-8 weeks before last spring frost. Sow the seeds on the surface of the seed-starting mix, 1-2 seeds per cell, and press them down to make sure they are in contact with the mix. Cover very lightly with a scattering of vermiculite or seed-starting mix.
Many sources suggest that the seeds germinate best in darkness. This is easy to achieve by simply covering the tray with another tray.
Seeds take about 7-14 days to germinate. Once they germinate, move the tray under lights or into a sunny space.
Transplant after the threat of frost.

Superbissimia

Royale Mix
PLANT SPACING
Plants grow best at 6-9 spacing. Closer spacing will encourage longer stems.
GROWING ON
Salpiglossis grows best in fertile soils with average watering.
I have not experimented with pinching them, so I can’t offer any feedback at this time.
Salpiglossis will need netting or support to keep the plants upright. This does make harvesting a bit cumbersome, but you’ll be glad you did it.
It’s important to harvest stems each week to keep the plants productive longer over the growing season. Salpiglossis can handle some heat but thrives in the cooler temperatures of late spring/early summer and early fall.

Royale Mix
STAGE OF HARVEST
When the top few blooms on the spray/stem are open. The other blooms will open up in the vase. Salpiglossis is very popular with pollinators, but unfortunately, once a bloom has been pollinated, it will decline rapidly. This is why I suggest harvesting the stems when only 1-2 blooms have opened.
POST-HARVEST CARE
Salpiglossis requires no special post-harvest care. If the stem is harvested before most of the blooms are pollinated, you can expect a vase life of about 5-7 days. If the blooms were open when harvested, expect a vase life of about 3 days.
QUESTIONS?
Ask them here and I’ll get back to you!
Ready for more?
If you’re serious about growing the garden of your dreams this year, register for my online course, “Backyard Cutting Garden 101”. You’ll find everything you need to plan, grow, harvest and arrange your stunning blooms. I can’t WAIT to help you grow! Click on the button below for all the details.

How to Grow Scabiosa
How to Grow: Scabiosa
Pronunciation: skab-ee-oh-sah
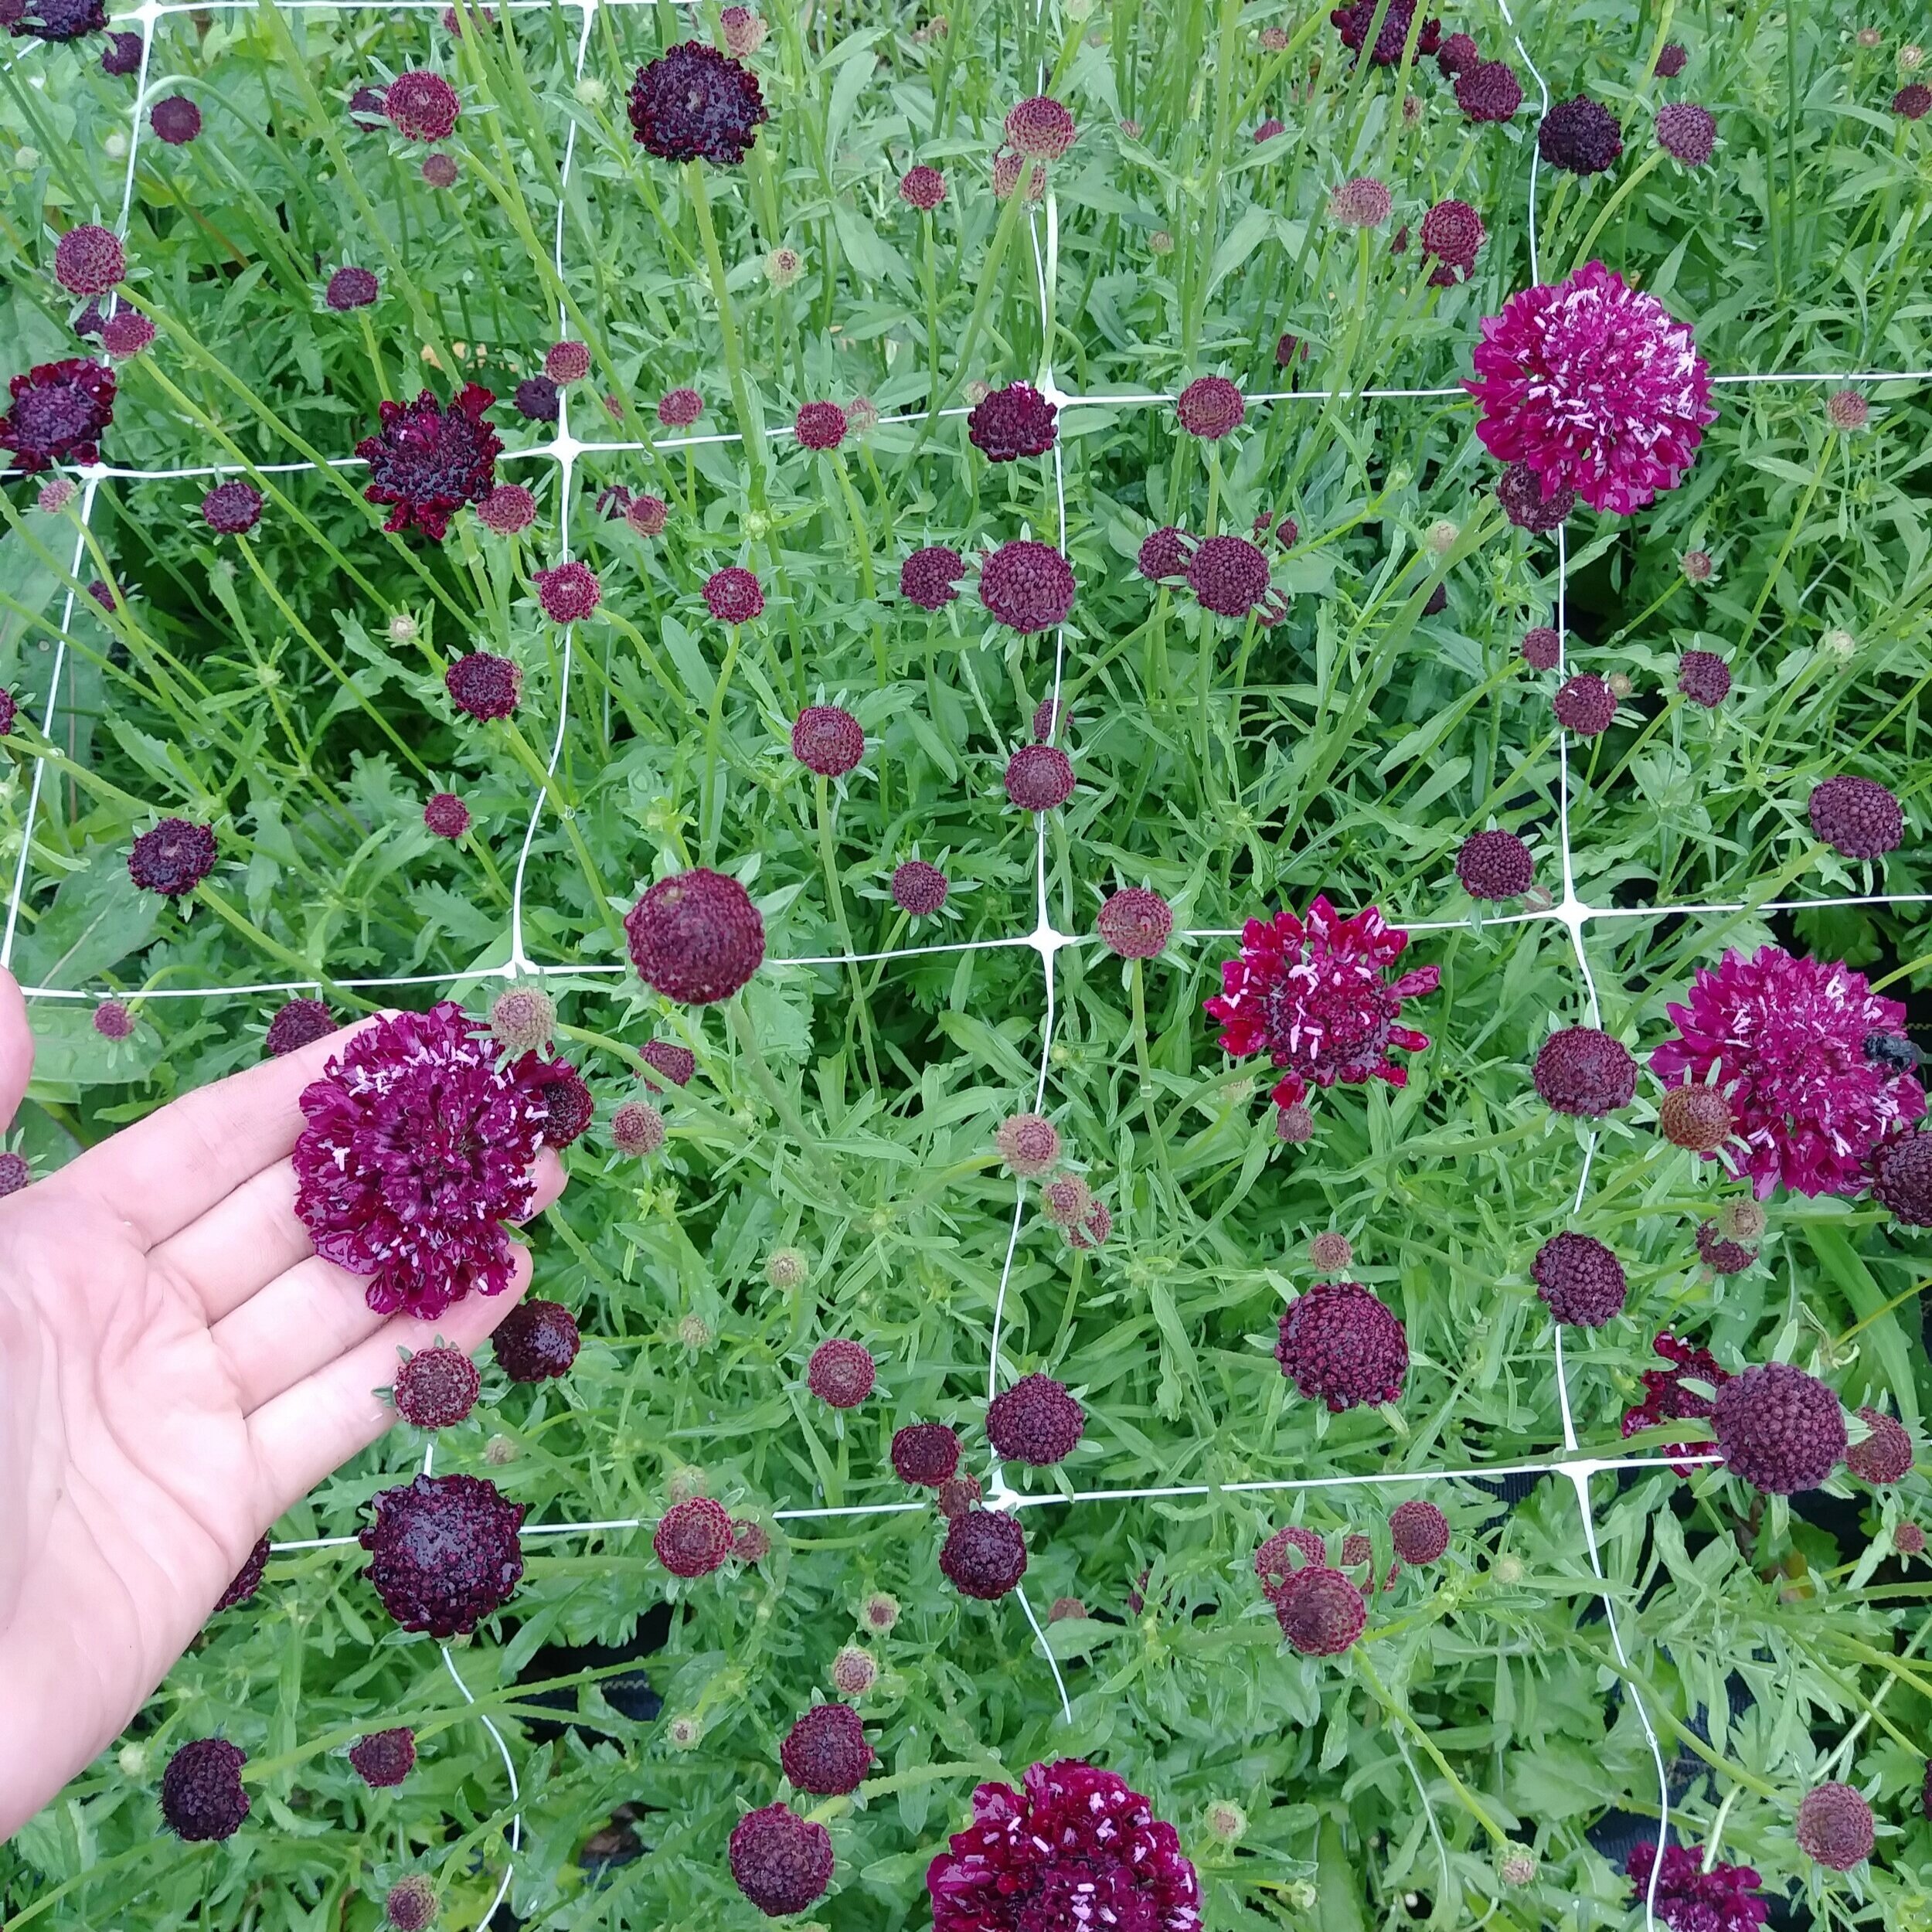
Few flowers can match the beauty and charm of Scabiosa. These whimsical blooms may not be the biggest or flashiest flowers in the cutting garden, but they are fabulous in bouquets and lovely to behold in the garden.

They are also a favorite of pollinators. On our farm, the Scabiosa patch is a hot spot for butterflies galore!

There are 3 main types of Scabiosa (also called “Pincushion Flower”).
Annual Scabiosa/Pincushion (Scabiosa atropurpurea): This is the most popular type for cutting gardens and the type that will be discussed in this blog post.
Perennial Scabiosa/Pincushion (Scabiosa caucasica): This type is a perennial plant that comes back each year (Zone 3-7). Usually identified by the name “Fama Series”
Starflower (Scabiosa stellata): Annual type grown primarily for its seed heads, not the blooms (pictured below).

“Fama White” Scabiosa (Perennial)

“Starflower” Scabiosa
Let’s look at the Pros and Cons of growing Scabiosa for cut flower use.
PROS
They come in a multitude of colors.
They are easy to grow.
The plants are productive for a long period of time, if continually dead-headed (more about this later…)
They are charming in bouquets.
They have a good vase life of 5 -7 days.
CONS
They bloom profusely and it’s nearly impossible to keep up with deadheading!
They need to be netted or they will fall over.
They get tangled in the netting and can be a real challenge to harvest.
“Merlot Red” Scabiosa

“Snowmaiden” Scabiosa
CHOOSING SEEDS
Most Scabiosa seeds offered by seed companies will “make the cut”.
Here are a few of my favorite Scabiosas to grow for cut flower use:
“Merlot Red” (by far my favorite variety, as the stems are sturdier and less likely to get tangled up)
“Black Night”
“Fata Morgana”
“Snowmaiden”
“Salmon Rose”
“Beaujolais Bonnets”
“Cutbrite Mix”

“Merlot Red” Scabiosa
HOW TO SOW
Scabiosa is a summer blooming flower. They are not frost hardy, so do not plant them too early in the season.
Transplants or Direct Sow?
Scabiosa is versatile and can be transplanted or direct sown.
Transplants are best for most climates. Start seeds indoors about 4 weeks before the last spring frost. Transplant after the risk of frost is over.
Direct sowing is possible. Sow seeds in the ground after the threat of frost is over.
While plants can produce for a long time, they do decline over the season. It’s best to plant 2-3 successions (batches) of seeds, about 3 weeks apart. This ensures you will always have some in bloom.
Scabiosaseed “pods” are a bit odd looking (kind of like little rocket ships!) and people wonder how to plant them. Up? Down? I usually lay them on their side. The actual seed is tiny and hiding inside the weird looking seed “pod”.

PLANT SPACING
Scabiosa should be grown at 9-12” spacing. Be sure to provide some sort of support with netting or the plants will flop over into a tangled mess.
We use Hortnova trellis netting stretched over the bed with stakes. Immediately after planting seeds or transplants, put the netting in place, hovering at about 12-18” high.

“Cutbrite Mix” Scabiosa
GROWING ON
After the transplants are established and growing, it’s helpful to “pinch back” the center stem of the plant when they are less than 8” tall. To pinch, simply use clippers to remove the top of the plant, only leaving 2-3 sets of leaves behind.
Plants that are pinched are more productive than plants that are not. Experiment for yourself - pinch half the plants and leave the other half alone. The un-pinched plants will bloom earlier, but the pinched plants will be more productive.
If flowers are harvested and spent blooms are “deadheaded” (removed), the plants will continue to send up blooms until frost or cold weather arrives.
Keeping up with deadheading is the HARDEST part about growing Scabiosa.
STAGE OF HARVEST
Scabiosa is unique because it can be harvested at several stages. All stages are acceptable and have their charms.
Bud (this is when they really look like a “pincushion”)
Flowering
Seed head (these can look very interesting in arrangements!)

“Cutbrite Mix” Scabiosa

“Merlot Red” Scabiosa
As with all cut flowers, be sure to cut deeply into the plant between 2 sets of leaves, cutting stems at least 18” long. Deep cuts signal the plants to produce MORE flowers to replace the one you just cut.
When you make deep cuts, you will end up with a stem with multiple blooms. This is the easiest and most efficient way to harvest Scabiosa and keep the patch manageable. You may be tempted to cut single blooms, but things will get out of hand quickly if you don’t make deep cuts.

POST HARVEST CARE
Scabiosa requires no special treatment after harvest.
QUESTIONS?
Ask them here and I’ll get back to you!
Ready for More?
If you’re serious about growing the garden of your dreams this year, register for my online course, “Backyard Cutting Garden 101”. You’ll find everything you need to plan, grow, harvest and arrange your stunning blooms. I can’t WAIT to help you grow! Click on the button below for all the details.

How to Grow: Snapdragons
The unsung hero of the cutting garden!
How to Grow: Snapdragons
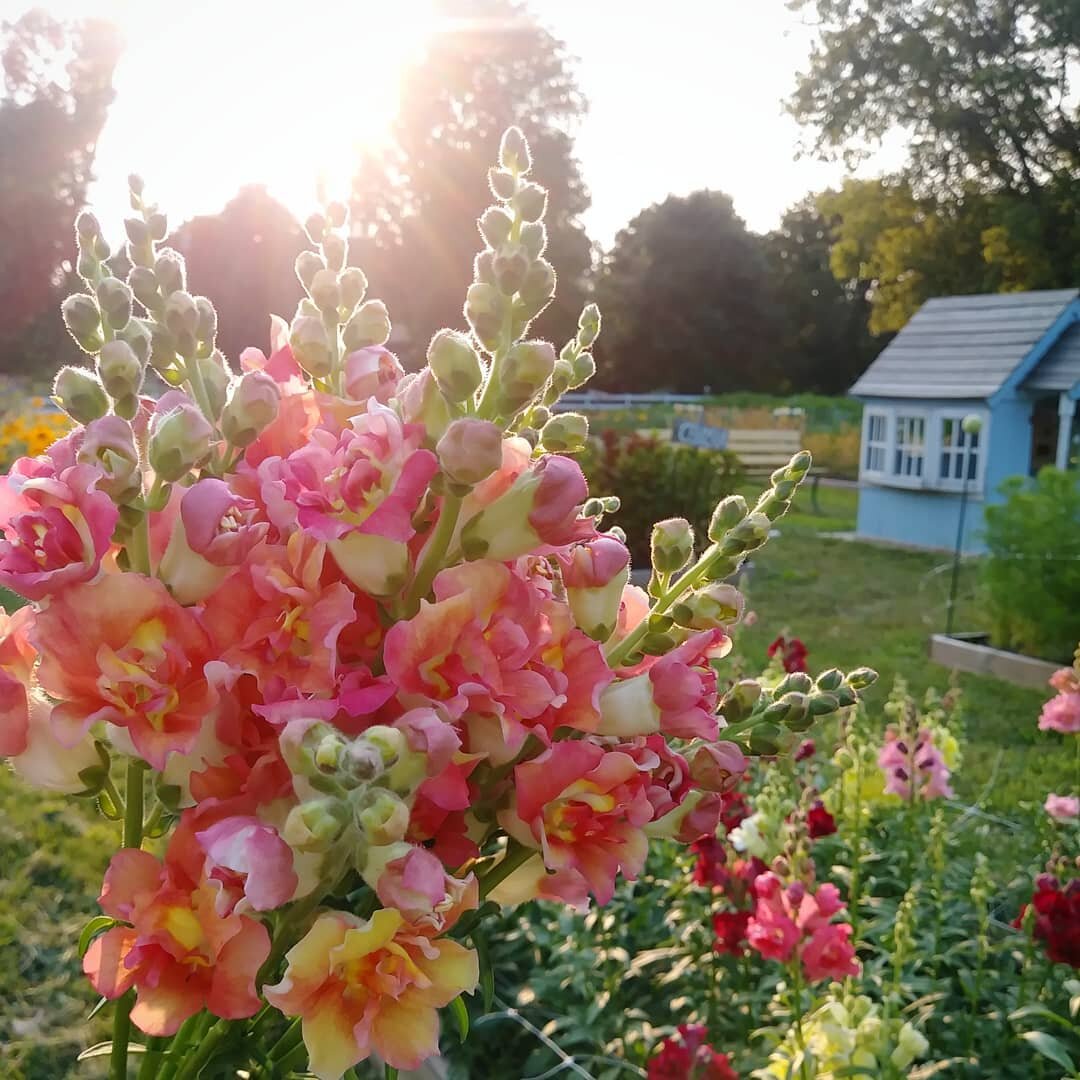
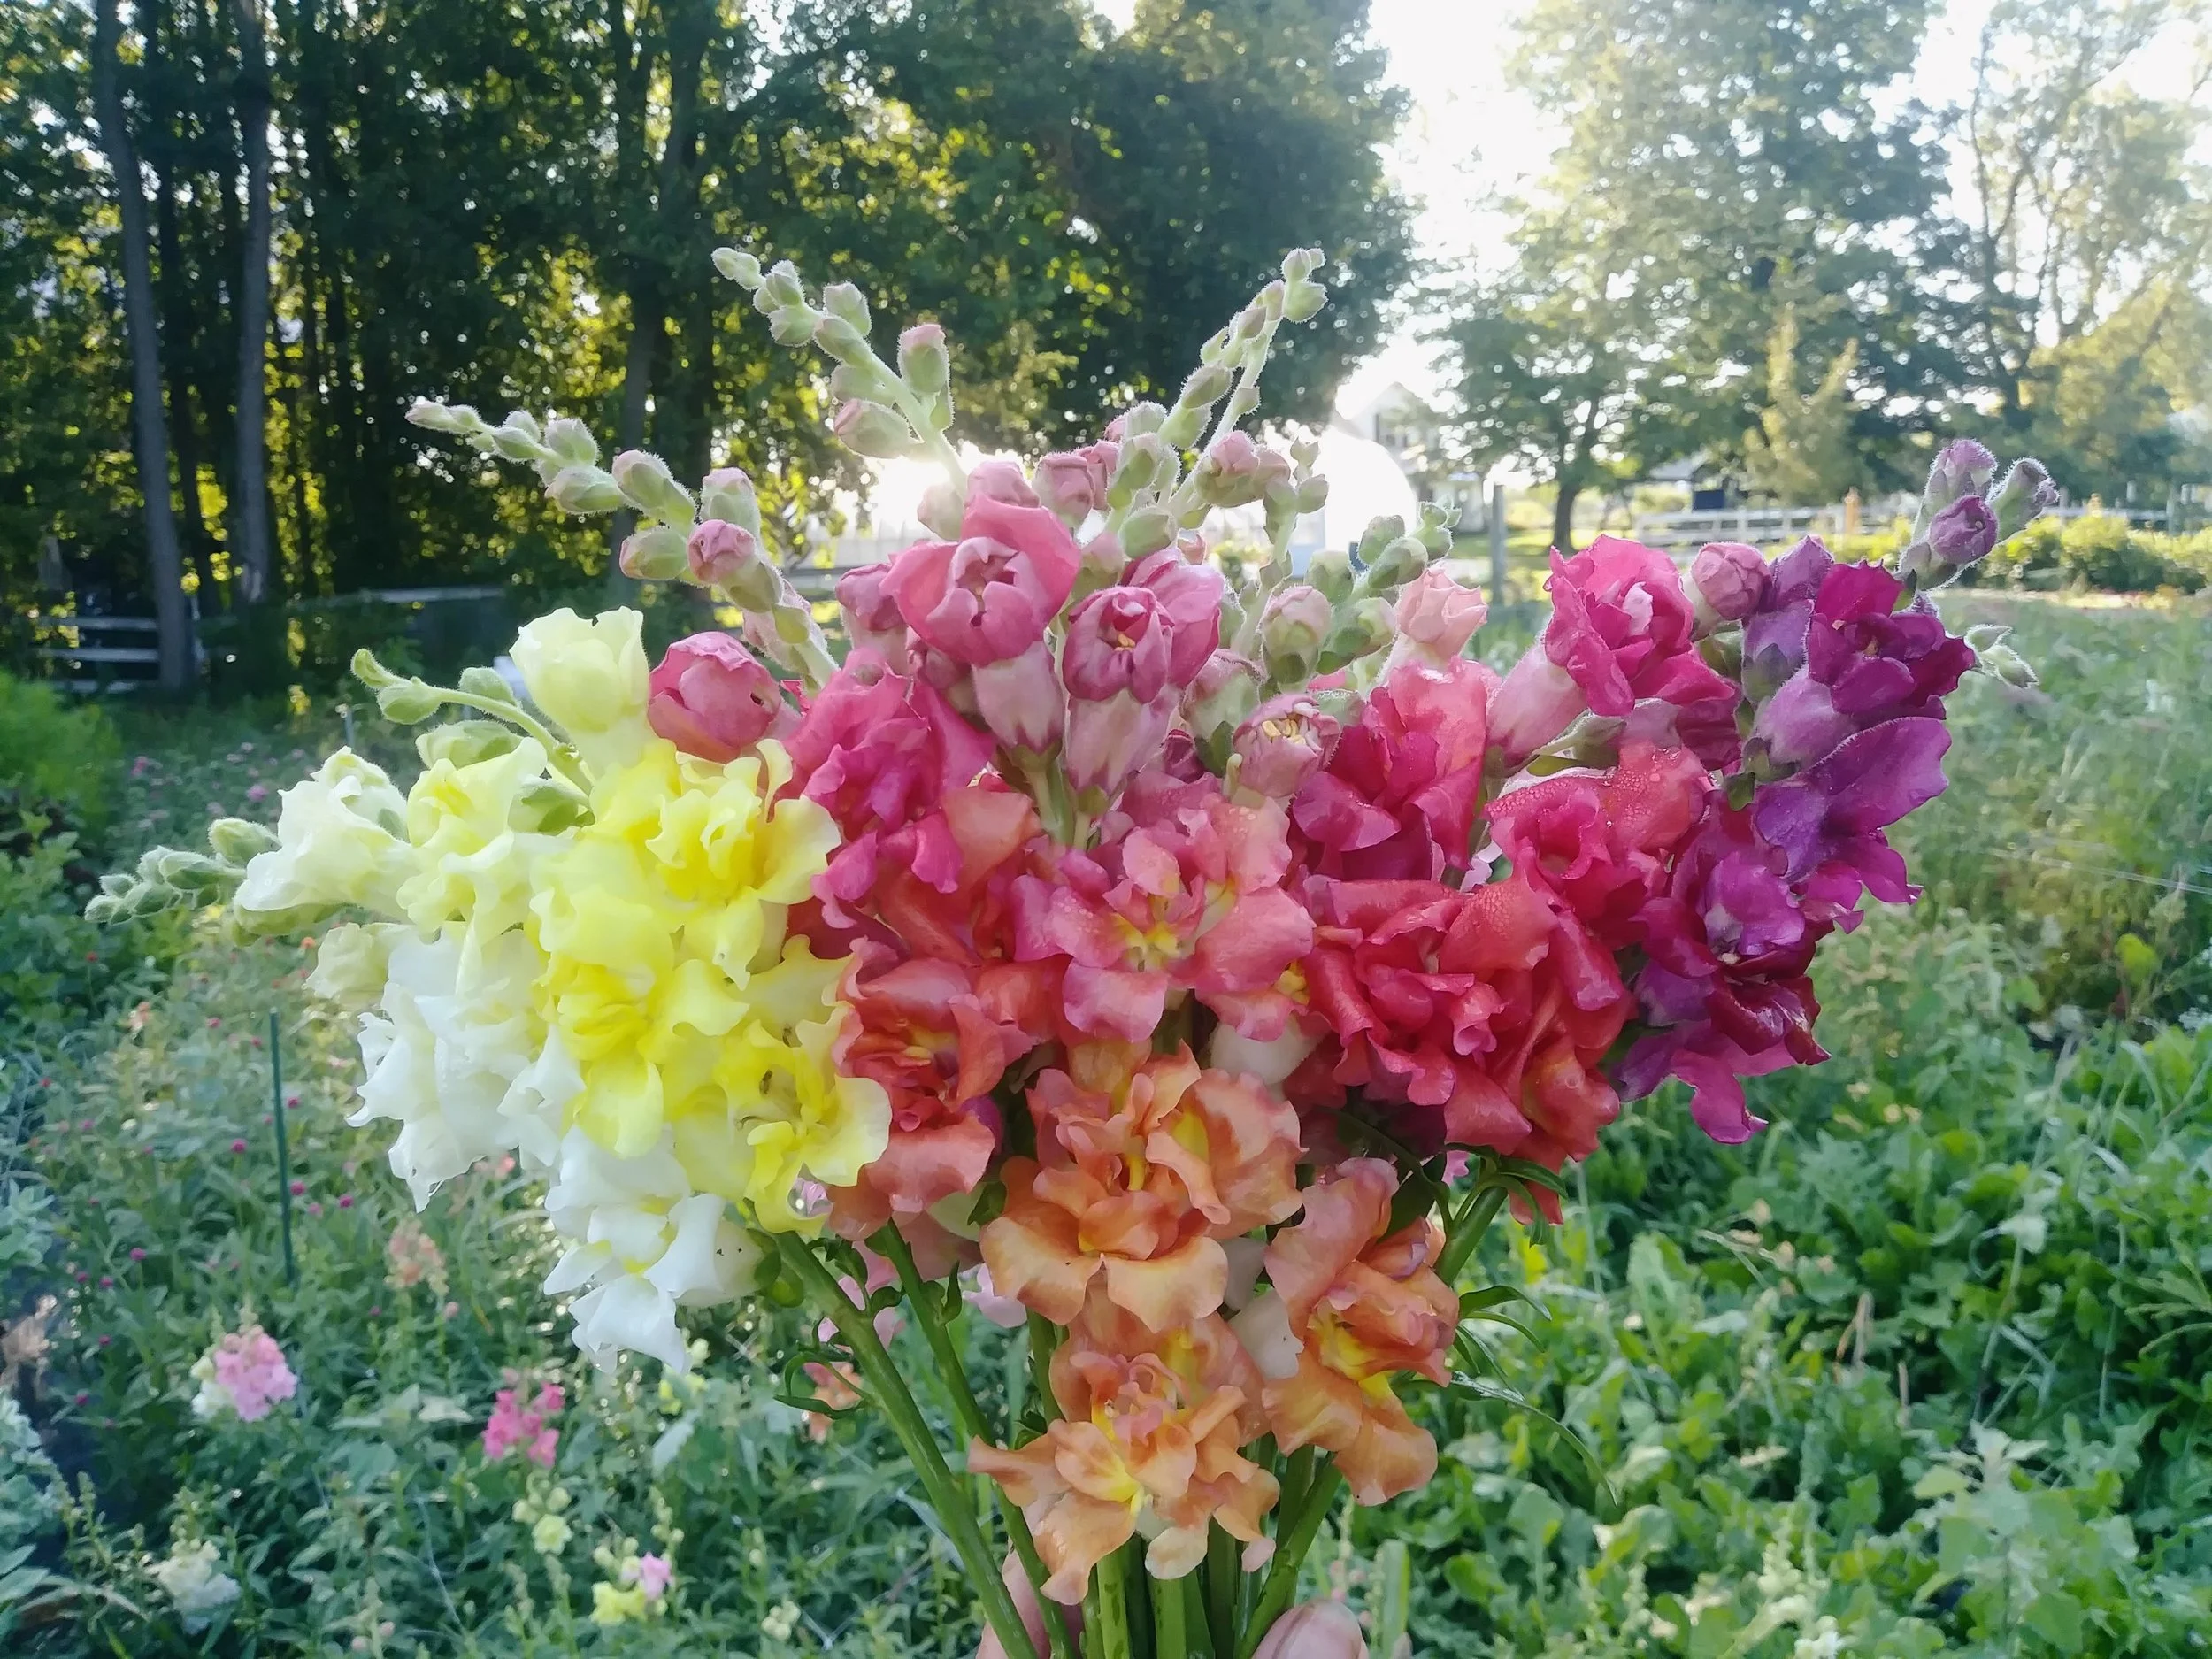
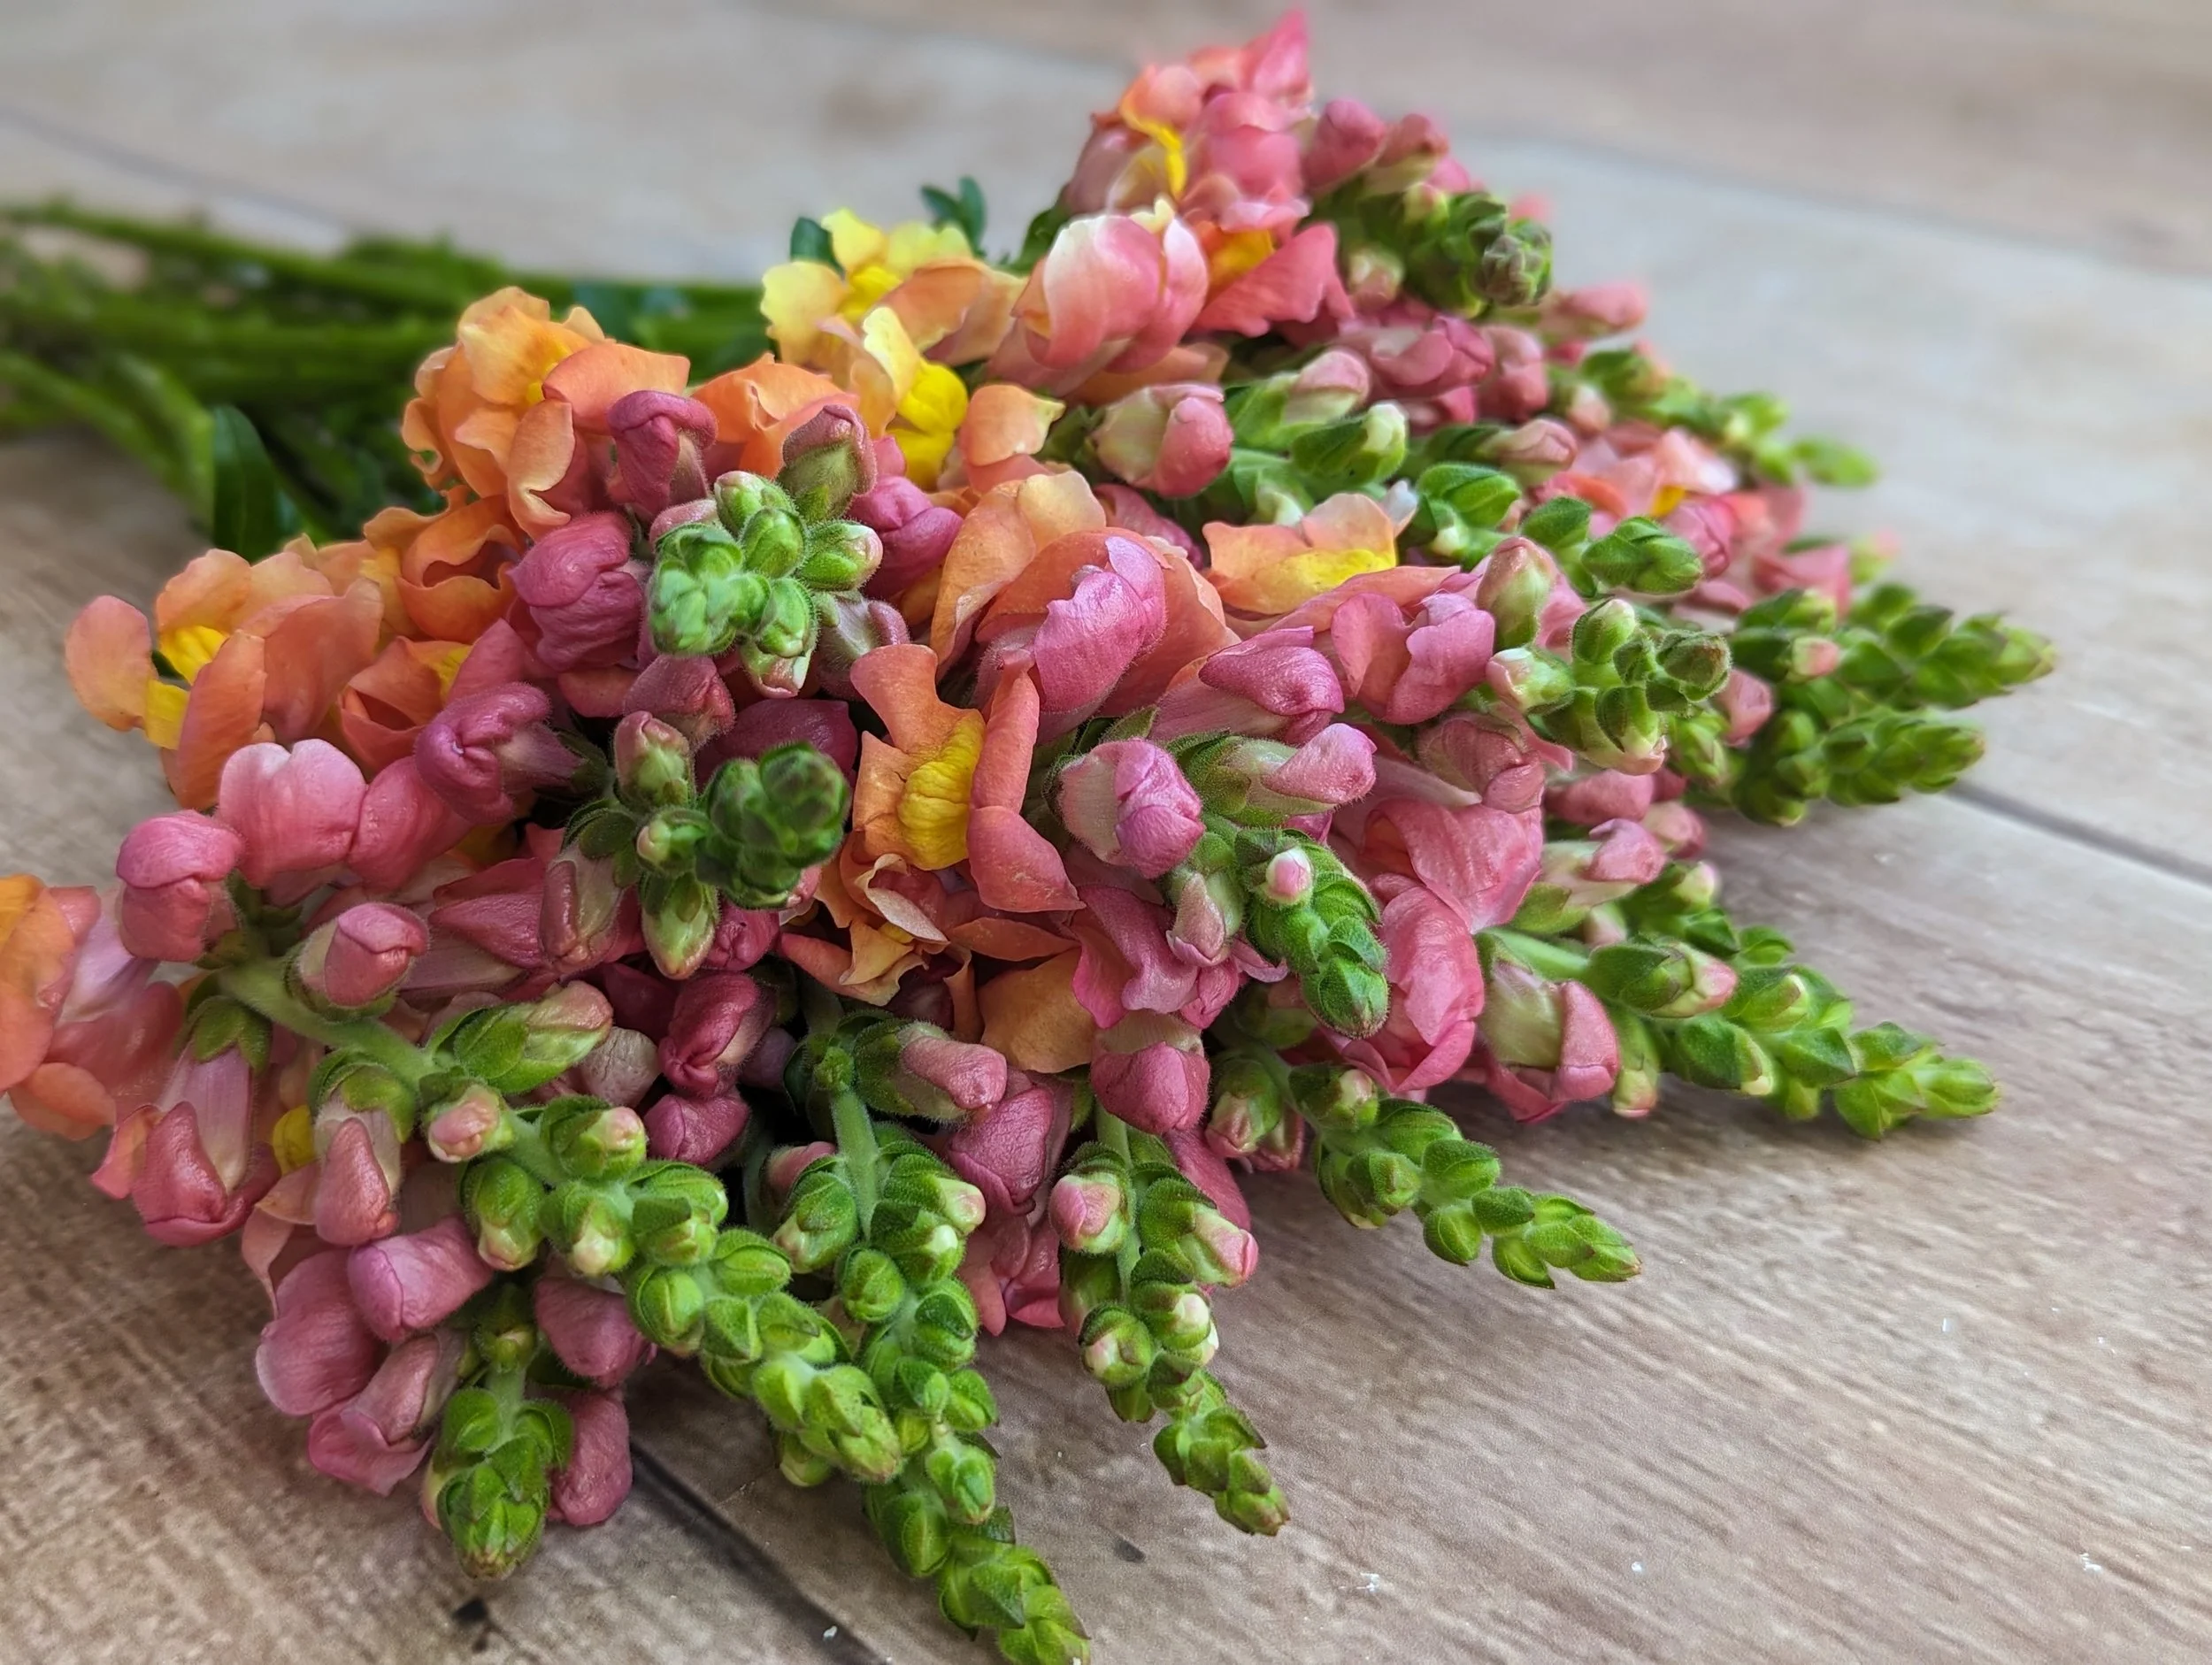
Snapdragons are the unsung hero of the cutting garden. In fact, they are one of my favorite cut flowers!
I’ve always wondered why they were not more popular… Maybe it’s because they don’t have a “round shaped” bloom, like a Daisy, Zinnias, Sunflower, Rose, etc.
Let me tell you though, these beautiful “spike” type flowers will bring your bouquets to the next level. It’s important to have a variety of lines and shapes in bouquets and Snapdragons are the perfect addition.
Let’s look at the Pros and Cons of growing Snapdragons for cut flower use.
PROS
They come in a multitude of colors.
They are perfect for bouquets.
They have an excellent vase life, sometimes lasting 2 weeks if harvested at the proper stage.
CONS
They can be a little tricky to start from seed. If you are a beginner at seed starting, I recommend skipping these until you’re more skilled and confident.
They can be difficult to find as transplants. You might be able to find transplants at your local nursery, but many of the varieties offered at nurseries are bred for landscape use, not cut flower use (you want to choose varieties that reach at least 18” tall).
They slow down in the heat. If you live in a place with hot summers, they may stop blooming. Here in Michigan, they bloom in June, slow down considerably in July/August, then bloom again in September. They are frost hardy and I’ve even had Snapdragon blooms all the way into November!
“Madame Butterfly Mix” Snapdragon

“Rocket White” Snapdragon
CHOOSING SEEDS
As mentioned above, you want to choose varieties that will reach at least 18” tall for cut flower use.
Snapdragon seeds often come in a mix of assorted colors, as well as single colors. Here are my favorite Snapdragons to grow for cut flower use:
“Rocket Bronze” Snapdragon
HOW TO SOW
Snapdragons can be a little tricky to start from seed. For best results, I like to keep the seeds in the freezer until I’m ready to sow them. This mimics their natural life cycle of germinating after a season of cold temperatures.
Snapdragon seeds are absolutely tiny. Seriously, they look like dust. It will make your eyes cross when you’re planting the seeds! Be sure to put on your glasses!
I sow 2 seeds per cell (they don’t need to be thinned, if both germinate).
To sow them, I put the seeds in a small dish or jar, lick the end of toothpick and use the toothpick to pick up 2 seeds. No, I am NOT joking! I wish I was! This is the best method for sowing tiny seeds, like Snapdragons and Poppies.
Gently transfer the seeds to the cell and sprinkle a dusting of soil over them, so they are not completely covered.


Because Snapdragons take so long to grow, direct sowing is not recommended.
Transplants should be started 8-10 weeks before your Average Last Spring Frost. For example, our Average Last Spring Frost is May 15, so I need to start my Snapdragon seeds indoors in early to mid March.
PLANT SPACING
Transplants should be spaced at 6-9” apart. Close spacing encourages longer stem growth.
GROWING ON
Once the transplants have a few sets of leaves and have been hardened off, they can be planted outside. They are “frost hardy” and can handle a light frost.
After the transplants are established and growing, it’s important to “pinch back” the plants. To pinch, simply use a clippers to remove the top of the plant, only leaving 2-3 sets of leaves behind.
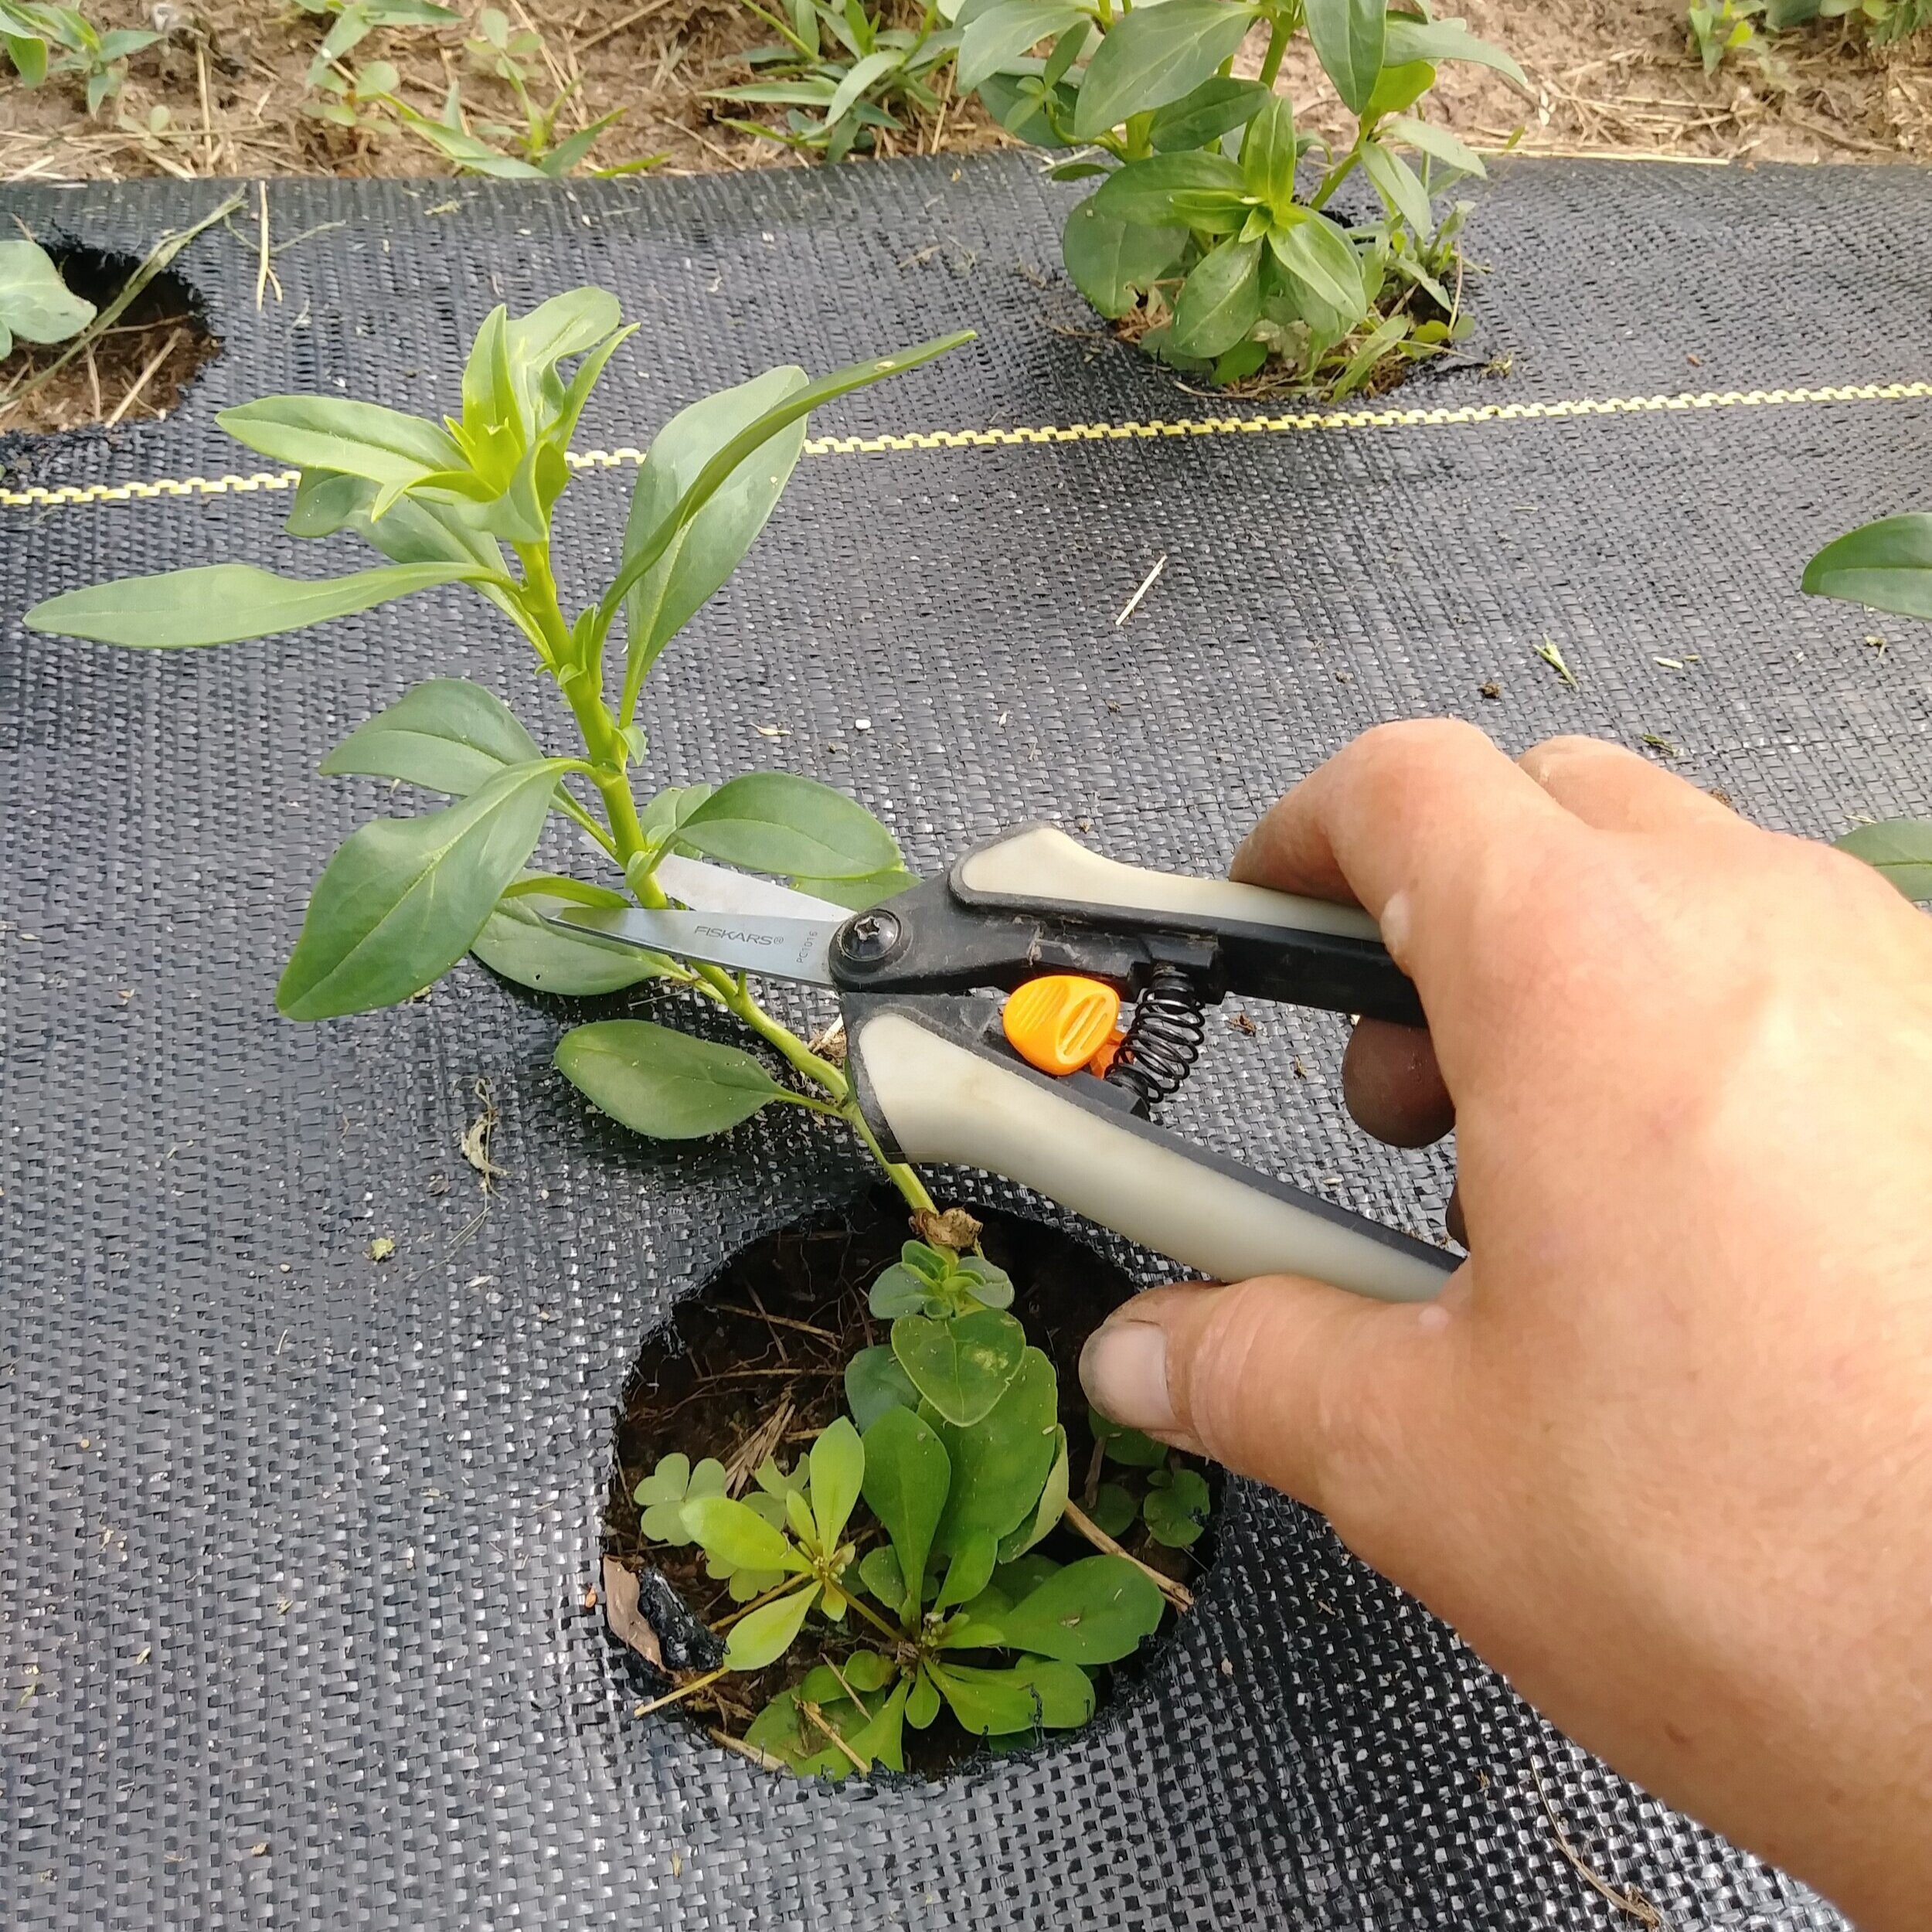
Pinching signals the plant to go into overdrive and send out multiple branches, with multiple blooms.
Check out the plant in the photo below - this was taken a few weeks after pinching and now the plant has tons of branches that produce lots of blooms.

Some people leave a few unpinched on purpose, simply to get early blooms. This is a good way to extend the bloom time of your Snapdragons.
After the spring/early summer flush of blooms, Snapdragons take a break during the summer heat. You can pinch back the plants again to 2-3 sets of leaves… and they will bounce back in the fall, sending up another flush of blooms.
STAGE OF HARVEST
Snapdragons should be harvested when 1-2 florets on the stem has opened. The rest should still be closed. As always, harvest in the cool of the day - morning or evening.

“Madame Butterfly Bronze with White” Snapdragon
POST HARVEST CARE
Snapdragons require no special care after harvesting.

QUESTIONS?
Questions or comments? Leave them below and I’ll get back to you!
Ready for more?
If you’re serious about growing the garden of your dreams this year, register for my online course, “Backyard Cutting Garden 101”. You’ll find everything you need to plan, grow, harvest and arrange your stunning blooms. I can’t WAIT to help you grow! Click on the button below for all the details.