

How to Grow: Ammi (False Queen Anne's Lace)
The perfect filler for all your arrangements!
How to Grow: Ammi (False Queen Anne’s Lace)
Pronunciation: am-ee
One of the biggest “newbie” flower gardening mistakes I see is not growing enough “filler” type flowers for bouquets.
I know, I know… it’s easy to get starry eyed over all those big blooming “focal” flowers, like Sunflowers, Zinnias and Dahlias… but a bouquet made with only big focal flowers can easily look a tad gaudy and overpowering.
In order to have well balanced bouquets and arrangements with visual interest, it’s important to grow some flowers whose soul purpose is to complement and enhance the focal flowers.
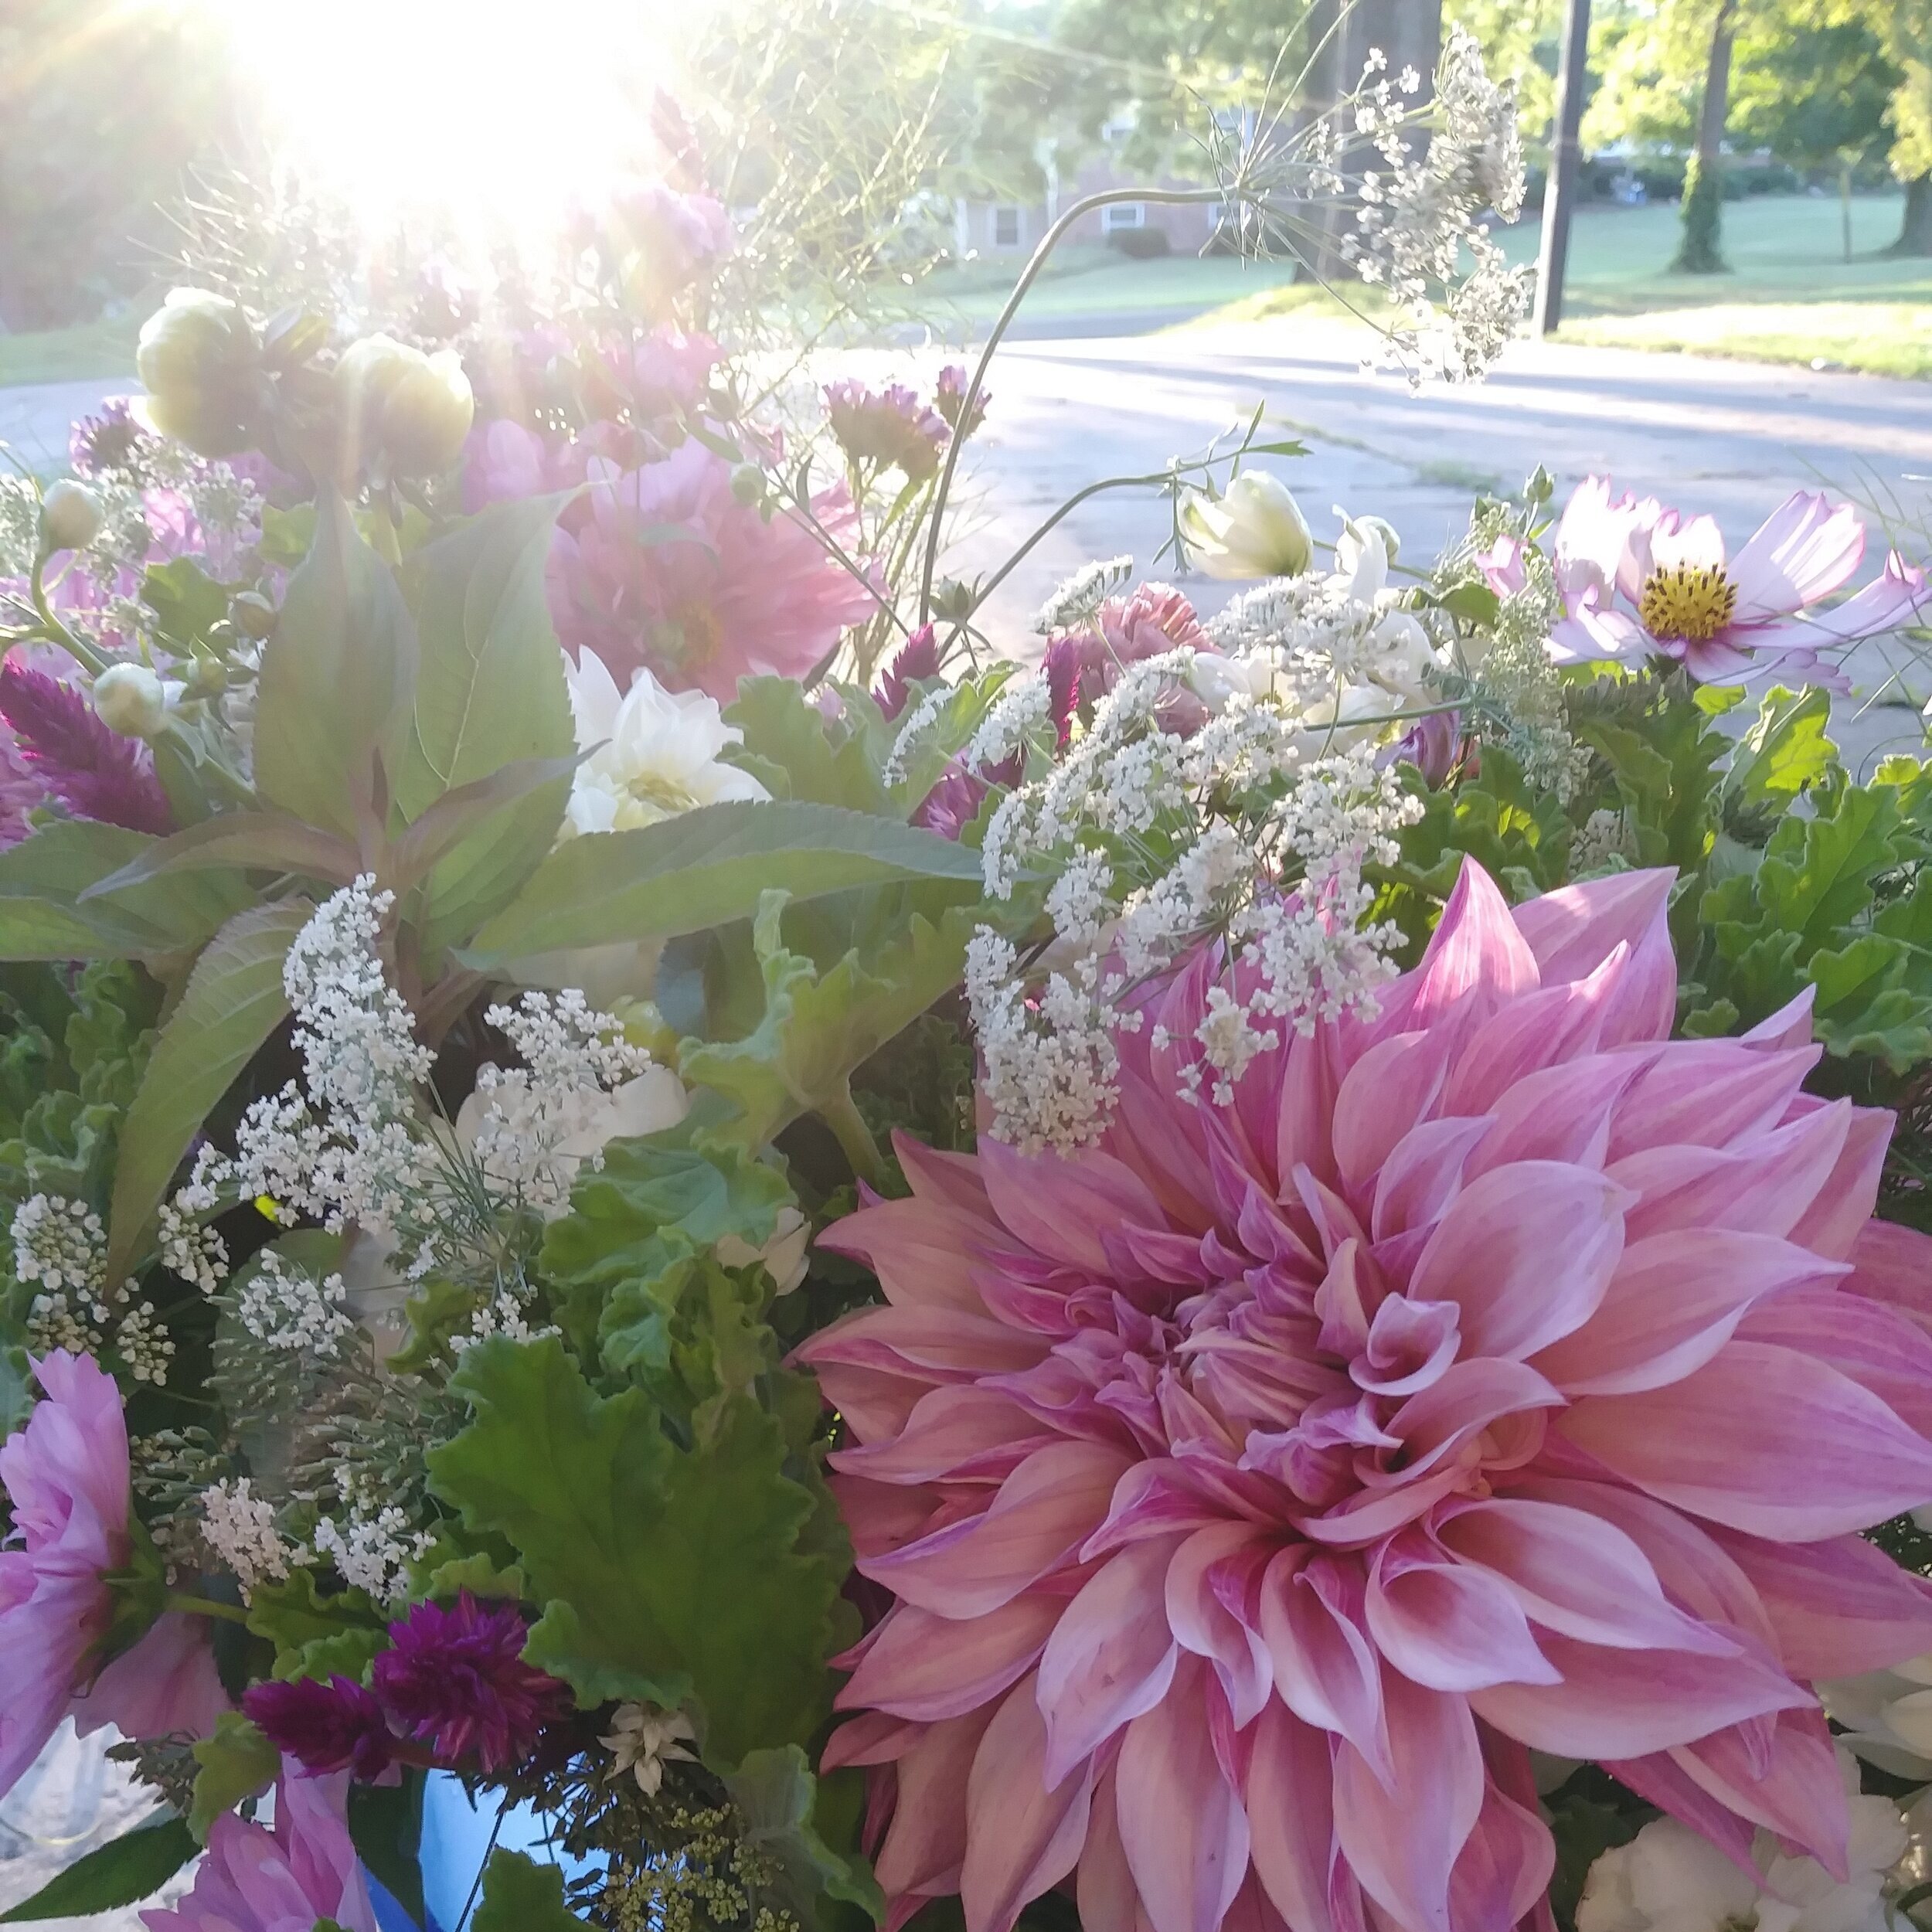
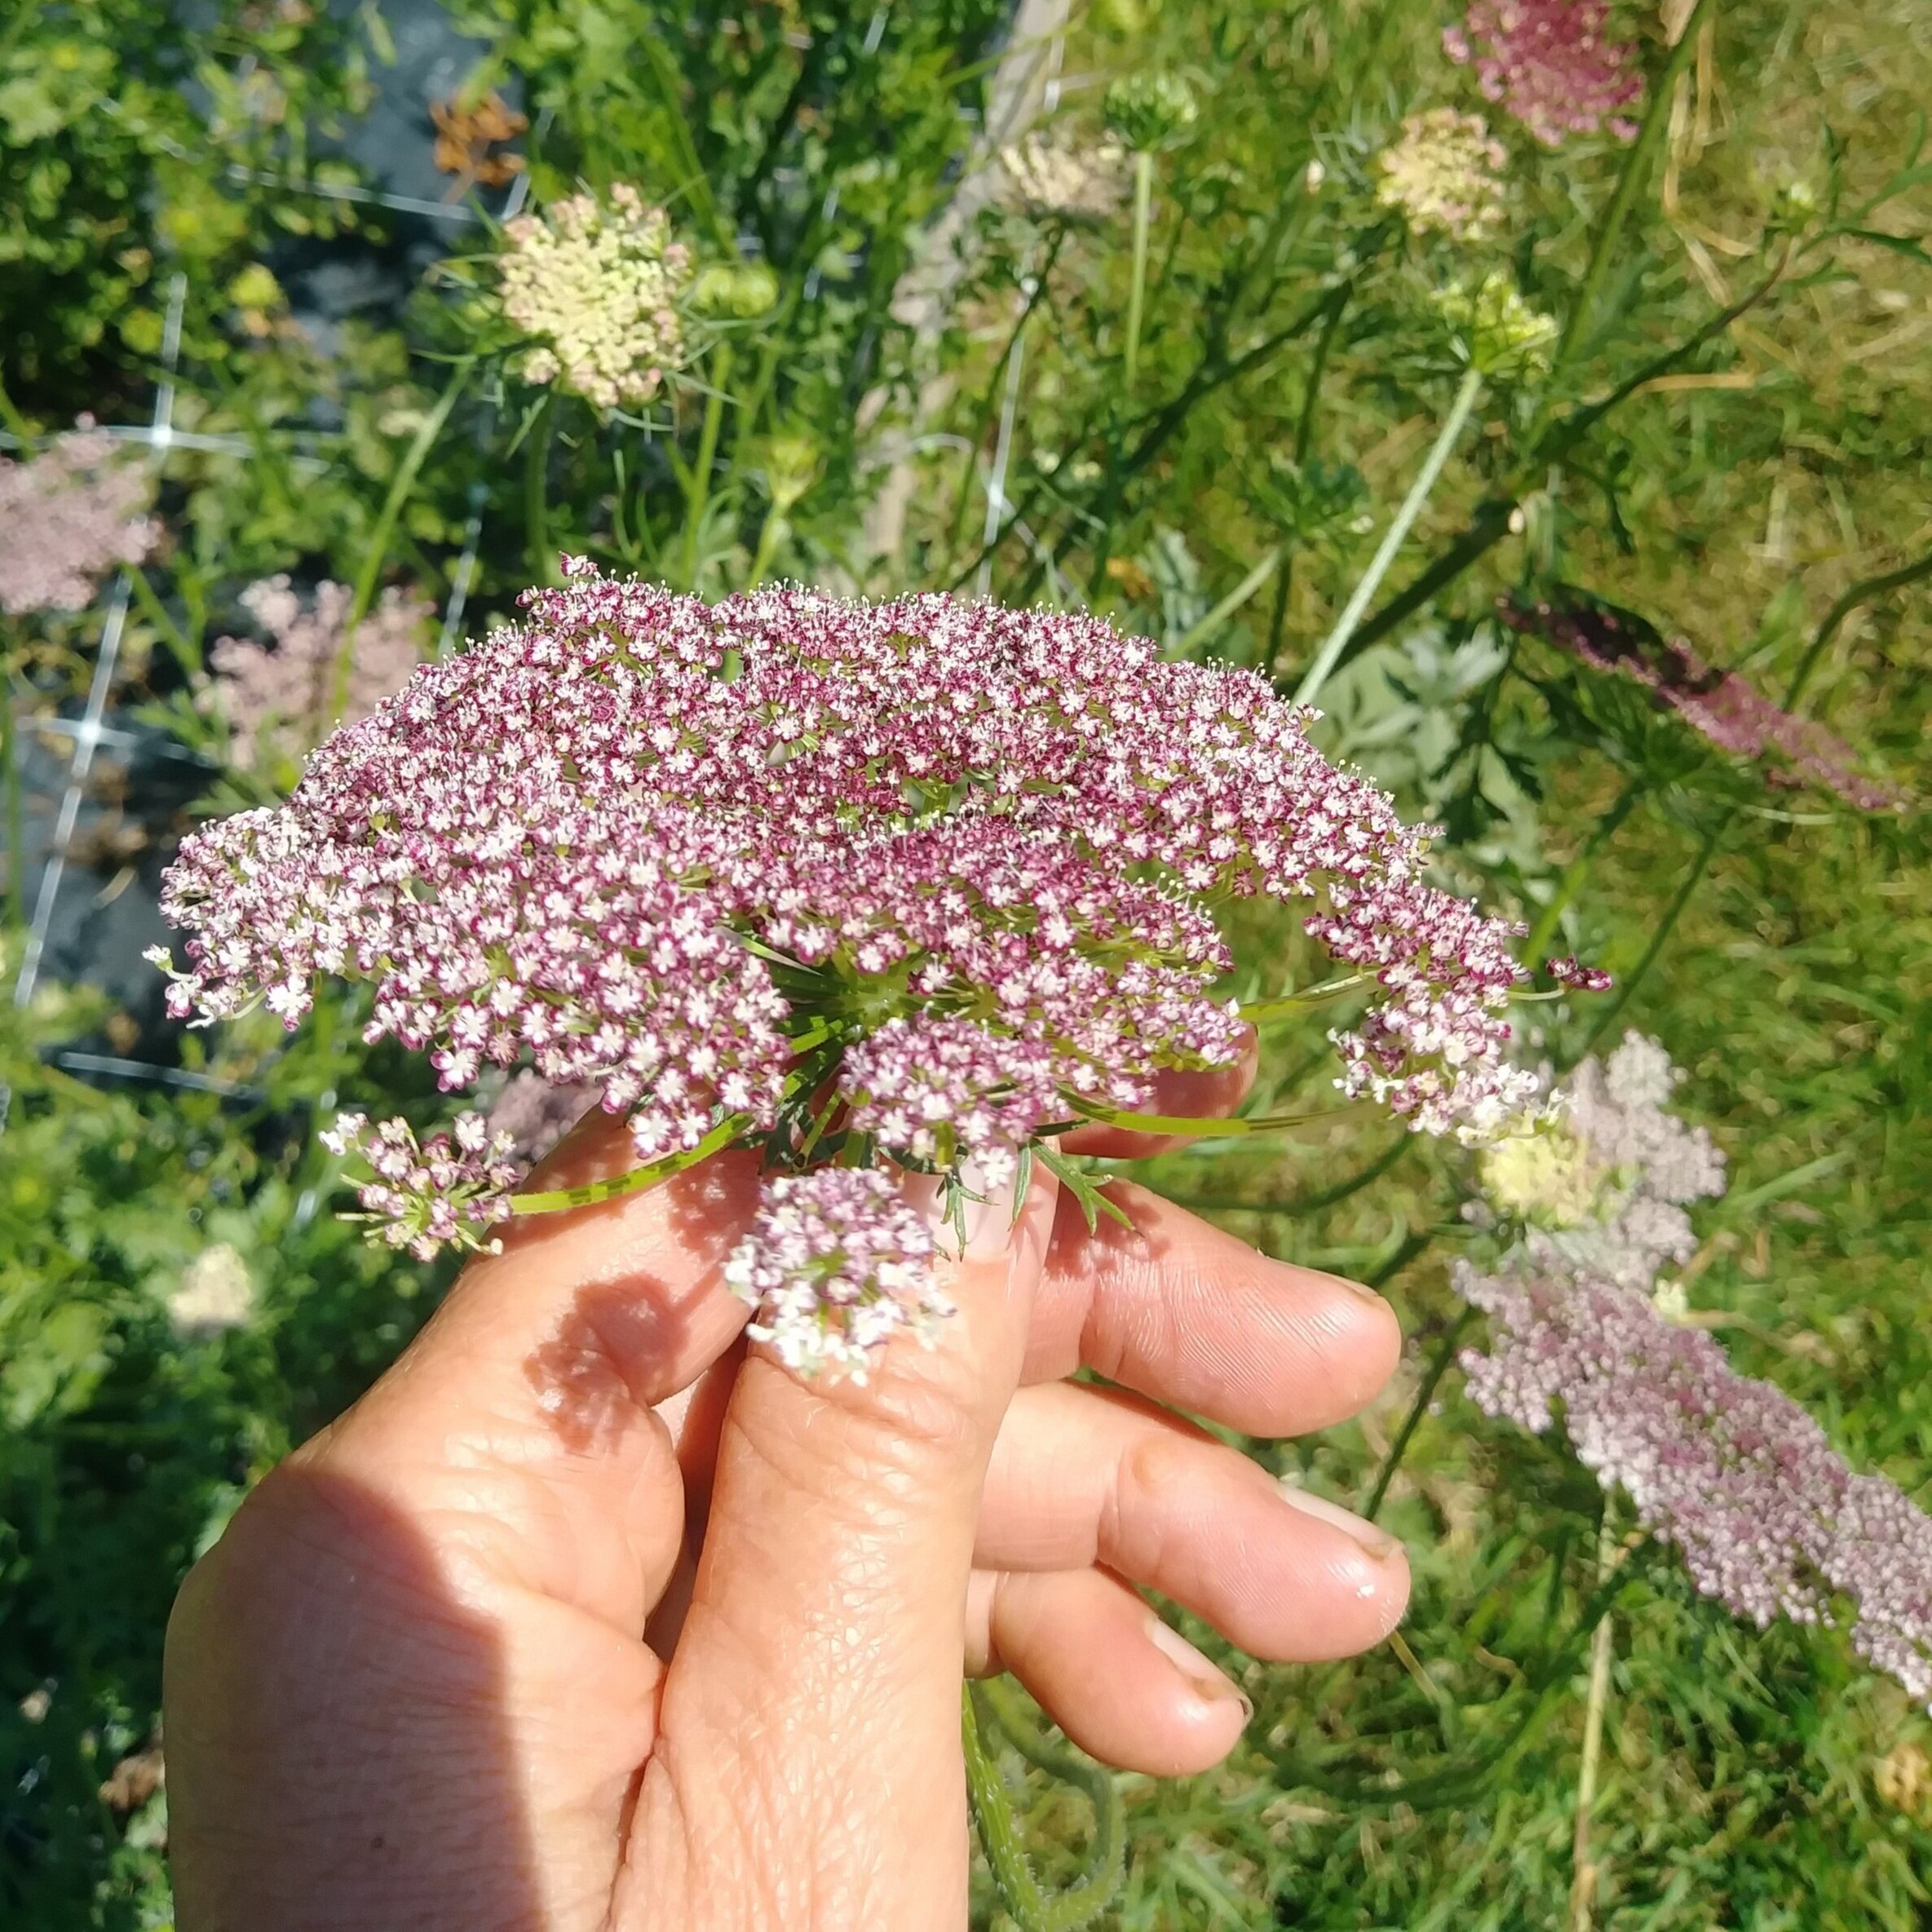
Ammi (False Queen Anne’s Lace) does this beautifully. It looks great with almost any type of flower and adds some much needed volume, texture and whimsy.

You may have noticed the wild Queen Anne’s Lace (Daucus carota) growing in meadows and roadsides. Another name for this plant is Wild Carrot, and yes, if you pull up the root, you’ll see and smell that it is indeed a white carrot!
Queen Anne’s Lace grows wild in our area. In fact, the field that is currently our U-Pick Flower Garden was an entire field of Queen Anne’s Lace when we moved to farm nearly a decade ago. It certainly was beautiful!

Gah! My kids were just babies. Now my son has a mustache and is taller than me… and my daughter is the same size as me. People, how does this happen?!? Excuse me while I have a moment…

For floral use, though, most people prefer to grow the more sophisticated and cultivated varieties of Ammi, which are related to wild Queen Anne’s Lace.
Let’s look at the Pros and Cons of growing Ammi for cut flower use.
PROS
They are fairly easy to grow.
They are versatile in bouquets and arrangements.
They attract pollinators.
They will reseed themselves, if you allow them to.
CONS
They are not the longest blooming flower. You’ll need to plant them a few times over the spring/summer to have a continual harvest.
They should be netted to keep them from falling over.
They have irritating sap that can cause contact dermatitis when harvested on a sunny day (more about this later!).
CHOOSING SEEDS
There are 3 main categories of Ammi that are used for floral work.
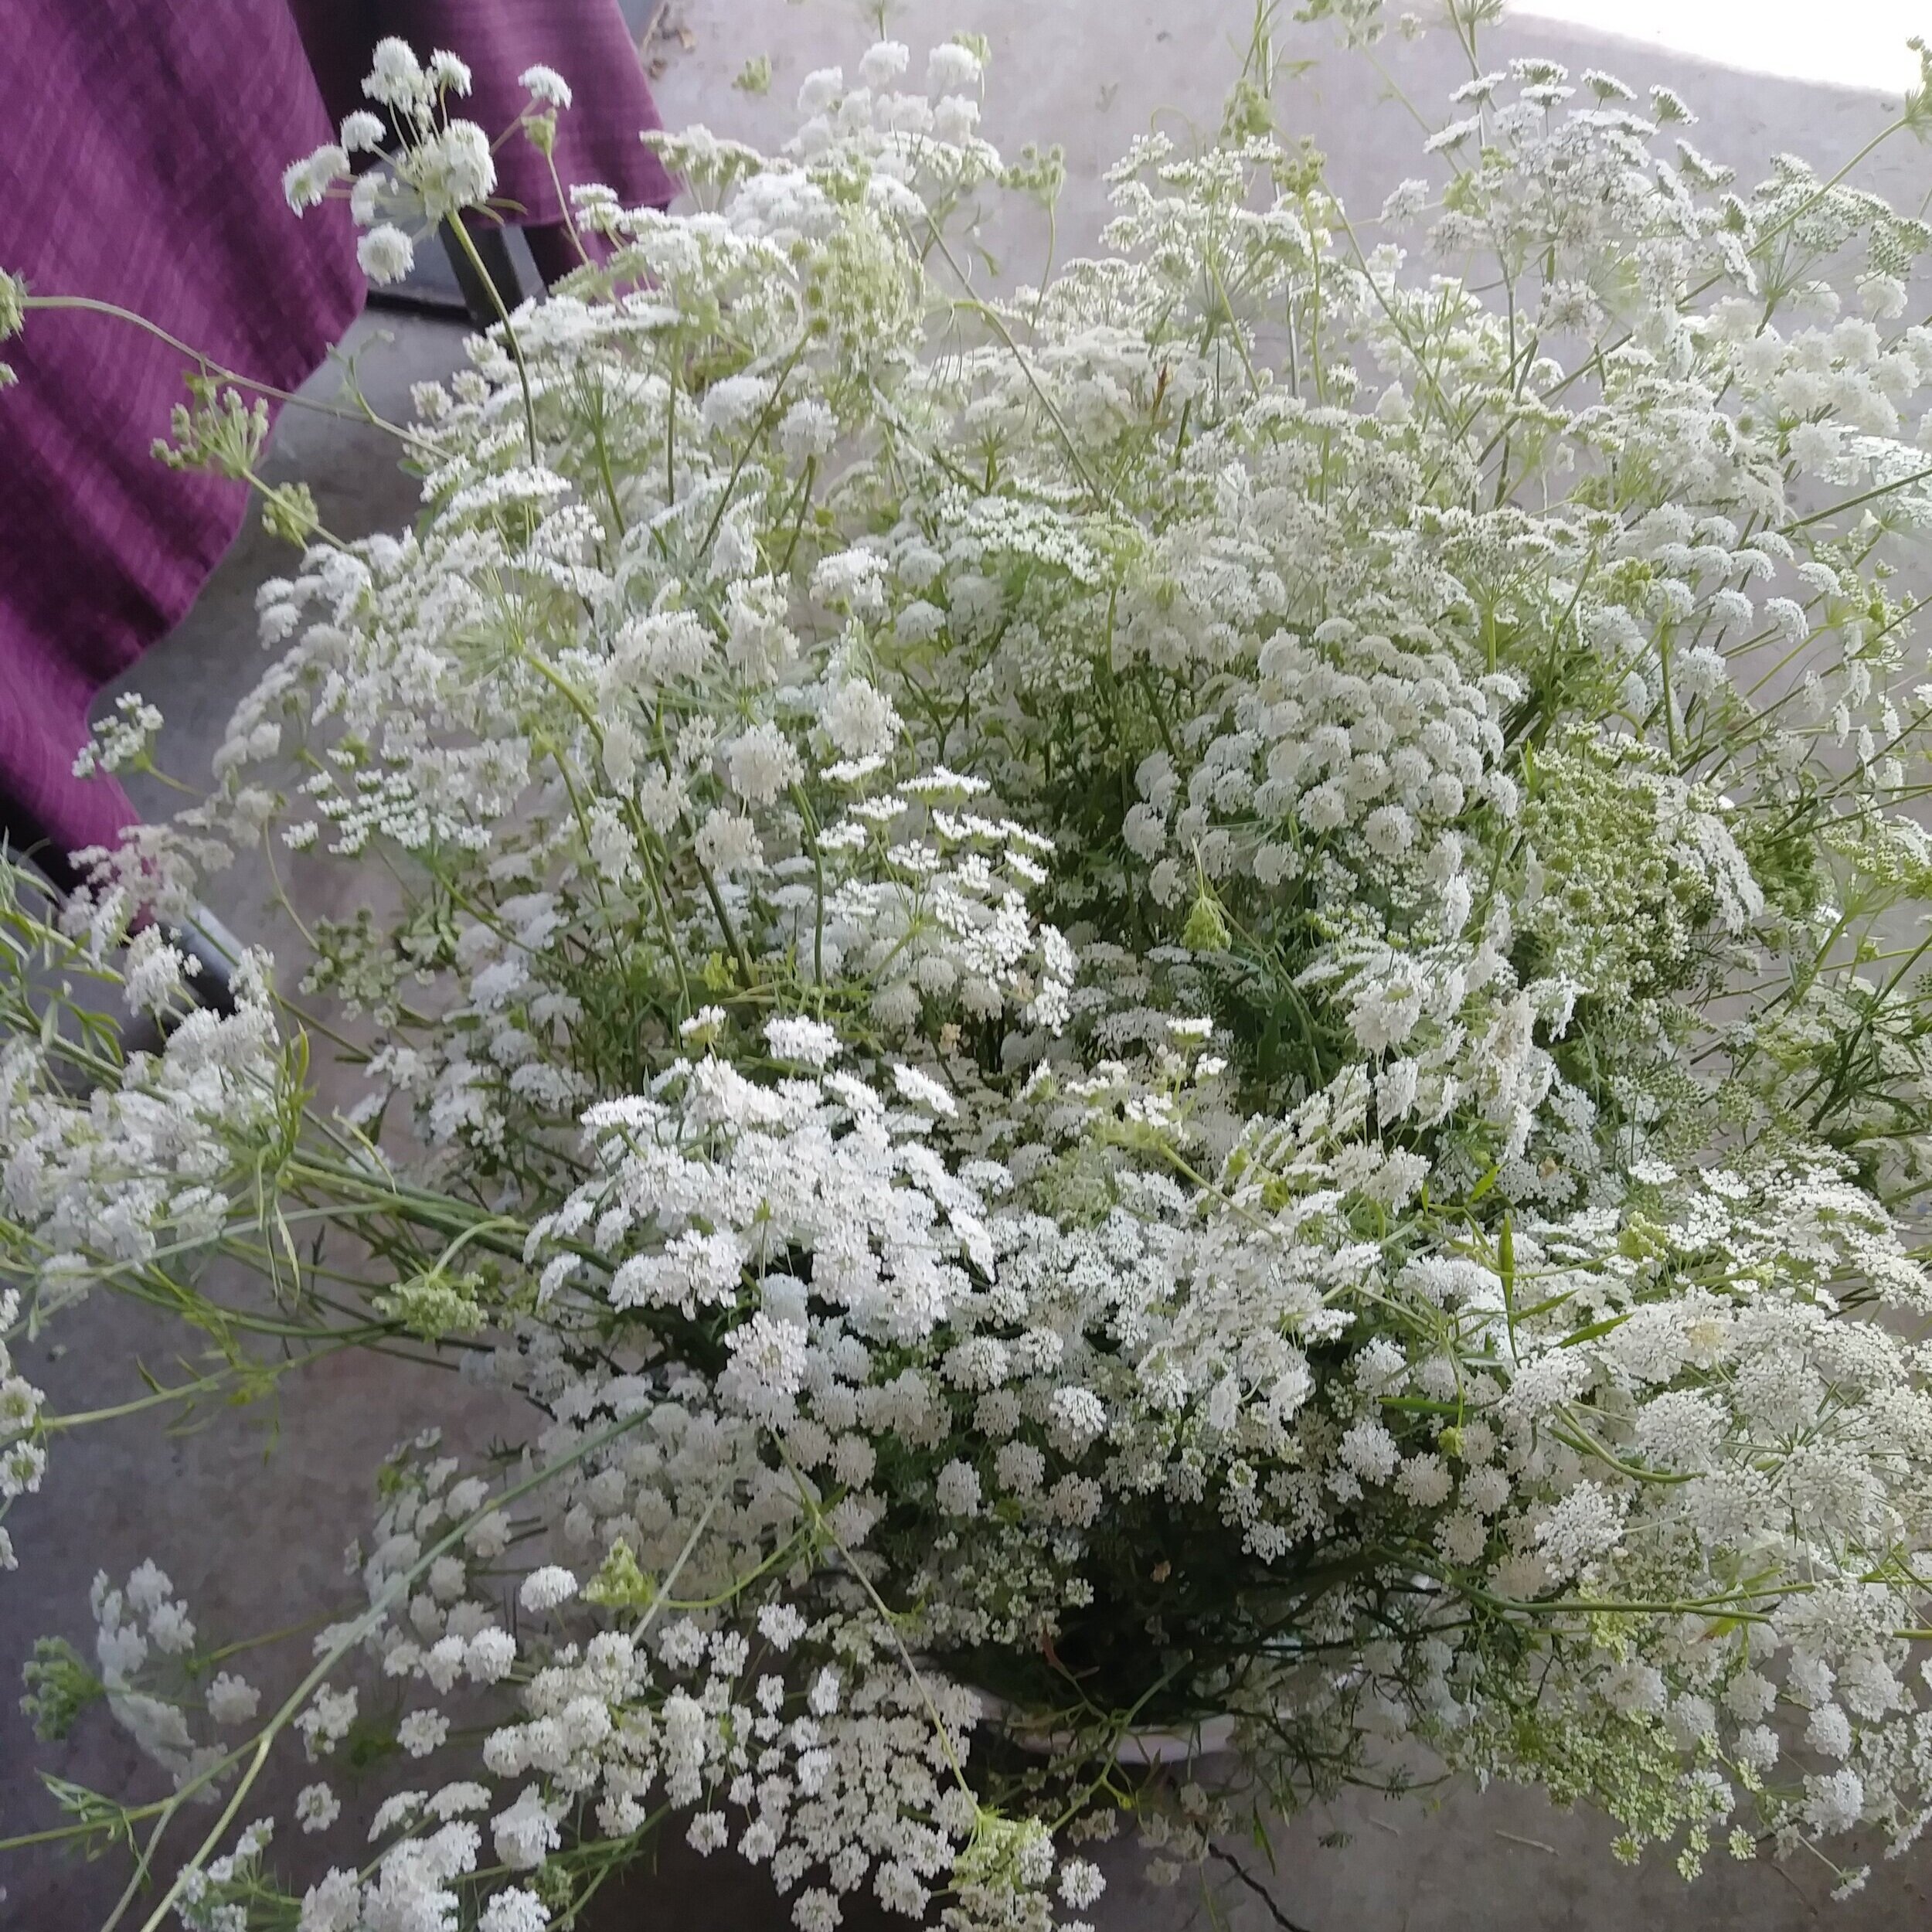
1. Ammi majus: This type most closely resembles wild Queen Anne’s Lace - light, airy and delicate. On our farm, this type does best in the spring/early summer.
2. Ammi visnaga: This type is much more robust and fuller than Ammi majus. It also tends to be more green than white. This type is sturdy and adds lots of structure to bouquets. Unfortunately, it also has a distinct smell that some people don’t like. On our farm, this type blooms well even in the heat of summer and into fall.
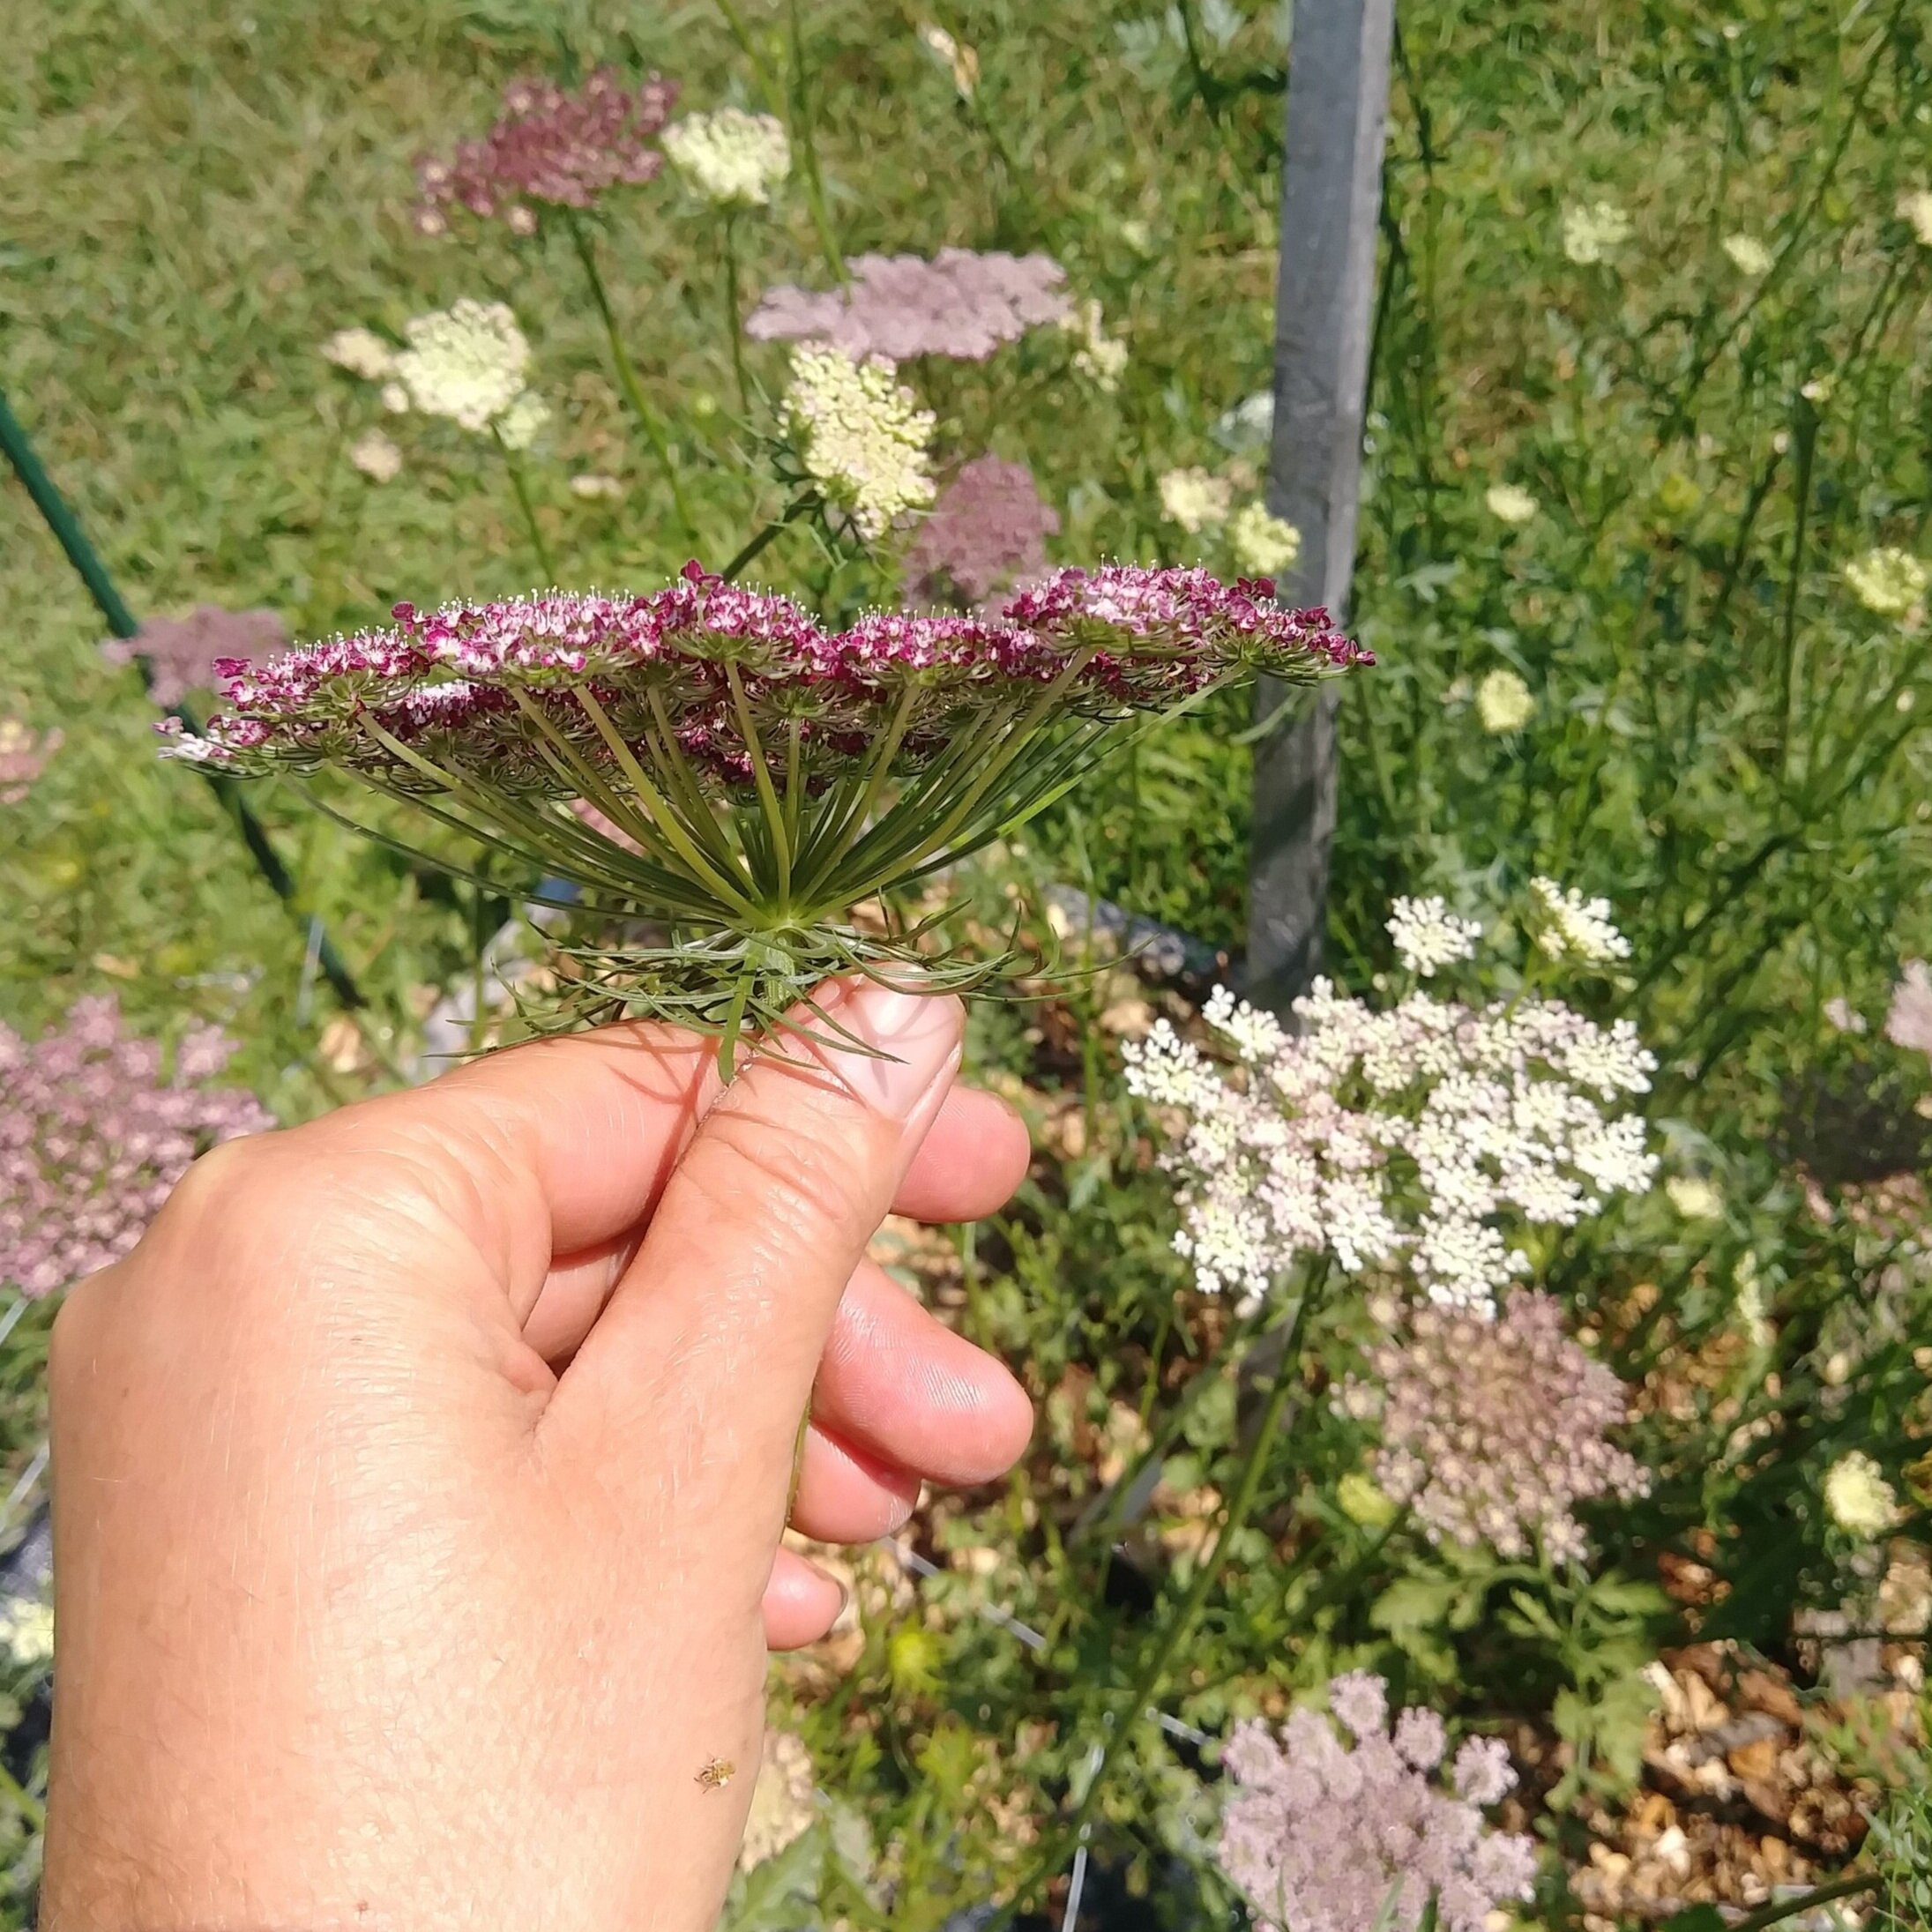
3. Dara/Daucus carota: Technically not “Ammi”, you’ll often find this in seed catalogs under the Ammi category. This type is a unique variety of wild carrot. The blooms come in a range of pink, purple and white. I’ve seen all sorts of names for this flower (no one seems to know exactly what to call it!), so search for “Dara”, “Ammi dara”, “Daucus”, “Daucus carota”, “False Queen Anne’s Lace”, “Chocolate Queen Anne’s Lace”, “Ornamental Carrot”, “Chocolate Flower” and even “Chocolate Lace Flower”!

Here are a few of my favorite Ammi to grow for cut flower use:
“White Dill” (Ammi majus)
“Graceland” (Ammi majus)
“Green Mist” (Ammi visnaga)
“Dara” (Daucus carota)

HOW TO SOW
Ammi generally prefers cooler weather and really shines in the spring/early summer. While it can handle warm days, it wants cool nights.
The plants are quite cold hardy and can handle some frost.
If you live in a warm climate, sow the seeds in the fall and they will take off early next spring. If you live in a cold climate, sow the seeds as early as you can in the spring (when the soil has thawed).
Transplants or Direct Sow?
Ammi can be transplanted or direct sown.
Transplants should be sown indoors 4-6 weeks before you plant them out. Keep the seeds in the fridge or freezer for 2 weeks before sowing (this mimics winter weather).
Remember, they want cold nights, so if you are using heat mats for your seedlings, be sure to turn off the heat at night or remove the tray at night. They can be transplanted out BEFORE the threat of frost is over, since they are cold hardy.
If you don’t want to mess around with moving trays every day (I don’t!!!), then simply direct sow when you want them to grow as early in the spring as possible.
Ammi prefers to be direct sown, so this method is the simplest and easiest. You might as well save yourself some time and growing space, and simply direct sow the seeds!
If you want to try Winter Sowing, Ammi is a great candidate for this method.
Ammi is a “self-sowing” hardy annual, which means if you leave a few seed heads to mature on the plants, new plants will pop up the following spring. Bonus!
PLANT SPACING
Ammi can be grown at 3-12” spacing… so if you direct sowed and your plants are crowded, don’t fret.
I find Dara needs the least amount of spacing (grows very upright), Ammi majus needs about 6-9” spacing, and Ammi vignaga does better at 12” spacing (widely branching plants).
Netting is helpful, as plants will grow 36” or more. We use Hortonova trellis netting stretched tight over the bed with stakes.
Yup. It’s a real pain harvesting those stems in the netting… But it’s better than having the plants falling over! Hint: Pull the stem down through the netting, not up.

Update: Recently, we switched to using “cattle panel support” pictured below for growing Ammi and Dara… and it is a GAME CHANGER. You can learn how we make the “cattle panel supports” in this blog post.

GROWING ON
Ammi is not a particularly long lasting flower in the field. Don’t expect it to bloom all summer long.
In order to harvest Ammi longer, I like to plant 2 successions of Ammi majus (spring/early summer blooming) 2-3 weeks apart, followed by 2 successions of Ammi visnaga (summer/fall blooming) 2-3 weeks apart.
Dara seems to do better as a spring/early summer blooming plant, but occasionally I can get some to bloom into the fall.

STAGE OF HARVEST
Recognizing the correct stage of harvest for Ammi can be a little tricky.
Harvest too early, and they will droop over and never recover.
It’s better to err on the side of too mature than too early. Fortunately, even if you harvest them too mature, they still look beautiful with their seed pods.
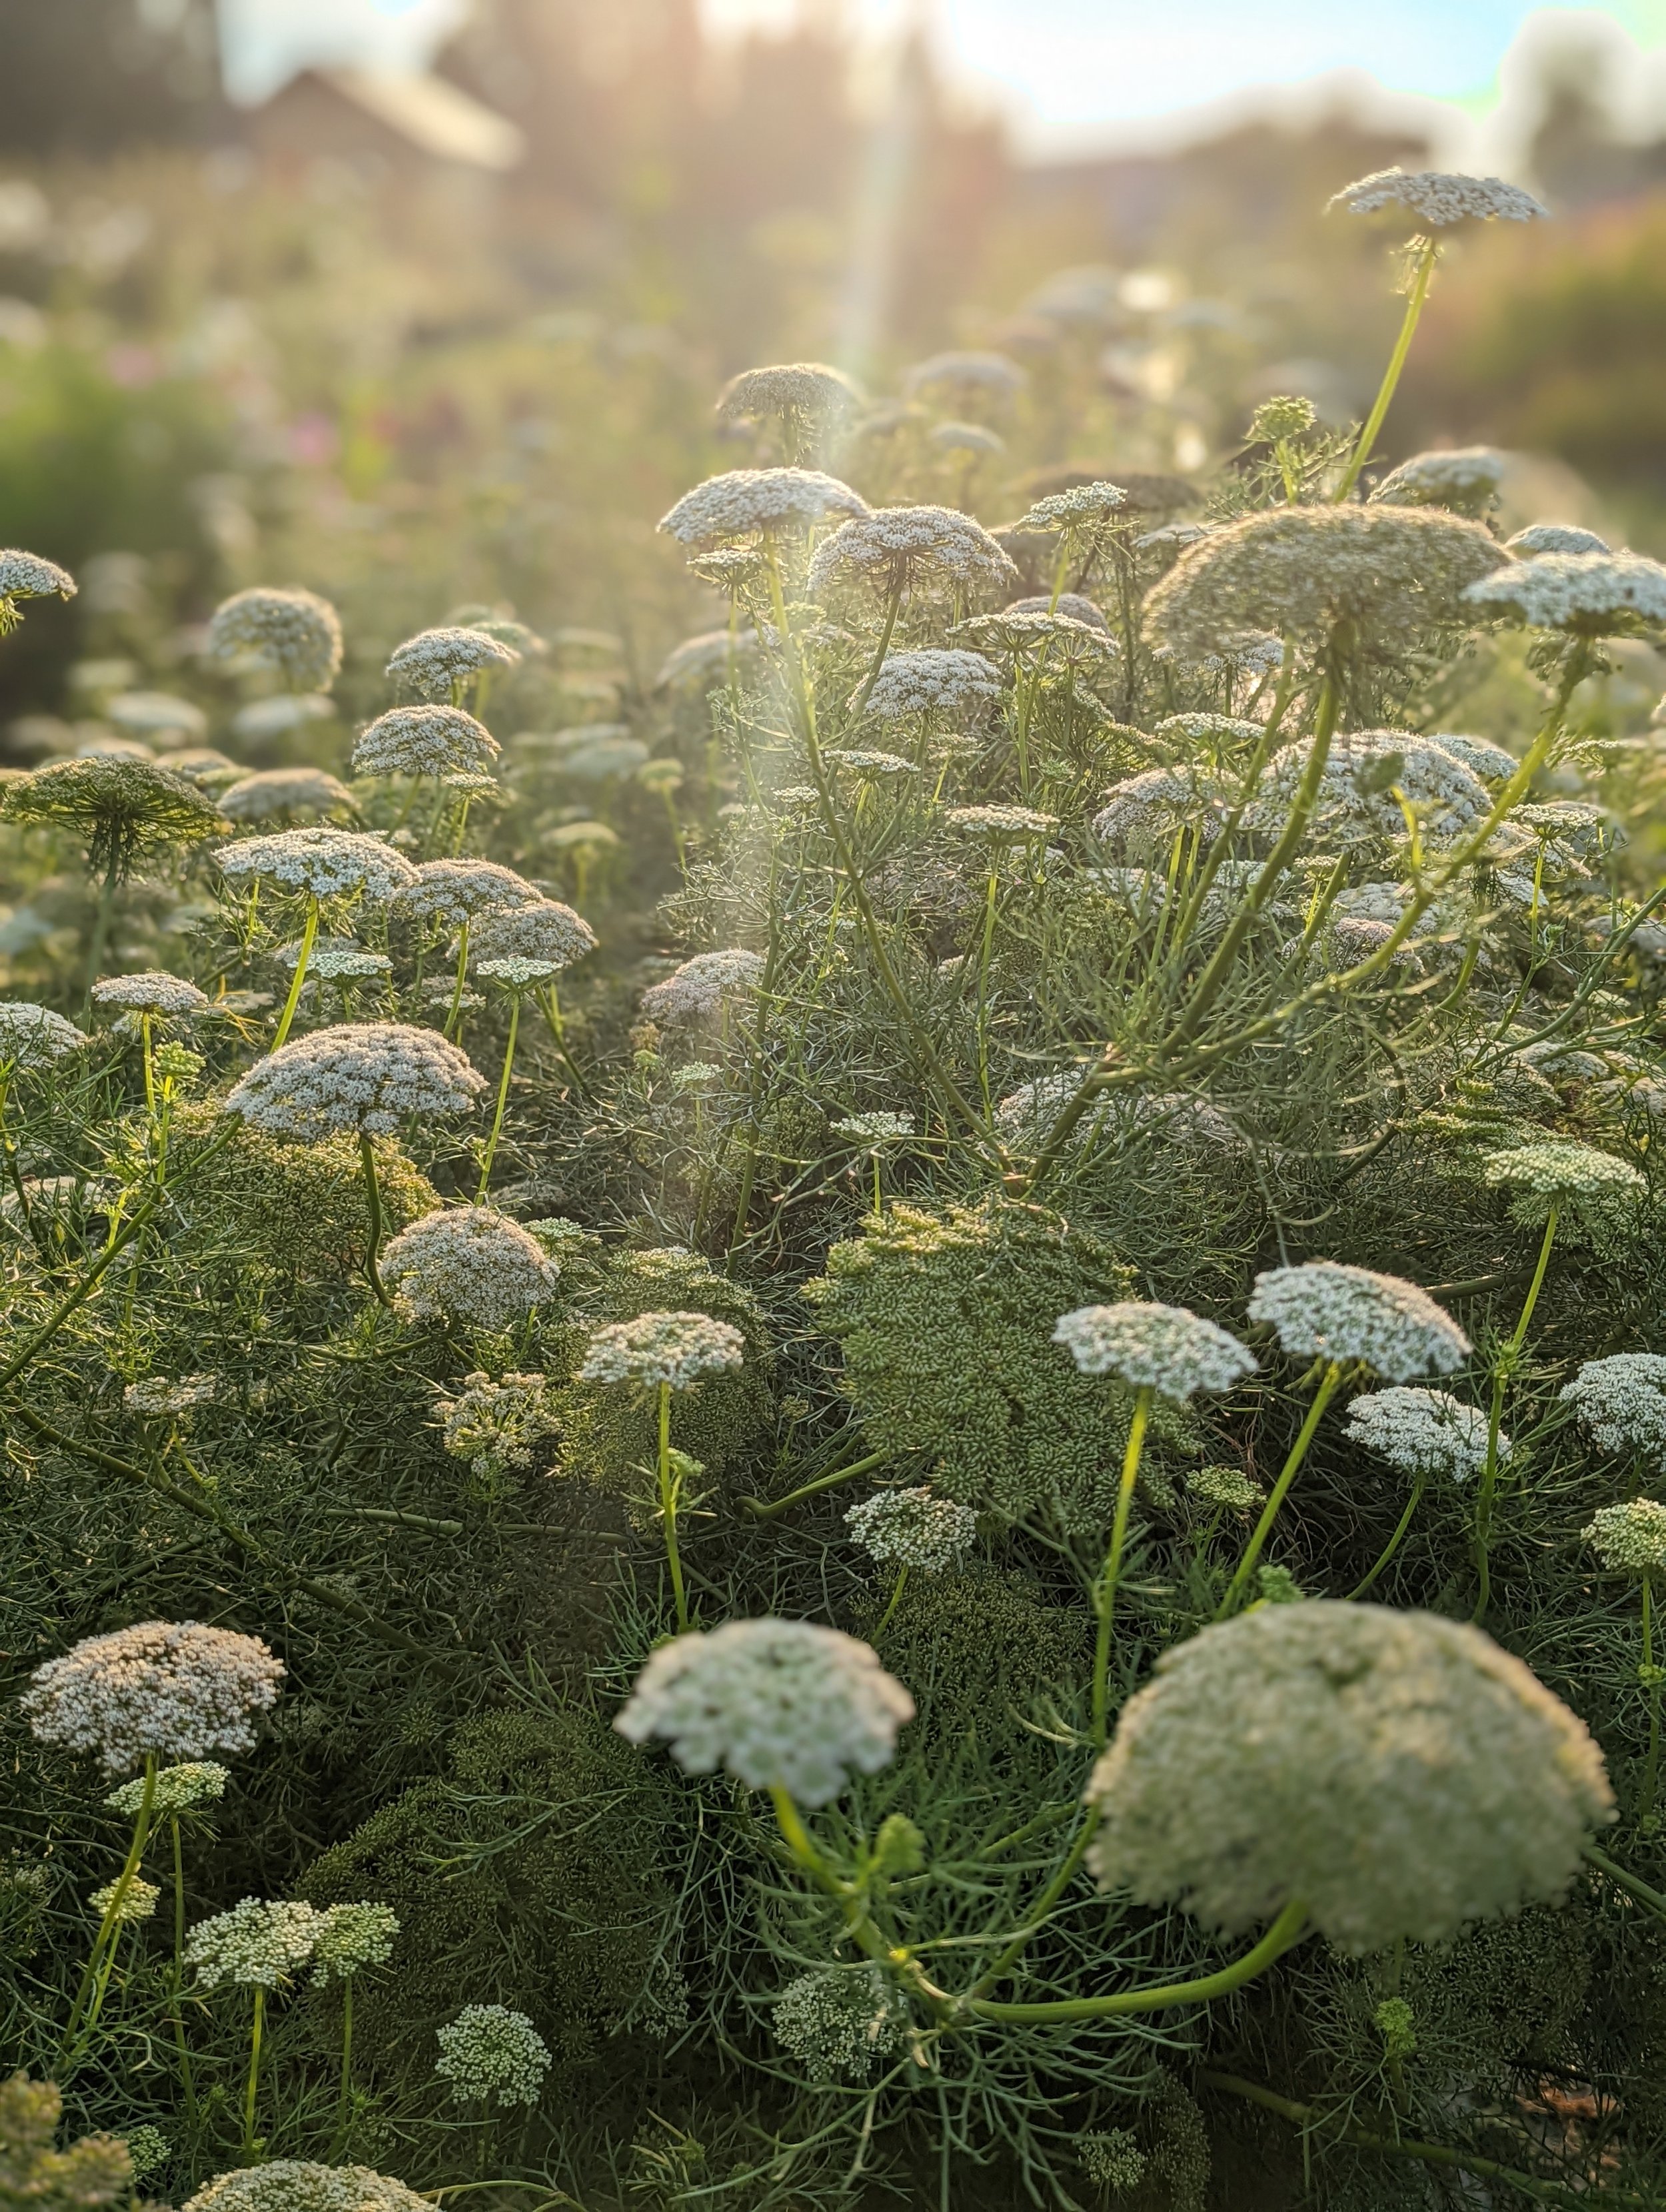
Take a look at the bloom. If it is flat or concave (sides higher than center), it is not ready.
If the bloom is domed or convex (sides lower than center), then it’s ready!
SPECIAL NOTE:
When you cut a stem of Ammi, sap will come out of the cut end. Do NOT allow this sap to come into contact with your skin, especially on a sunny day. Ammi can cause contact dermatitis on some people, called Phytophotodermatitis, a reaction caused by contact with a plant sap/substance that reacts to sunlight.
When the sap gets on your skin and is exposed to the sun, it can cause burns and blisters. While usually not painful, it can cause scarring that lasts for months. Ask me how I know this.
Usually, I wear long pants, long sleeves and gloves when harvesting (AND harvest it before sunrise or after sunset), but on this one day, we had to harvest it 9am and it was 90+ degrees. I learned a hard lesson to always wear long pants/sleeves, even when it’s suffocating (and this is exactly why farm workers wear long pants/sleeves when harvesting carrots, celery and other plants).
The blisters were not painful, but I had scars/dark patches on my legs/forearms for about 3 months.

POST HARVEST CARE
Immediately upon harvest, allow the Ammi to rest in a bucket of water in a cool, dark place.
After resting overnight, stems should be ready for arranging!

QUESTIONS?
Ask them here and I’ll get back to you!
READY FOR MORE?
If you’re serious about growing the garden of your dreams this year, register for my online course, “Backyard Cutting Garden 101”. You’ll find everything you need to plan, grow, harvest and arrange your stunning blooms. I can’t WAIT to help you grow! Click on the button below for all the details.

Ultimate Color Palettes For Stunning Bouquets
When I first started growing cut flowers, I chose a bunch of random flowers in random colors and randomly planted them.
As you can expect… my bouquets looked pretty, well, RANDOM.
Random (adjective)
Definition:
1.a: lacking a definite plan, purpose, or pattern
b: made, done, happening, or chosen without method or conscious decision
Yup, that sounds about right!
No plan, method, pattern or conscious decision.
Now, don’t get me wrong. I do appreciate qualities such as whimsy, spontaneity and “happy accidents” (thank you very much, Bob Ross).
But I quickly realized that while random-looking bouquets were fun to make, I wanted something a little more… professional-looking.
Something that looked like a bit of thought and intention went into it!
The human eye/brain loves order, rhythm and pattern. Without those elements, the design can look cluttered, chaotic and disorganized.
After years of growing, harvesting and crafting thousands of bouquets, I finally figured out how to create pleasing bouquets based on COLOR palettes.
It all starts with being intentional about what COLOR flowers you choose you grow !
I’m here today to help you PLAN AHEAD and choose the best seeds in your favorite color palettes.
Psst… choosing a color palette INTENTIONALLY is what makes your bouquets look more pleasing, appealing, and well… professional!
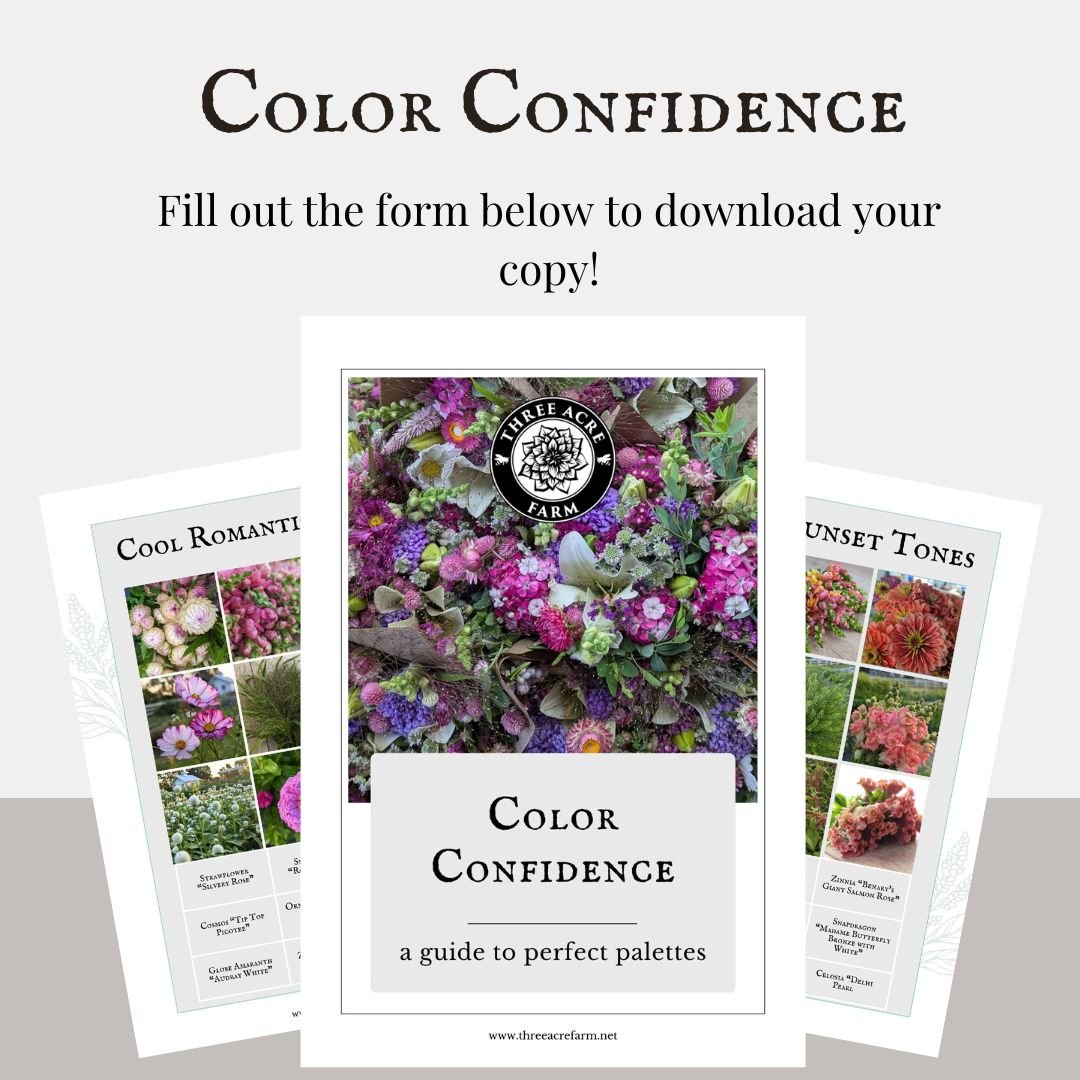
On our farm, we work with 3 broad color palettes to craft beautiful and coherent bouquet designs that are pleasing to the eye and easy to put together.
While there are ALWAYS going to be variations in each bouquet depending on what’s available (it changes day by day!), most of our bouquets fit into one of the 3 following color palettes.
Warm Sunset tones: Flowers in warm tones, like peach, coral, apricot, salmon, buttery yellow, bronze, strawberry lemonade, sunset, etc (plus white, because white goes with everything!).
Cool Romantic tones: Flowers in cool tones, like pink, lavender, violet, silvery rose, rose, wine, blue, magenta, etc (plus white, because white goes with everything!)
Bright Bold tones: Flowers in bright tones, like red, magenta, violet, carmine, yellow-orange, maroon, orange, yellow, lime green, etc (plus white, because white goes with everything!)
Want a printable guide to help you formulate your color palette strategy?
You’re in luck!
I put together a beautiful resource to help you explore and plan your color palettes.
It’s called “Color Confidence: A Guide to Perfect Palettes”.
Inside your find:
Example Photos of Color Palettes
Photos of individual flowers, according to their color palettes
A printable list of flowers that fit into each color palette:
Warm Sunset tones
Cool Romantic tones
Bright Bold tones
Let’s look at some examples of color palettes so you can see how they work in real life….

Warm tones vs cool tones

Warm tones

Cool tones

Cool tones vs Bright tones

Warm tones vs Cool tones

Warm tones

Bright tones

Bright tones

Cool tones (with a few touches of bright! )
Once you have a color palette in mind, it’s so much easier to choose what seeds to grow.
You can be confident that when it’s time to harvest your blooms, your bouquets will look organized, sophisticated and visually appealing.
Side note: If you love random-looking bouquets, then you should 100% keep making them. You do you, friend!
Enjoy the Color Confidence Guide. All the flowers featured in the guide are available for purchase on our website.
You can buy seeds from all 3 palettes (there is some overlap!) or make your life super simple and stick to one palette.
Personally, I’m on Team “Warm Sunset Tones”! I can’t get enough! They blend so perfectly with my warm-toned Dahlias in September.
What’s YOUR favorite?

It’s Dahlia Evaluation Time on the Farm!
It’s Dahlia Evaluation Time on the Farm!
Right now is the PERFECT time to do a Dahlia Evaluation before they get hit by frost and the growing season abruptly ends. Dahlia Evaluation time means I’m inspecting each plant, looking to make sure:
It’s properly labeled.
It’s healthy and productive. Any plant that looks suspect or is not producing blooms true to form is immediately culled and destroyed.

MORNING WALKS IN THE DAHLIA FIELD
This time of year, most mornings are spent walking the Dahlia field. While it’s a beautiful way to start the day, it also has purpose. One of my best (and also exhausting) qualities is observation. I notice EVERYTHING. My eyes are evaluating every plant:
Is it healthy?
Is it productive?
Is it true to form?
Is it labeled correctly?
Is it experiencing disease or pest issues?
Most of these answers are cataloged in my brain, where I file away a decade's worth of observation, examination, and scrutiny. As I get older, I become more aware that these thoughts, observations, and awareness need to be recorded or they will be lost forever. So I’m starting to record them.
A UNIQUE PERSPECTIVE ON DAHLIAS
Each Dahlia variety is unique and has different characteristics and qualities. I think of them like people. Even though they are all the same species, the variations are astounding—just like humans. I even find myself talking to them like old friends. When they start blooming, it’s usually been 9-10 months since I’ve last beheld their beautiful faces. It’s so good to see them again, and I tell them how much I’ve missed them. Every morning is a new delight. I’m cherishing these quiet moments, knowing that my time with the Dahlias is limited.
We could have 6 weeks left before frost ❄️… or 2 weeks… or somewhere in between. So I soak it all up, into my body, into my bones… to get me through that 9-10 month absence from my dear friends.
EVALUATING FOR NEXT SEASON
As I make decisions about what to grow next year, I like to keep it simple, growing about 100 different Dahlia varieties each year. This means that if I’m adding 10 new varieties, I must say goodbye to 10 varieties as well.
We are a “Cut Flower Farm,” which means we are growing Dahlias for the purpose of cutting the stems for bunches or bouquets, NOT as a landscape plant. If the Dahlia is beautiful but too short for bouquets or the petals get too damaged in arrangements, then it’s not worth our time or effort to grow it (except in a few cases where we grow them just for fun).
At the end of each season, I take about 3-4 hours and walk the field with my clipboard, making observations and notes about each Dahlia, looking for things like:
Does it grow tall enough to be used as a cut flower? If not, does it have any other redeeming qualities?
What kind of growth habit does it have? Are the stems easy to harvest for cut flowers?
Did this variety have specific issues with disease or pests?
Did I like the color? Was it easy to use in bouquets and bunches?
Are the petals sturdy and able to hold up to handling during harvesting and bunching? If not, does it have any other redeeming qualities?
Is it a good tuber producer? Some Dahlias grow incredible blooms but have consistently poor-quality tubers that make reliable tuber storage difficult. I usually give these varieties three seasons, and if it doesn’t get easier, I will discontinue growing them.
FINAL THOUGHTS ON DAHLIA EVALUATION
If you haven’t done a Dahlia Evaluation yet… you’ve still got time! Grab a notebook, inspect your plants, and start making decisions for next season. Your “Future Self” will thank you!
We have our first chances of frost this week, so if you haven’t done your Dahlia evaluation and inspection, NOW is the time to do it! If we do get frost, I expect it to be very patchy. It won’t kill the plants. It usually takes temperatures below freezing to truly end the Dahlia growing season. We call this our first “Killing Frost” or “Frostmas.” Frostmas is a celebrated holiday on our farm that signals the completion of our growing season, but we never know exactly when the holiday will arrive! It’s usually around October 15, but some years Frostmas arrives weeks before or after that date.

Once the Dahlias are killed by frost, they become completely unrecognizable, so it’s important to do your inspection and evaluation while you can still see what they look like! I walk up and down the rows with my Dahlia Map, ID tags, a Sharpie, and a spade, inspecting every single PLANT that I grow:
Is it labeled correctly? If not, be sure to flag it.
Is it healthy? If not, remove it and dispose of it.
Are the flowers true to form? If not, remove it and dispose of it.
I’m also taking notes on my clipboard about each VARIETY that I grow:
Does it grow tall enough to be used as a cut flower?
Are the stems easy to harvest for cut flowers?
Did this variety have specific issues with disease or pests?
Was the color easy to use in bouquets and bunches?
Are the petals sturdy and able to hold up to handling during harvesting and bunching?

LOOKING AHEAD TO NEXT YEAR
Next year, we are going to divide our Dahlias into two groups and two separate fields:
Dahlias for Cutting/Production: The tried-and-true varieties that perform well as cut flowers in bunches and bouquets.
Garden Dahlias: The varieties that are best enjoyed in the garden. While they still CAN be used as cut flowers, these may be Dahlias with fragile blooms or short stems, which are otherwise better suited for garden decoration.
I'll be sure to share my evaluation this winter!
QUESTIONS?
Ask them here and I’ll get back to you!
Ready for More?
If you’re serious about growing the garden of your dreams this year, register for my online course, “Backyard Cutting Garden 101”. You’ll find everything you need to plan, grow, harvest and arrange your stunning blooms. I can’t WAIT to help you grow! Click on the button below for all the details.

Meet the Dahlia Harvest Cart 1.0
Meet the Dahlia Harvest Cart 1.0
Let me introduce you to the Dahlia Harvest Cart 1.0
It’s a bit of a rough design, but it gets the job done!

Harvesting Dahlias is extremely time consuming and somewhat cumbersome because we sanitize our snips in a 10% bleach water solution between every single plant… which means we have to haul the solution with us up and down the aisles while harvesting.
(This protocol is recommended by the American Dahlia Society to help prevent the spread of virus and other disease from plant to plant. Virus is easily spread via snips, which is why we don’t allow anyone else to harvest our Dahlias. We work hard to keep our Dahlia fields as disease free as possible!)
We used to carry a bucket down the aisles with us, dipping our snips into bleach water between each cut.
However, 3-4 hours of constantly bending over to dip the snips in the bucket was hard on our bodies!
So we started imagining a better system that would allow us to sanitize the snips without bending over.

The Harvest Cart has a caddy that holds our bleach and rinse water jars. The bottom of the cart has a large bucket for holding the cut flowers.
It’s so much easier on our bodies and now we’re not bending over a million times a day!
Here’s our workflow for harvesting Dahlias:
Fill clean buckets with cold water and drive them out to the Dahlia field in the golf cart.
Scrub and sharpen snips.
Fill the jars with bleach solution and wheel the Harvest Cart out to the Dahlia field.
Push the Harvest Cart up and down the Dahlia aisles, cutting stems with freshly sanitized snips between each plant.
Drop cut stems into Harvest Cart bucket (bucket is dry but stems are only out of water for about 2 minutes).
When finished with the row of Dahlias, push the Harvest Cart back to the golf cart.
Place cut stems on a table or golf cart seat and begin processing - cutting off foliage and unnecessary side shoots into wheel barrows.
Before placing in water, recut the stems so they can take up water.
Once buckets are full, place them in a cool dark place to rehydrate.
We’ll likely make some modifications in the future, but for now… it works!
QUESTIONS?
Ask them here and I’ll get back to you!
Ready for More?
If you’re serious about growing the garden of your dreams this year, register for my online course, “Backyard Cutting Garden 101”. You’ll find everything you need to plan, grow, harvest and arrange your stunning blooms. I can’t WAIT to help you grow! Click on the button below for all the details.

The Bane of My Existence: Cucumber Beetles
The Bane of My Existence: Cucumber Beetles
Let me introduce you to the bane of my existence this time of year: cucumber beetles. All it takes is one nibble, and the bloom is destined for the compost pile instead of being proudly displayed in a vase.
After a record-breaking stretch of heat for two weeks in September (it was so hot that the lilacs bloomed again—WHAT?!), the Dahlias are stressed. Unfortunately, stressed plants are magnets for pests. It’s a real bummer, but it’s also part of the reality of growing ANY crop, especially one that has to be 100% blemish-free to be acceptable.

EMBRACING THE REALITY OF LOSS
I’ve learned to expect that I’ll lose ⅓ of my blooms to pests, disease, or weather-related issues. While that might sound defeatist, it actually gives me a TON of peace of mind. Instead of:
Freaking out
Getting upset
Fretting and stressing
Beating myself up
Feeling like a failure
…I simply acknowledge the issue, chuck the bloom into the compost pile (where it will turn into AMAZING soil to grow next year’s flowers!), and move on with my life. Since I plan on losing ⅓ of my blooms, I make sure to plant ⅓ MORE than I expect I need.
A PRACTICAL APPROACH TO PEST MANAGEMENT
We could put organza bags over the blooms to prevent cucumber beetle damage, but with over 1,800 plants and multiple blooms per plant, it would require thousands of bags and hundreds of labor hours to cover, uncover, harvest, and recover the blooms. This would mean I’d have to charge an exorbitant price per stem just to break even. Instead, I simply accept that loss goes hand in hand with growing. Nothing has gone wrong—this is real life!
I’m sharing this with you because it’s easy to look at other people on the internet and think they have it all figured out and that you are doing everything wrong. It’s not true. We’re all just out here, stumbling around and figuring things out as we go! The people that “fail” the most are also the people that try the most.
HOLISTIC PEST CONTROL: PARTNERING WITH NATURE
I get lots of questions about what we spray on our flowers to keep the bugs off of them, and many are surprised when I say that we don’t use sprays. There are lots of reasons we don’t spray:
It’s expensive.
It’s time-consuming.
It can be hazardous to the health of humans, animals, and the environment (many insecticides are not safe for use around pollinators). We love knowing our fields and flowers are safe and won’t cause long-term health issues.
Instead, I like to take a more holistic approach. Instead of trying to dominate nature, I like to partner with it. Instead of trying to control everything and stressing out about a damaged bloom, I accept the reality that there will always be loss in growing. We plan on loss because loss is normal.
CREATING A BIRD SANCTUARY FOR PEST CONTROL
My dad was a biology teacher, and I grew up spending a lot of time in nature, studying how ecosystems work. I’ve always been fascinated by how all the parts and pieces work together to create a healthy, thriving environment. So when we started noticing pest damage on our Dahlia blooms about a month ago, I didn’t reach for a bottle to kill all the bugs (if you do decide to use insecticides, PLEASE read the instructions on the bottle very carefully, follow the directions precisely, and make sure you know EXACTLY what pest you are targeting).
Instead, we made a trip to the hardware store and bought several bird feeders. We decided to make our flower fields a bird sanctuary. We set up feeders, created water sources, and made places to perch. We rolled out the red carpet for the birds and invited them in because birds are nature’s #1 ally for pest control.

THE RESULTS OF OUR EXPERIMENT
We’re a month into our experiment. Do we still have pest damage? Yes. Is it less than a month ago? Yes. Is it because of the birds? Not sure. It could be that the pests have completed their life cycle, the drier weather has slowed them down, or maybe the birds really have helped to restore the balance.
Either way, it’s an exciting experiment, and hiring the birds to do what they do best has been a lot of fun! Working in a farm ecosystem that is fully alive with plants, insects, and animals is very rewarding.
QUESTIONS?
Ask them here and I’ll get back to you!
Ready for More?
If you’re serious about growing the garden of your dreams this year, register for my online course, “Backyard Cutting Garden 101”. You’ll find everything you need to plan, grow, harvest and arrange your stunning blooms. I can’t WAIT to help you grow! Click on the button below for all the details.