

How to Grow: Bells of Ireland
How to Grow: Bells of Ireland
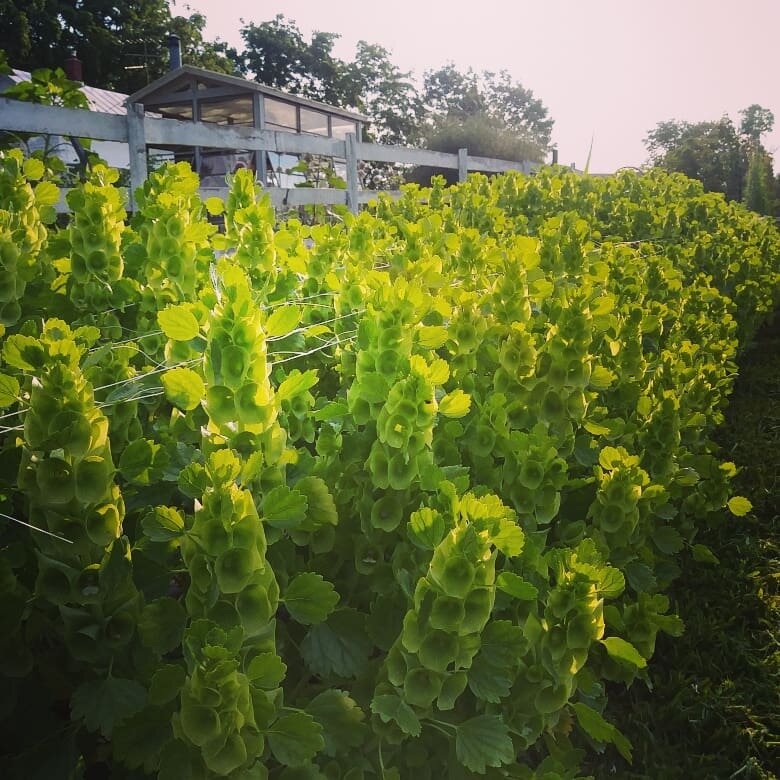
Bells of Ireland have to be one of my favorite foliages/greenery to grow on the farm.
Not only do they add incredible texture and color to arrangements, they are also long-lasting in the vase... and bonus! They smell delicious! To me, they smell exactly like lime flavored Skittles.
Bells of Ireland are often considered a “Hardy Annual”, which means they prefer cooler weather and have some frost tolerance. This also means they are a late spring/early summer blooming flower (they usually die out by mid/late July, when it gets hot).
Let’s look at the Pros and Cons of growing Bells of Ireland for cut flower use.
PROS
They last a long time in the vase (in fact, they can even be dried and used as an “Everlasting Flower”).
They are an excellent foliage/greenery for bouquets and compliment nearly every flower type.
They smell good - clean and fresh, with a hint of citrus.
They are beautiful, unique and provide visual interest.

CONS
They can be notoriously tricky to start from seed. If you’re a beginner, maybe put this one on hold until you have more experience.
They need to be supported with netting or they will be flattened in a rain/wind storm.
They develop “spines” that can prick your hands if they are not harvested early enough.
The plants are not particularly long lasting. They are finished on our farm in mid-July. We pull up the plant and put in sunflowers to fill the beds.
They prefer cooler weather and do not handle heat well. For those living in climate with weather extremes, growing Bells of Ireland successfully can be difficult. Here in Michigan, it’s not uncommon in the spring for our temperatures to fluctuate over 60 degrees in a matter of days. Bells of Ireland do not handle these extremes well - they can get stressed and succumb to disease.
CHOOSING SEEDS
Choosing seeds is easy, because there is only one variety of Bells of Ireland (Moluccella laevis) that is generally used for cut flowers.
HOW TO SOW
The most difficult part about growing Bells of Ireland is starting the seeds.
They seem to be quite unpredictable and in all my research, I can’t seem to find a “Fool-Proof” method for germination. Instead, I’ll share some suggestions that may help.
First of all, storing the seeds in the freezer until you are ready to sow them is a smart idea. The freezer mimics the natural cold/dormant period the seeds need to germinate properly.
*Side Note: I store all of my seeds in the freezer, with no ill effects. I figure that if the Svalbard Global Seed Vault, the world’s seed saving experts that are preserving seeds for humanity in case of major global disaster, can store all their seeds in a freezer, so can I. As a bonus, all my hardy annual seeds are always chilled and ready to go.
Another tip is to soak the seeds in water for 24-48 hours before sowing. This helps to soften the tough seed casing.
Here is my method for germinating. It’s a bit of work and seems a little fussy…. But I’ve had good success!
1.Soak seeds in water for about 24 hours. Place seeds in a damp paper towel. Put the paper towel in a plastic bag and set it on a heat mat or in a warm spot (on top of your fridge).

2. In just a few days, the seeds will begin to sprout.

3. Carefully transfer the sprouted seeds into seed trays, tucking the "tail" (root) into the soil.

4. Seedlings can grow the trays for a few weeks until they have 2-3 sets of leaves.
Transplants or Direct Sow?
Transplants should be started indoors 6-8 weeks before the last spring frost.
Some people have better success direct sowing Bells of Ireland and don’t even attempt transplants. If you live in a mild climate, you may be able to sow the seeds in the fall or very early spring. They need a cold/dormant period to germinate properly. The freeze/thaw activity also helps to break open the tough seed casing.
For people living in colder climates, I recommend trying both methods. Start some indoors and also direct sow some seeds outdoors as soon as the soil can be worked.
Bells of Ireland can also be grown using the Winter Sowing method. Find out more about Winter Sowing.
PLANT SPACING
Bells of Ireland should be spaced 12-18” apart.
GROWING on
Bells of Ireland prefer rich soil, with plenty of nutrients and plenty of water.
If you live in a place with cooler summers, the plants may continue to produce for a few weeks. In Michigan, the summers get too hot and the plants stop producing mid-July. Enjoy them while you can!

STAGE OF HARVEST
You’ll know the Bells of Ireland are ready to be harvested when you see the tiny white flowers inside the “bells”.

Cut deep down into the plant to get long stems. You may notice the plants begin to develop “spines” as they mature. Watch out!
Strip off the leaves/bells at the bottom of the stem.

POST HARVEST CARE
Bells of Ireland don’t require any special care after harvest.
Like all flowers, store in a cool, dark place after harvesting and allow stems to rest for a few hours before arranging.
Some people like to remove all the leaves. It’s personal preference whether you do this or not. Sometimes, the leaves will turn brown or spotted, but the bells are still in great shape - in this case, simply remove the leaves.

QUESTIONS?
Ask them here and I’ll get back to you!
Ready for More?
If you’re serious about growing the garden of your dreams this year, register for my online course, “Backyard Cutting Garden 101”. You’ll find everything you need to plan, grow, harvest and arrange your stunning blooms. I can’t WAIT to help you grow! Click on the button below for all the details.

How to Grow: Celosia
A “must-have” for your cutting garden!
How to Grow: Celosia
Pronunciation: sel-oh-see-ah
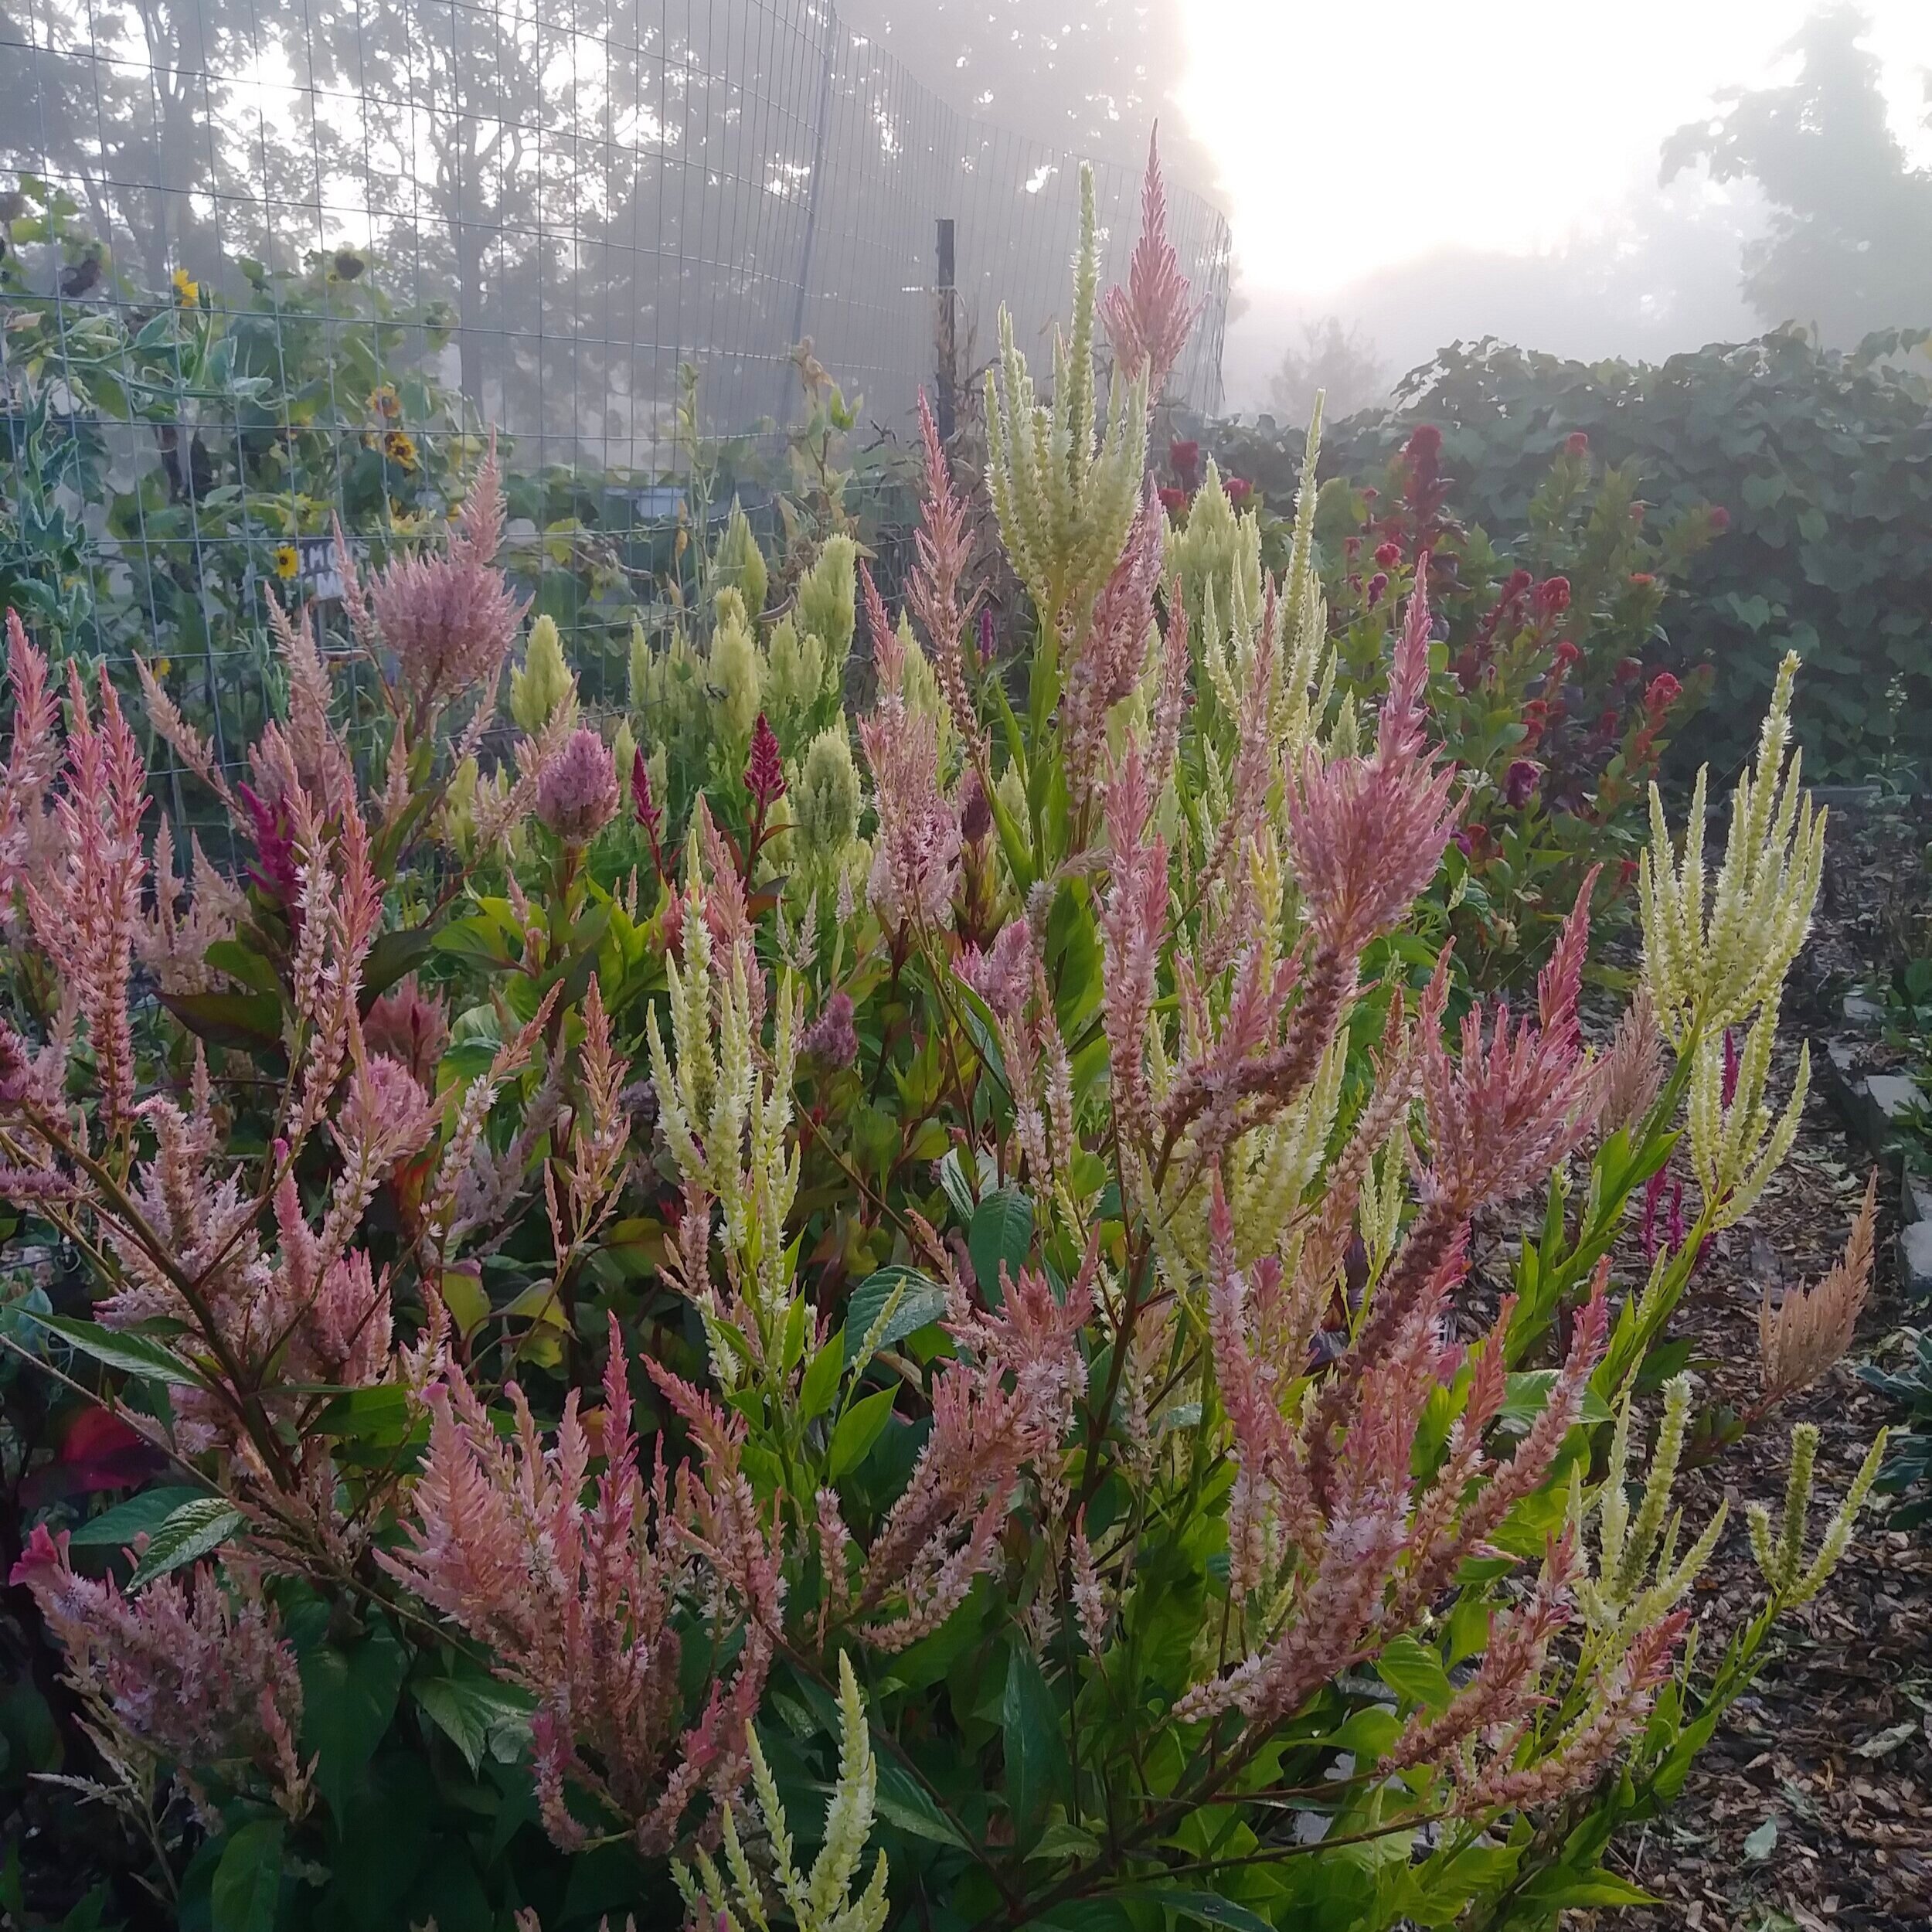
Celosia is another underappreciated and overlooked cut flower. It’s unfortunate, because Celosia is beautiful, long lasting and comes in a wide variety of shapes and colors! It also makes an excellent “Everlasting Flower”.
While they are not a flower you would likely display on their own, they compliment other flowers so nicely and shine in bouquets, adding much needed texture and shape.


“Delhi Pearl” Celosia
The types of Celosia grown for cut flower use are different than the types you normally find at a garden center. This means you’ll likely have to start your own Celosia from seed.
Let’s look at the Pros and Cons of growing Celosia for cut flower use.
PROS
They come in a multitude of colors, sizes and types.
They are easy to grow.
The plants are productive for a long period of time.
They are bright and cheerful in bouquets.
They love hot weather and thrive in the summer.
They have an excellent life of up to 2 weeks or longer, with proper harvest and care.
They make a great dried (“Everlasting”) flower.
CONS
They like hot weather and won’t do well in places with cool, wet summers.
The seedlings can succumb to “damping-off” disease in cool moist conditions. Keep those babies warm!
CHOOSING SEEDS
Since most of the Celosia varieties offered at garden centers will not grow tall enough for cut flower use, you’ll probably have to start your Celosia from seed. Thankfully, they are easy to grow from seed. Even if you are not able to start transplants indoors, you can still direct sow them in some climates.
Be sure to look for varieties that reach a minimum of 24” tall.
Celosia is divided into 3 main types:
1. Crested Type (Celosia argentea cristata): These are the “Cock’s Comb”/ “Brain Coral” types.
2. Plume Type (Celosia argentea plumosa): These are feathery and wispy looking.
3. Spike Type (Celosia argentea spicata): These have an upright, spike shape.
Plume Type: “Texas Plume”
Here are a few of my favorite Celosias to grow for cut flower use:
“Chief Series” (Crested Type)
“Cramer’s Series” (Crested Type)
“Sylphid” (Plume Type)
“Pampas Plume” (Plume Type)
“Texas Plume” (Plume Type)

“Celway Salmon” Celosia
HOW TO SOW
Celosias are heat loving, summer blooming flowers. They do not like cold temperatures and can’t handle frost, so do not try to plant them too early in the season.
Transplants or Direct Sow?
Celosias can be transplanted or direct sown, but transplants are recommended for most climates.
Sow seeds indoors 6-8 weeks before your Average Last Spring Frost. Be sure to keep them in a warm place as they are growing. They can be transplanted out after the threat of frost.
The seeds can also be direct sowed into the garden well after the threat of frost has passed. Celosia will not germinate or grow well in cool weather.
Seeds are tiny and I recommend sowing them using the “toothpick method.” Pour the seeds into a container, lick the end of toothpick and use the toothpick to remove seeds one a time. Sow 1-2 seeds per cell.

PLANT SPACING
Most varieties can be pinched to encourage branching and should be spaced at 9”-18”, depending on type. I grow most Celosia at 9” spacing.
GROWING ON
After the transplants are established and growing, it’s helpful to “pinch back” the plants when they are less than 8” tall. To pinch, simply use clippers to remove the top of the plant, only leaving 2-3 sets of leaves behind. I know this seems counter-intuitive and you probably just freaked out, but trust me!
Plants that are pinched are more productive than plants that are not. Experiment for yourself - pinch half the plants and leave the other half alone. The un-pinched plants will bloom earlier, but the pinched plants will produce WAAAAAY more blooms.
Pinching signals the plant to go into overdrive and send out multiple branches, with multiple blooms.

“Ruby Parfait” Celosia

“Ruby Parfait” Celosia that has been pinched back to produce multiple stems per plant
STAGE OF HARVEST
Unlike other flowers, Celosia has a long “harvest window”, so there is no rush to harvest them. In fact, the will continue to get bigger, so harvest when they are the size you want, but before the florets on the bottom start to look dry and form seeds (like the one in the photo below - you can see how dry and “tired” it looks, and it is dropping seeds).

POST HARVEST CARE
Celosia requires no special treatment after harvest.
All types of Celosia can be dried and used as an “Everlasting Flower”. Be sure to dry/store them out of direct light to help retain color.
QUESTIONS?
Ask them here and I’ll get back to you!
Ready for more?
If you’re serious about growing the garden of your dreams this year, register for my online course, “Backyard Cutting Garden 101”. You’ll find everything you need to plan, grow, harvest and arrange your stunning blooms. I can’t WAIT to help you grow! Click on the button below for all the details.

How to Grow: China Asters
How to Grow: China Asters
Pronunciation: ka-LIS-te-fus chin-EN-sis
China Asters (Callistephus chinensis) are a lovely addition to the cutting garden.
There are many types of Asters, including popular cultivated and wild native Perennial types. However, here we are going to discuss only the Annual blooming China Asters (Callistephus chinensis).

“Optimo Alpha Light Blue” and “Optimo Red”
There’s a reason why China Asters are so popular as a cut flower. They are sturdy, tough and long-lasting in the vase. They also come in wide range of colors and shapes. Some of them even resemble fluffy Peonies!
However, China Asters can be a bit tricky to grow, since they are “day length” sensitive and must be planted at juuuuust the right time to achieve good stem length (more about that later).
They also can be susceptible to some difficult disease issues, depending on where you live.
Because of these challenges, I categorize China Asters as best for “Experienced Growers”.
On our farm, we love growing a variety of China Asters as both a Focal Flower (large flower that is the focus of a bouquet) and Filler Flower (medium-sized flowers that complement the Focal Flowers).
Some China Asters will produce 8-12 large flowers on long stems, while others may produce dozens of smaller flowers on a “spray” type stem (one main stem with multiple flowers).

“Optimo Red” and “Optimo Alpha Light Blue”
Let’s look at the Pros and Cons of growing China Asters for cut flower use.
PROS
They come in a multitude of colors, sizes and types.
They are very sturdy plants.
The flowers are durable and not easily damaged by handling.
The flowers “hold” for a long time in the field, giving you a long window of opportunity to harvest the blooms.
They often produce multiple blooms per plant.
They have an excellent vase life of 7-10 days with proper harvest and care.
CONS
They must be planted at a specific time due to day-length sensitivity. If this “window of opportunity” is missed, the plants will likely bloom on short, unusable stems.
They are not a good candidate for “succession planting” since they perform best when planted at a specific time.
They are very susceptible to Aster Yellows disease, which is spread by leafhoppers and thrips. If you live in an area where Aster Yellows disease is common, you may have a difficult time growing healthy plants (this is a BIG challenge for us!).
They can experience “Aster Rot”, a fungal infection that causes the plant to rapidly wilt and rot.
CHOOSING SEEDS
There are lots of different types of China Asters you can try, so choose ones that have colors and shapes that please you.
Be sure to look for varieties that reach a minimum of 24” tall. Many China Asters are sold for bedding plant/landscape use and won’t be tall enough for cut flower use.
The following China Aster series are a great choice for cut flower use:
Azumi X
Bonita
Matsumoto
Optimo
Tower

“Optimo Red”
Here are a few of my favorite China Asters to grow for cut flower use:
Azumi X “Rose”
Tower “Chamois”

“Optimo Alpha Light Blue”
HOW TO SOW
China Asters are easy to grow from seed in trays. Bury seeds about ⅛ deep and keep seeds moist and warm until germination occurs in 10-14 days.
Transplants or Direct Sow?
China Asters should be transplanted. Direct sowing is not recommended.
Sow seeds indoors 6-8 weeks before your Average Last Spring Frost. They should be transplanted out after the threat of frost when the soil is warm.
It’s important to transplant the seedlings promptly so they can grow as much as possible before the Summer Solstice occurring around June 21(ish) in the Northern Hemisphere. As the days shorten after the Solstice, the plants begin to set their blooms and the stems will not grow much taller.
Ideally, you want the plants to grow as tall as possible before the Summer Solstice to get the longest stems possible.
“Succession Planting” is not recommended for China Asters, since transplanting additional successions later in the season will result in short, unusable stems.

“Optimo Alpha Light Blue”
PLANT SPACING
Most varieties can be grown at 6-12” spacing. We usually grow at 9” spacing, but could grow most varieties closer for more efficient use of space. Closer spacing will encourage longer stems as the plants compete for light.

“Bonita Shell Pink”
GROWING ON
If you live in an area where Aster Yellows disease is a problem, I recommend covering the seedling with insect netting IMMEDIATELY after transplanting. You can find my favorite insect netting and clamps HERE. This will help to protect the plants from leafhoppers and thrips.
If the plants DO show signs of Aster Yellows or Aster Rot, remove them immediately and throw them away (do not compost). Be sure to rotate where you plant China Asters each year to help prevent disease issues.
To reiterate, it’s important to transplant the seedlings promptly so they can grow as much as possible before the Summer Solstice occurring around June 21(ish) in the Northern Hemisphere. As the days shorten after the Solstice, the plants begin to set their blooms and the stems will not grow much taller.
Ideally, you want the plants to grow as tall as possible before the Summer Solstice to get the longest stems possible.
Fertilize and water the plants regularly when the plants are young and actively growing. Once the buds begin to form, back off on feeding but continue watering.
The plants are sturdy but still benefit from netting or support to keep the stems straight.
Pinching is generally not necessary or recommended, however some types may benefit from it. If desired, you could experiment by pinching a few plants and comparing them to unpinched plants. Note: This is how I discovered Optimo series does NOT like to be pinched! ;)
STAGE OF HARVEST
China Asters bloom in mid to late summer (usually around mid-August on our farm in Michigan). Unlike other flowers, China Asters have a long “harvest window”, so there is no rush to harvest them.
Harvest when the outside florets begin to open. Single stem types can be harvested one stem at a time, while spray types do best as a whole plant harvest (cut the entire plant off at the ground).

“Tower Chamois”
POST-HARVEST CARE
China Asters require no special treatment after harvest.
QUESTIONS?
Ask them here and I’ll get back to you!
Ready for more?
If you’re serious about growing the garden of your dreams this year, register for my online course, “Backyard Cutting Garden 101”. You’ll find everything you need to plan, grow, harvest and arrange your stunning blooms. I can’t WAIT to help you grow! Click on the button below for all the details.

How to Grow: Cosmos
Dreamy. Whimsical. Romantic. Swoon-worthy. Delightful.
How to Grow: Cosmos
Pronunciation: koz-mose
Dreamy. Whimsical. Romantic. Swoon-worthy. Delightful.
Cosmos are all this and more. Because they are such a common and easily grown flower, I think they are often overlooked and underestimated for their value as a cut flower. They are not necessarily big or bold or flashy… but they are still one of my favorites!
They are reliable, productive and simple to grow. The more you cut them, the more they produce. As a bonus, they really shine in late summer, when some of the other flowers are starting to get tired. Every cutting garden should have some Cosmos!

PROS
They come in a variety of colors and sizes.
They are very easy to grow.
The plants are productive for a long period of time (if harvested regularly).
They are a beautiful addition to bouquets.
They have a good vase life of about 5 days, if harvested at the proper stage.
CONS
They are susceptible to Powdery Mildew. This usually does not affect the blooms, but eventually the plant will die.
Deadheading (removing old blooms) can be difficult to keep up with! If plants are not regularly harvested or deadheaded, they will stop blooming.

“Afternoon White” Cosmos

“Kiiro” Cosmos
CHOOSING SEEDS
Nearly every type of Cosmos can be used to cut flower use, but there are some varieties that have been bred specifically for cut flower use, rather than ornamental use.
Some Cosmos have “single” petals, while other are “double” petals. Some Cosmos even have petals that look like cupcake liners!
Most Cosmos grow quite tall, often reaching 4’ tall, but recently new shorter varieties have been introduced as well. Make sure you purchase varieties that reach at least 24” tall.
Cosmos bipinnatus is the class of Cosmos that includes the Cosmos you are likely familiar with, in shades of pink, white, magenta and burgundy. However, Cosmos sulphureus, know as “Sulfer Cosmos”, are another great addition to the cutting garden. They come in shades of bright yellow and orange.


Here are a few of my favorite Cosmos to grow for cut flower use:
“Bright Lights” (Sulfer Comsos)
“Double Click” Series (all the colors are beautiful, but I especially like the “Double Click Bicolor Pink”)
“Tip Top Picotee” (beautiful bicolor blooms)
“Xsenia” (gorgeous color, stems are short)
“Versailles” (classic, sturdy variety bred specifically for cut flower use)
HOW TO SOW
Cosmos are a summer-blooming flowers. They should be planted after your last spring frost.
Transplants or Direct Sow?
Cosmos are versatile and can be transplanted or direct sown.
Transplants are fine, but make sure to start the transplants only about 3-4 weeks before planting outside. Larger, older transplants tend to be “root bound” and may be permanently stunted in their growth and vigor.
Personally, I find Cosmos grow faster, are more productive and healthier when they are direct sown. You might as well save yourself some time and space, and simply direct sow the seeds!
Transplants/seeds should be spaced at about 12” apart.


GROWING ON
After the transplants are established and growing, it’s helpful to “pinch back” the plants when they are about 8”-10” tall. To pinch, simply use clippers to remove the top of the plant, only leaving 2-3 sets of leaves behind. I know this seems counterintuitive and you probably just freaked out, but trust me!
Plants that are pinched are more productive than plants that are not. Experiment for yourself - pinch half the plants and leave the other half alone. The unpinched plants will bloom earlier, but the pinched plants will produce more branches.
If flowers are harvested and spent blooms are “deadheaded” (removed), the plants will continue to send up blooms until frost or cold weather arrives.


“Apricotta” Cosmos
STAGE OF HARVEST
Many people say that Cosmos don’t last in the vase… but this is because they are harvesting the blooms too late.
Once a Cosmos bloom opens, it is immediately pollinated by bees. Once pollinated, the flower quickly drops its petals so it can begin its next stage of life - forming seeds.

In order to have long lasting blooms, you must cut Cosmos BEFORE the blooms have been pollinated, looking for buds that are cracking open or just opened. The flower will open up in the vase over the next few days. When harvested at this stage, you can expect them to last about 5 days.
Below, you can see the difference between an “Unpollinated” bloom and a “Pollinated” bloom. If the bloom has been pollinated, you might as well leave it in the garden, as the petals will quickly fall off in the vase.

“Unpollinated” bloom

“Pollinated” bloom - notice the pollen scattered on the petals
Cut deeply into the plant between 2 sets of leaves, cutting stems at least 18” long. Each stem should have multiple blooms/buds, a “spray” of flowers. Deep cuts are especially important with Cosmos, as they tend to become a tangled mess if you don’t make deep cuts!
POST HARVEST CARE
Cosmos require no special treatment.

Questions?
Questions or comments? Leave them below and I’ll get back to you!
ready for more?
If you’re serious about growing the garden of your dreams this year, register for my online course, “Backyard Cutting Garden 101”. You’ll find everything you need to plan, grow, harvest and arrange your stunning blooms. I can’t WAIT to help you grow! Click on the button below for all the details.

How to Plant Tulip Bulbs
Frequently Asked Questions about planting Tulips
Let’s talk Tulips!
Each fall, we plant about 10,000 - 12,000 Tulip bulbs on our farm. The blooms (and bulbs! More about that later…) are harvested the following spring.
Since we are a cut flower farm, we only grow Tulips intended to be harvested and displayed in a bouquet or bunch.
We do not grow Tulips to be displayed in the field or landscaping (in fact, we harvest them all BEFORE they bloom).
While planting and growing Tulips for as “Landscape flower” is quite straightforward, growing Tulips to harvest as a “Cut flower” is a completely different concept and method.
Since the concept can be a bit confusing, I wrote a comprehensive Blog post about growing Tulips as a cut flower. You can READ IT HERE.
Let’s go over some of the most Frequently Asked Questions about Tulips that show up in my inbox.

When should I plant Tulip bulbs?
Tulips are planted in the fall, before the soil freezes. It’s best to wait until after the soil temperature has cooled to below 60.
For people in extreme Northern climates, this may mean planting in September or October.
For people in warmer climates, this may mean planting between October and December.
We usually plant on our farm (Michigan, Zone 5b/6a) in mid to late November.
2. I live in a warm climate. Can I grow Tulips?
It depends. Tulips need a prolonged period (about 10-12 weeks) of cold temperatures between 35-45 F (or cooler) to grow and bloom properly.
If the Tulip bulbs do not have “chill time” in the ground, they will bloom very short, down in the leaves at ground level. If you’ve ever had Tulips bloom super short, it’s likely because they were not cold enough, long enough.
Many northern regions of the USA are sufficiently cold enough, but anyone growing in Zones listed at 7 or above on the USDA Zone Hardiness Map should consider “Prechilling” their bulbs for 6-12 weeks in a beverage refrigerator before planting them out.
(Note: Do NOT store them in a fridge with fruits/veggies, as the ethylene gas from fruits/veg can harm the bulbs. A wine or beverage fridge works best)
“Prechilling” in a fridge mimics the necessary long chill period and tricks the bulbs into thinking they have just experienced winter. Instead of “wintering” in the ground, the bulbs are “wintering” in your fridge. Plant the bulbs IMMEDIATELY after pulling them out of the refrigerator.
Here’s a sample timeline for growing Tulips in warmer climates:
Oct/Nov - place bulbs in the refrigerator for 6-12 weeks
Dec/early Jan - plant bulbs in the ground
Mar/April - Tulips bloom
(Note: Prechilled bulbs should be treated as Annuals. They will likely not rebloom the following year, because of insufficient chill time)
3. How deep should I plant the bulbs?
The general rule is to plant bulbs about 3x as deep as their length. For most Tulip bulbs, this means planting around 5-7 inches deep.
4. How do I plant the bulbs?
This depends on what your end goals are for your Tulips. There are 2 main end goals:
Growing for Landscape Use (to be enjoyed in the garden/landscape)
Growing for Cut Flower Use (to be enjoyed in the vase)
If your goal is Landscape Use, use a bulb planter to plant the bulbs 4-5 inches apart. Alternatively, you can dig a trench or large hole 5-7 inches deep, place the bulbs 4-5 inches apart, then backfill the trench/hole.
If your goal is Cut Flower Use, the bulbs can be planted much closer together, nestled like eggs in a carton (not quite touching each other, but snug). This method involves digging a trench or large hole 5-7 inches deep, placing the bulbs like eggs in a carton, then backfilling the trench (or building a temporary raised bed, as explained in this BLOG POST).

Growing for Landscape Use - bulbs planted 4-5 inches apart, 5-7 inches deep

Growing for Cut Flower Use: Bulbs planted like “eggs in a carton” about 5-7 inches deep in a trench or raised bed
Tulips do best with full sun, but can tolerate partial shade.
Tulips require well-draining soil. They may rot in wet, heavy soils.
Water deeply once after planting the bulbs. Water moderately in the spring if the soil is dry. During the blooming season, water every 3-5 days if there is no rainfall.
5. How do I keep critters from eating my bulbs?
I feel your pain. The first time I planted 125 Tulip bulbs, the next spring I discovered voles had devoured 123 of the bulbs. I was devasted! It was a hard way to learn that I can’t plant Tulip bulbs without using some sort of protection.
Unfortunately, there is no foolproof method to keep your bulbs safe besides a physical barrier (completely encasing them in wire mesh). You can read THIS BLOG POST explaining the great lengths we go to our our farm to keep our bulbs safe over the winter. It is a LOT of work, but the only way we can avoid losing thousands of bulbs each year.
6. How do I keep deer and rabbits from eating my Tulips once they come up in the spring?
Again, there is no foolproof way to keep them safe besides a physical barrier (fencing). Deer will require a tall fence, while rabbits will require a fence that is sunk into the ground to prevent digging.
If this sounds like too much work, or if you have very intense deer/rabbit pressure, then perhaps growing Tulips is a not a good fit for your property. You may want to try growing more “deer resistant” spring bulbs, such as Daffodils and Allium.
7. How do I make sure my Tulips come back each year?
There are many factors to consider and it can be helpful to adjust your expectations.
Many Tulip varieties are bred to produce a beautiful bloom in their first season… and then decline in quality in subsequent years. It's advised to replace bulbs every 2-3 years for the best display.
Some Tulip varieties may perennialize, but many will not. Most climates in the USA cannot meet their needs and are not conducive to Tulip perennialization. Tulips are native to Central Asia (Turkey, Iraq, Russia) and thrive in climates that are similar - hot, dry summers and cold, wet winters. There are very few climates in North America that can mimic these conditions required for perennialization.
These 3 varieties are most likely (but not guaranteed) to perennialize if the climate is right:
Darwin Hybrid Tulips
Emperor Tulips
Triumph Tulips
Without a physical barrier to protect them, bulbs are often eaten by voles, mice, squirrels, etc.
After the Tulip has finished blooming, you can cut off the bloom at the top of the stem, but make sure to allow the rest of the stem and all the leaves to die back COMPLETELY before cleaning up the debris. If you remove the dying foliage too early, the bulb will not be able to photosynthesize and regenerate.
If you harvest the bloom for a bouquet (cut the stem away from the bulb), the bulb has lost its ability to photosynthesize and regenerate. Do NOT harvest the bloom if you want the Tulip to rebloom the following year. Tulips grown as a cut flower are treated as an Annual. I recommend growing your “Landscape Tulips” (treated as a Perennial) and “Cut Flower Tulips” (treated as Annual) separately.
8. Are there any Tulips you recommend as a cut flower?
Any Tulip can be grown and harvested as a cut flower.
However, on our farm, we prefer to grow “Double” or “Peony-flowering” types, “Parrot” types, “Fringed” types and a few select “Single” types…basically anything that doesn’t look like a standard landscape Tulip ;)
You can learn about a few of my favorite Tulip varieties for cut flowers in THIS BLOG POST.
