

How to Grow Scabiosa
How to Grow: Scabiosa
Pronunciation: skab-ee-oh-sah
Few flowers can match the beauty and charm of Scabiosa. These whimsical blooms may not be the biggest or flashiest flowers in the cutting garden, but they are fabulous in bouquets and lovely to behold in the garden.

They are also a favorite of pollinators. On our farm, the Scabiosa patch is a hot spot for butterflies galore!

There are 3 main types of Scabiosa (also called “Pincushion Flower”).
Annual Scabiosa/Pincushion (Scabiosa atropurpurea): This is the most popular type for cutting gardens and the type that will be discussed in this blog post.
Perennial Scabiosa/Pincushion (Scabiosa caucasica): This type is a perennial plant that comes back each year (Zone 3-7). Usually identified by the name “Fama Series”
Starflower (Scabiosa stellata): Annual type grown primarily for its seed heads, not the blooms (pictured below).

“Fama White” Scabiosa (Perennial)

“Starflower” Scabiosa
Let’s look at the Pros and Cons of growing Scabiosa for cut flower use.
PROS
They come in a multitude of colors.
They are easy to grow.
The plants are productive for a long period of time, if continually dead-headed (more about this later…)
They are charming in bouquets.
They have a good vase life of 5 -7 days.
CONS
They bloom profusely and it’s nearly impossible to keep up with deadheading!
They need to be netted or they will fall over.
They get tangled in the netting and can be a real challenge to harvest.
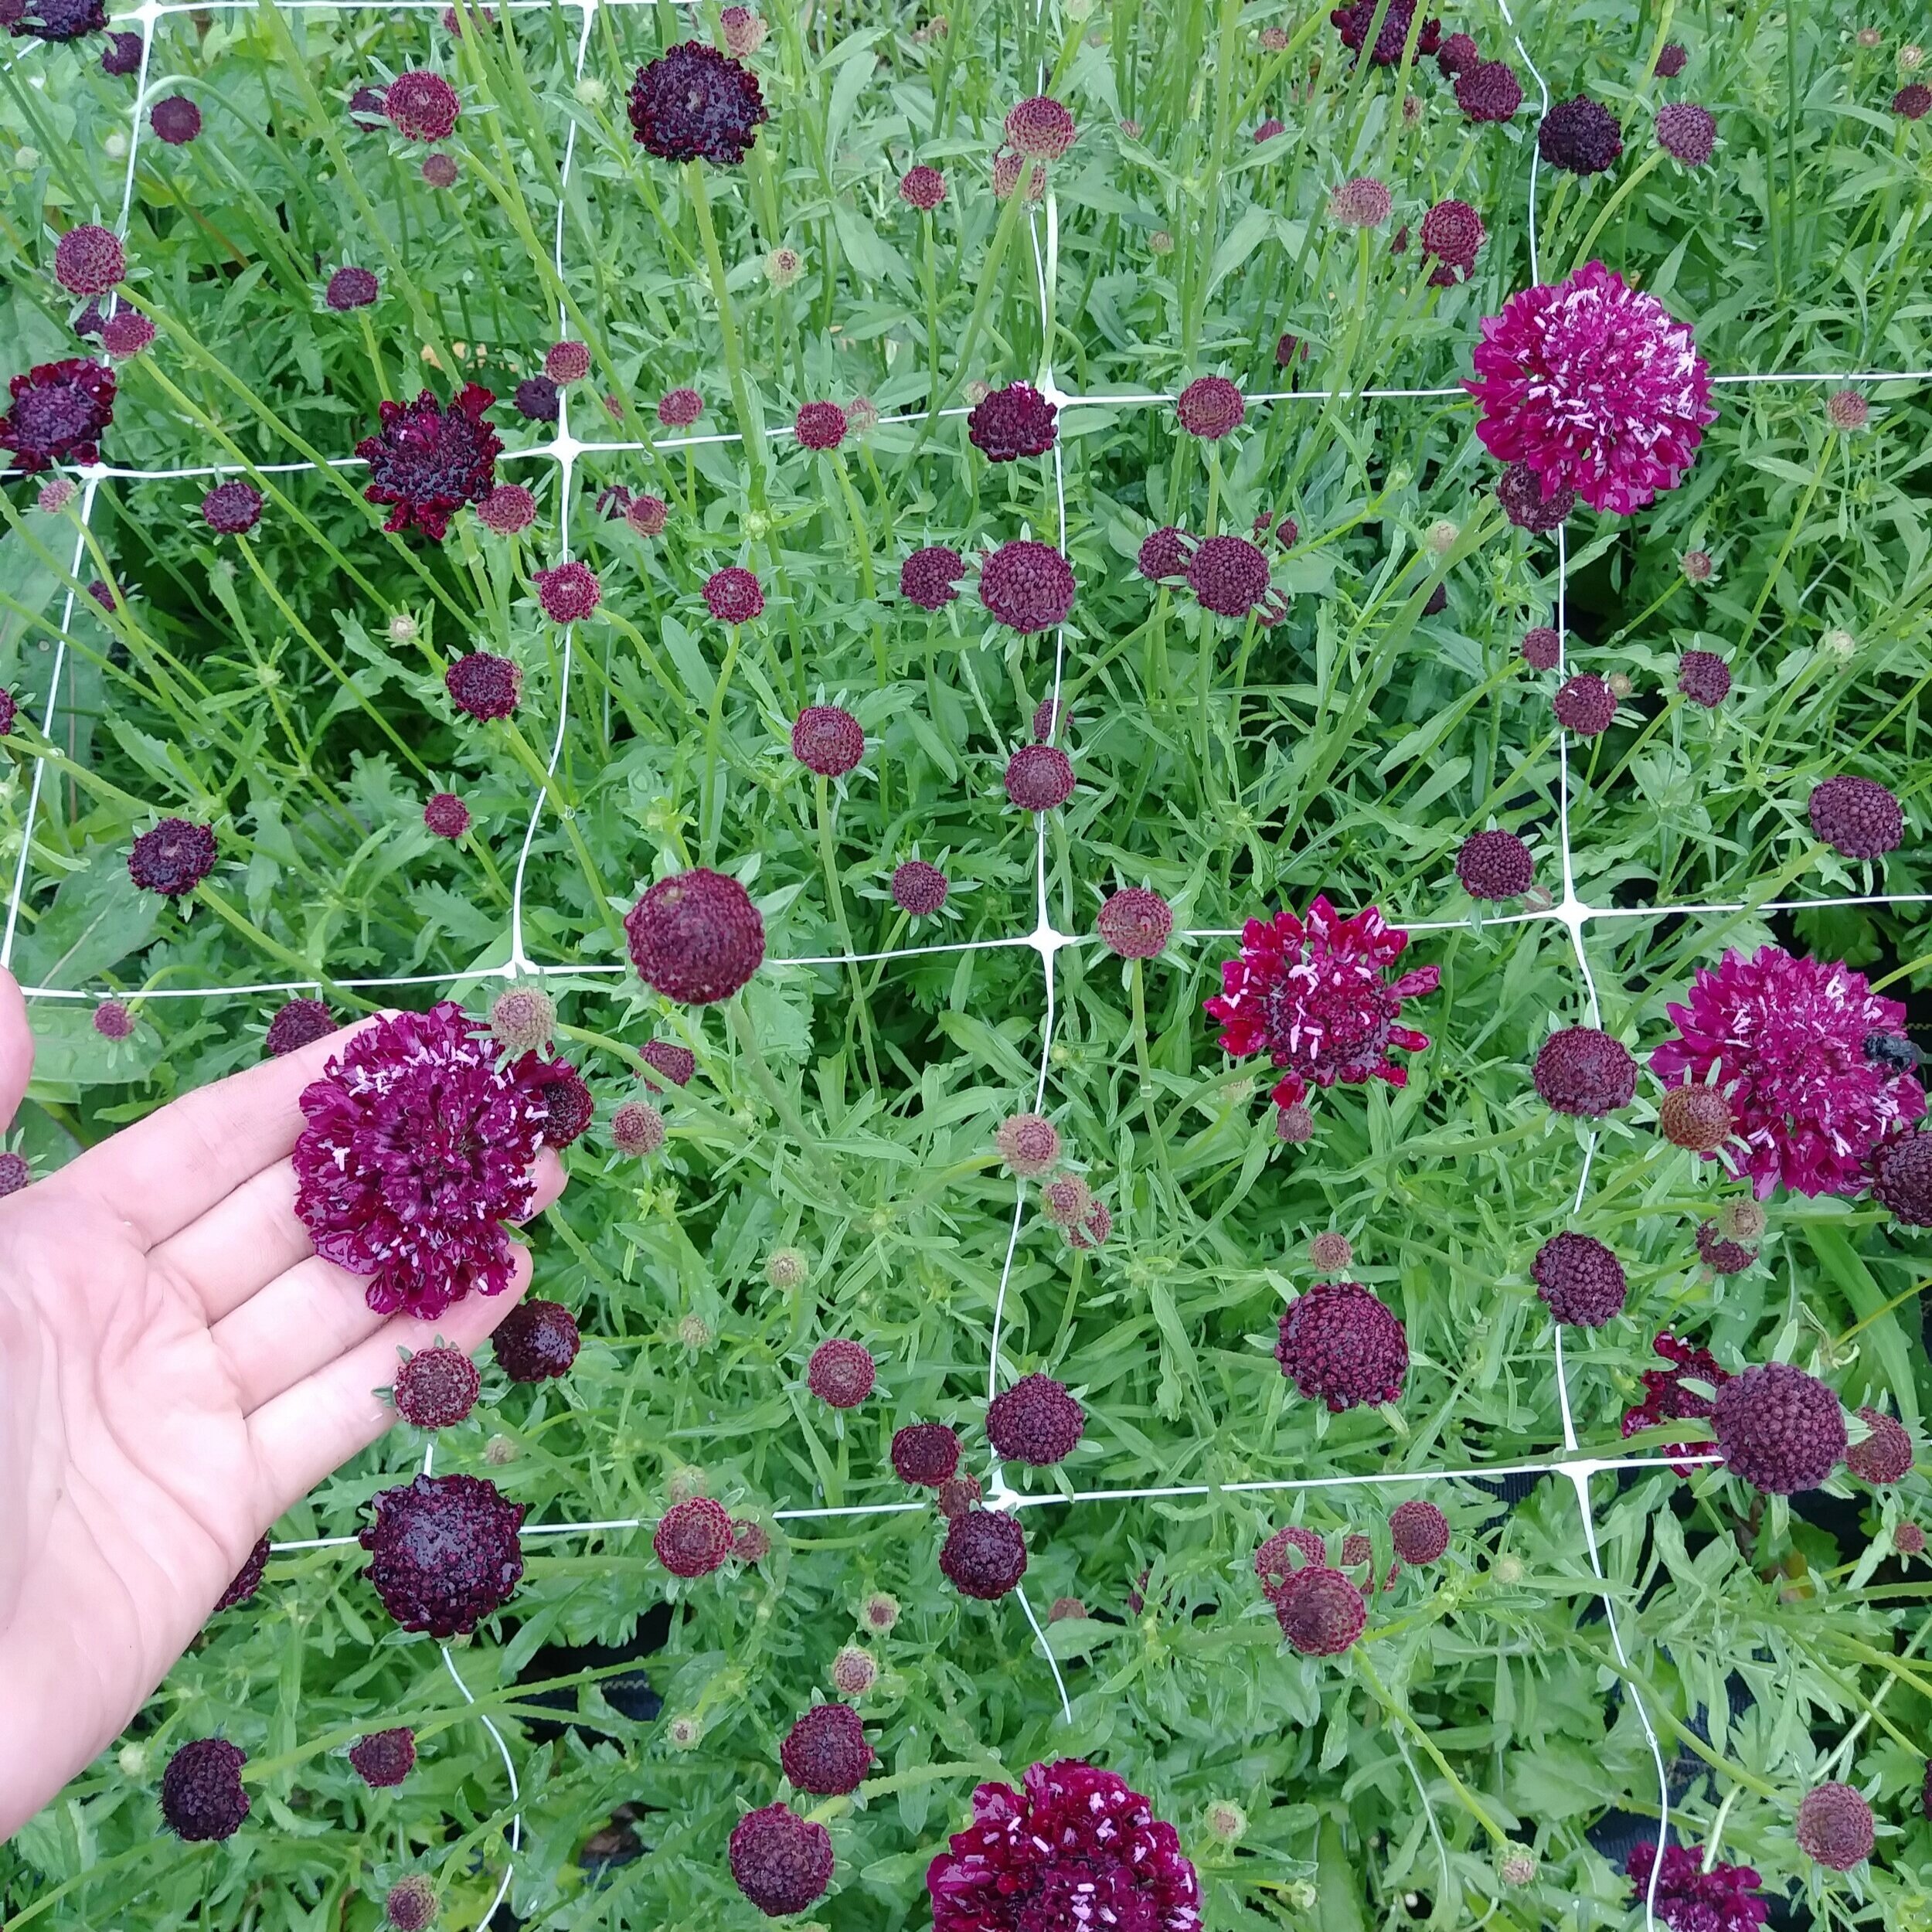
“Merlot Red” Scabiosa

“Snowmaiden” Scabiosa
CHOOSING SEEDS
Most Scabiosa seeds offered by seed companies will “make the cut”.
Here are a few of my favorite Scabiosas to grow for cut flower use:
“Merlot Red” (by far my favorite variety, as the stems are sturdier and less likely to get tangled up)
“Black Night”
“Fata Morgana”
“Snowmaiden”
“Salmon Rose”
“Beaujolais Bonnets”
“Cutbrite Mix”

“Merlot Red” Scabiosa
HOW TO SOW
Scabiosa is a summer blooming flower. They are not frost hardy, so do not plant them too early in the season.
Transplants or Direct Sow?
Scabiosa is versatile and can be transplanted or direct sown.
Transplants are best for most climates. Start seeds indoors about 4 weeks before the last spring frost. Transplant after the risk of frost is over.
Direct sowing is possible. Sow seeds in the ground after the threat of frost is over.
While plants can produce for a long time, they do decline over the season. It’s best to plant 2-3 successions (batches) of seeds, about 3 weeks apart. This ensures you will always have some in bloom.
Scabiosaseed “pods” are a bit odd looking (kind of like little rocket ships!) and people wonder how to plant them. Up? Down? I usually lay them on their side. The actual seed is tiny and hiding inside the weird looking seed “pod”.

PLANT SPACING
Scabiosa should be grown at 9-12” spacing. Be sure to provide some sort of support with netting or the plants will flop over into a tangled mess.
We use Hortnova trellis netting stretched over the bed with stakes. Immediately after planting seeds or transplants, put the netting in place, hovering at about 12-18” high.

“Cutbrite Mix” Scabiosa
GROWING ON
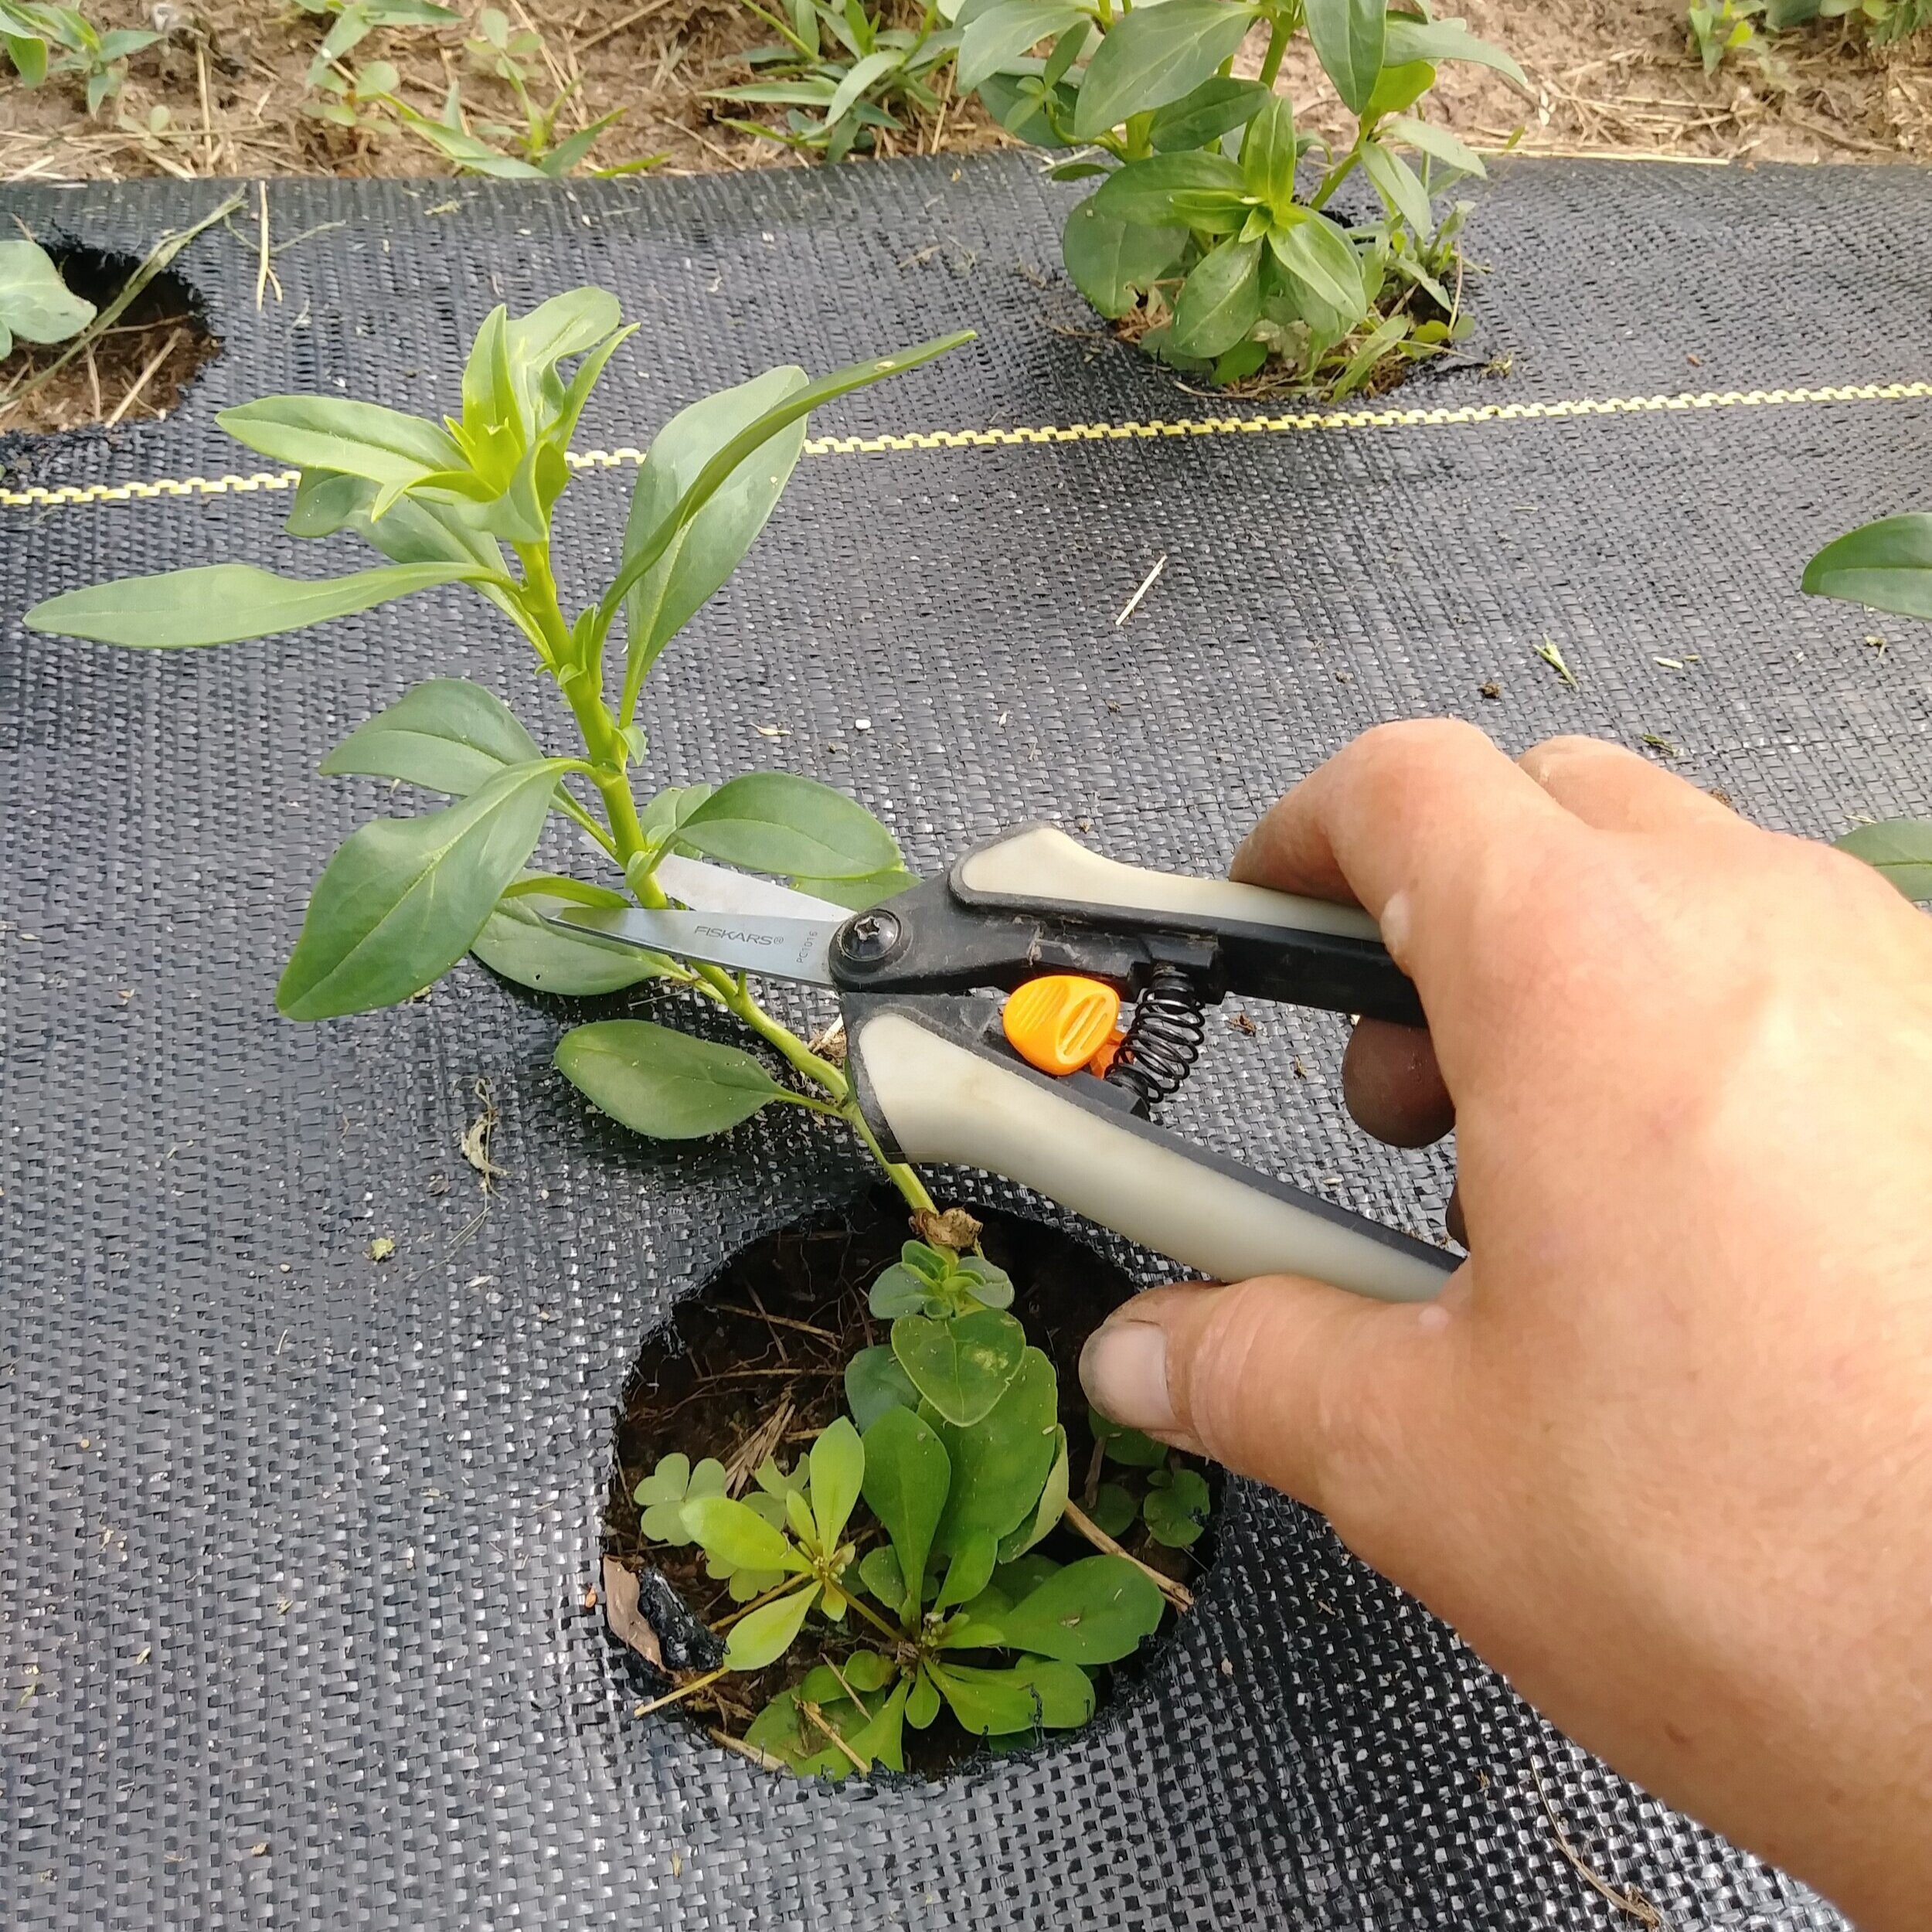
After the transplants are established and growing, it’s helpful to “pinch back” the center stem of the plant when they are less than 8” tall. To pinch, simply use clippers to remove the top of the plant, only leaving 2-3 sets of leaves behind.
Plants that are pinched are more productive than plants that are not. Experiment for yourself - pinch half the plants and leave the other half alone. The un-pinched plants will bloom earlier, but the pinched plants will be more productive.
If flowers are harvested and spent blooms are “deadheaded” (removed), the plants will continue to send up blooms until frost or cold weather arrives.
Keeping up with deadheading is the HARDEST part about growing Scabiosa.
STAGE OF HARVEST
Scabiosa is unique because it can be harvested at several stages. All stages are acceptable and have their charms.
Bud (this is when they really look like a “pincushion”)
Flowering
Seed head (these can look very interesting in arrangements!)

“Cutbrite Mix” Scabiosa

“Merlot Red” Scabiosa
As with all cut flowers, be sure to cut deeply into the plant between 2 sets of leaves, cutting stems at least 18” long. Deep cuts signal the plants to produce MORE flowers to replace the one you just cut.
When you make deep cuts, you will end up with a stem with multiple blooms. This is the easiest and most efficient way to harvest Scabiosa and keep the patch manageable. You may be tempted to cut single blooms, but things will get out of hand quickly if you don’t make deep cuts.

POST HARVEST CARE
Scabiosa requires no special treatment after harvest.
QUESTIONS?
Ask them here and I’ll get back to you!
Ready for More?
If you’re serious about growing the garden of your dreams this year, register for my online course, “Backyard Cutting Garden 101”. You’ll find everything you need to plan, grow, harvest and arrange your stunning blooms. I can’t WAIT to help you grow! Click on the button below for all the details.

How to Grow: Snapdragons
The unsung hero of the cutting garden!
How to Grow: Snapdragons
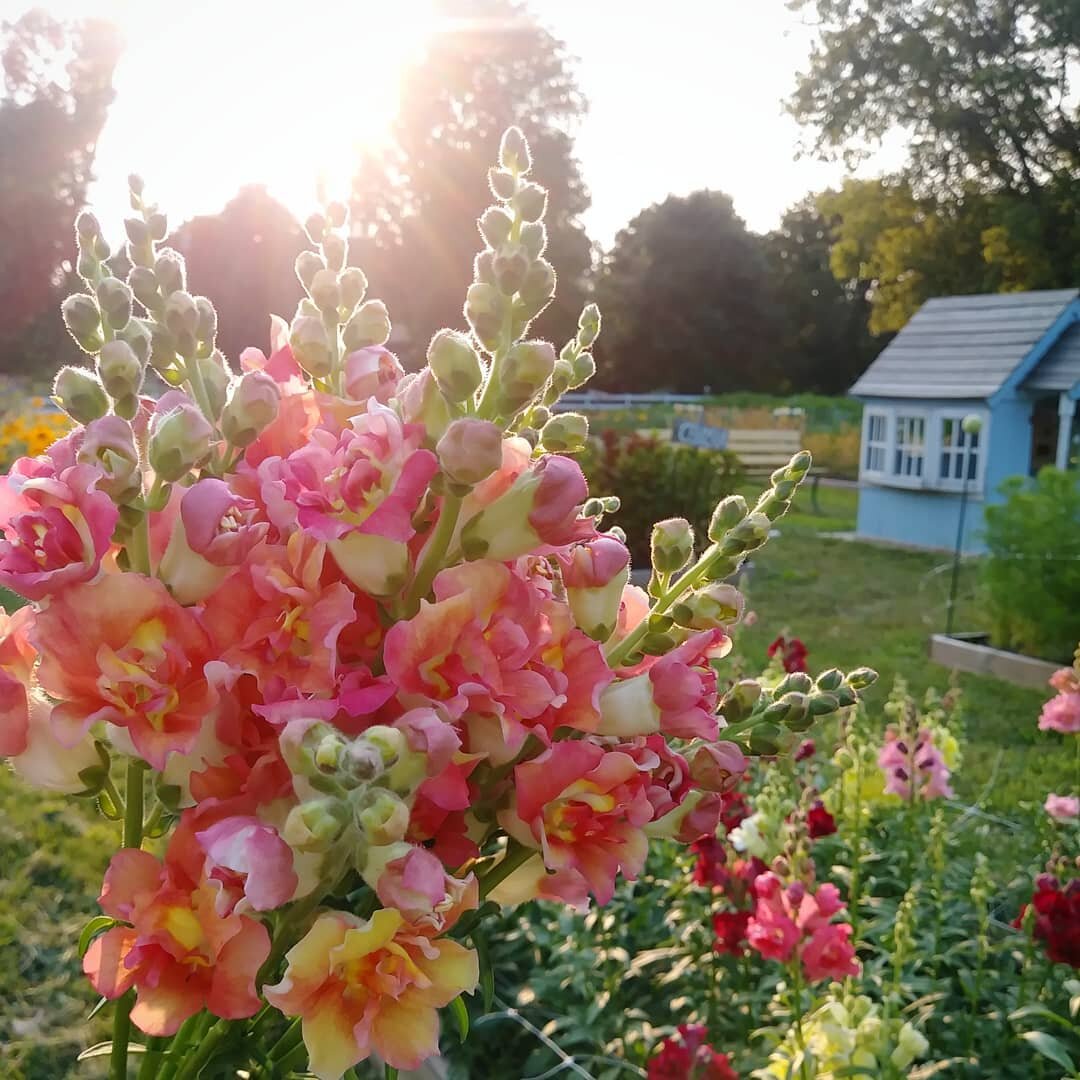
Snapdragons are the unsung hero of the cutting garden. In fact, they are one of my favorite cut flowers!
I’ve always wondered why they were not more popular… Maybe it’s because they don’t have a “round shaped” bloom, like a Daisy, Zinnias, Sunflower, Rose, etc.
Let me tell you though, these beautiful “spike” type flowers will bring your bouquets to the next level. It’s important to have a variety of lines and shapes in bouquets and Snapdragons are the perfect addition.
Let’s look at the Pros and Cons of growing Snapdragons for cut flower use.
PROS
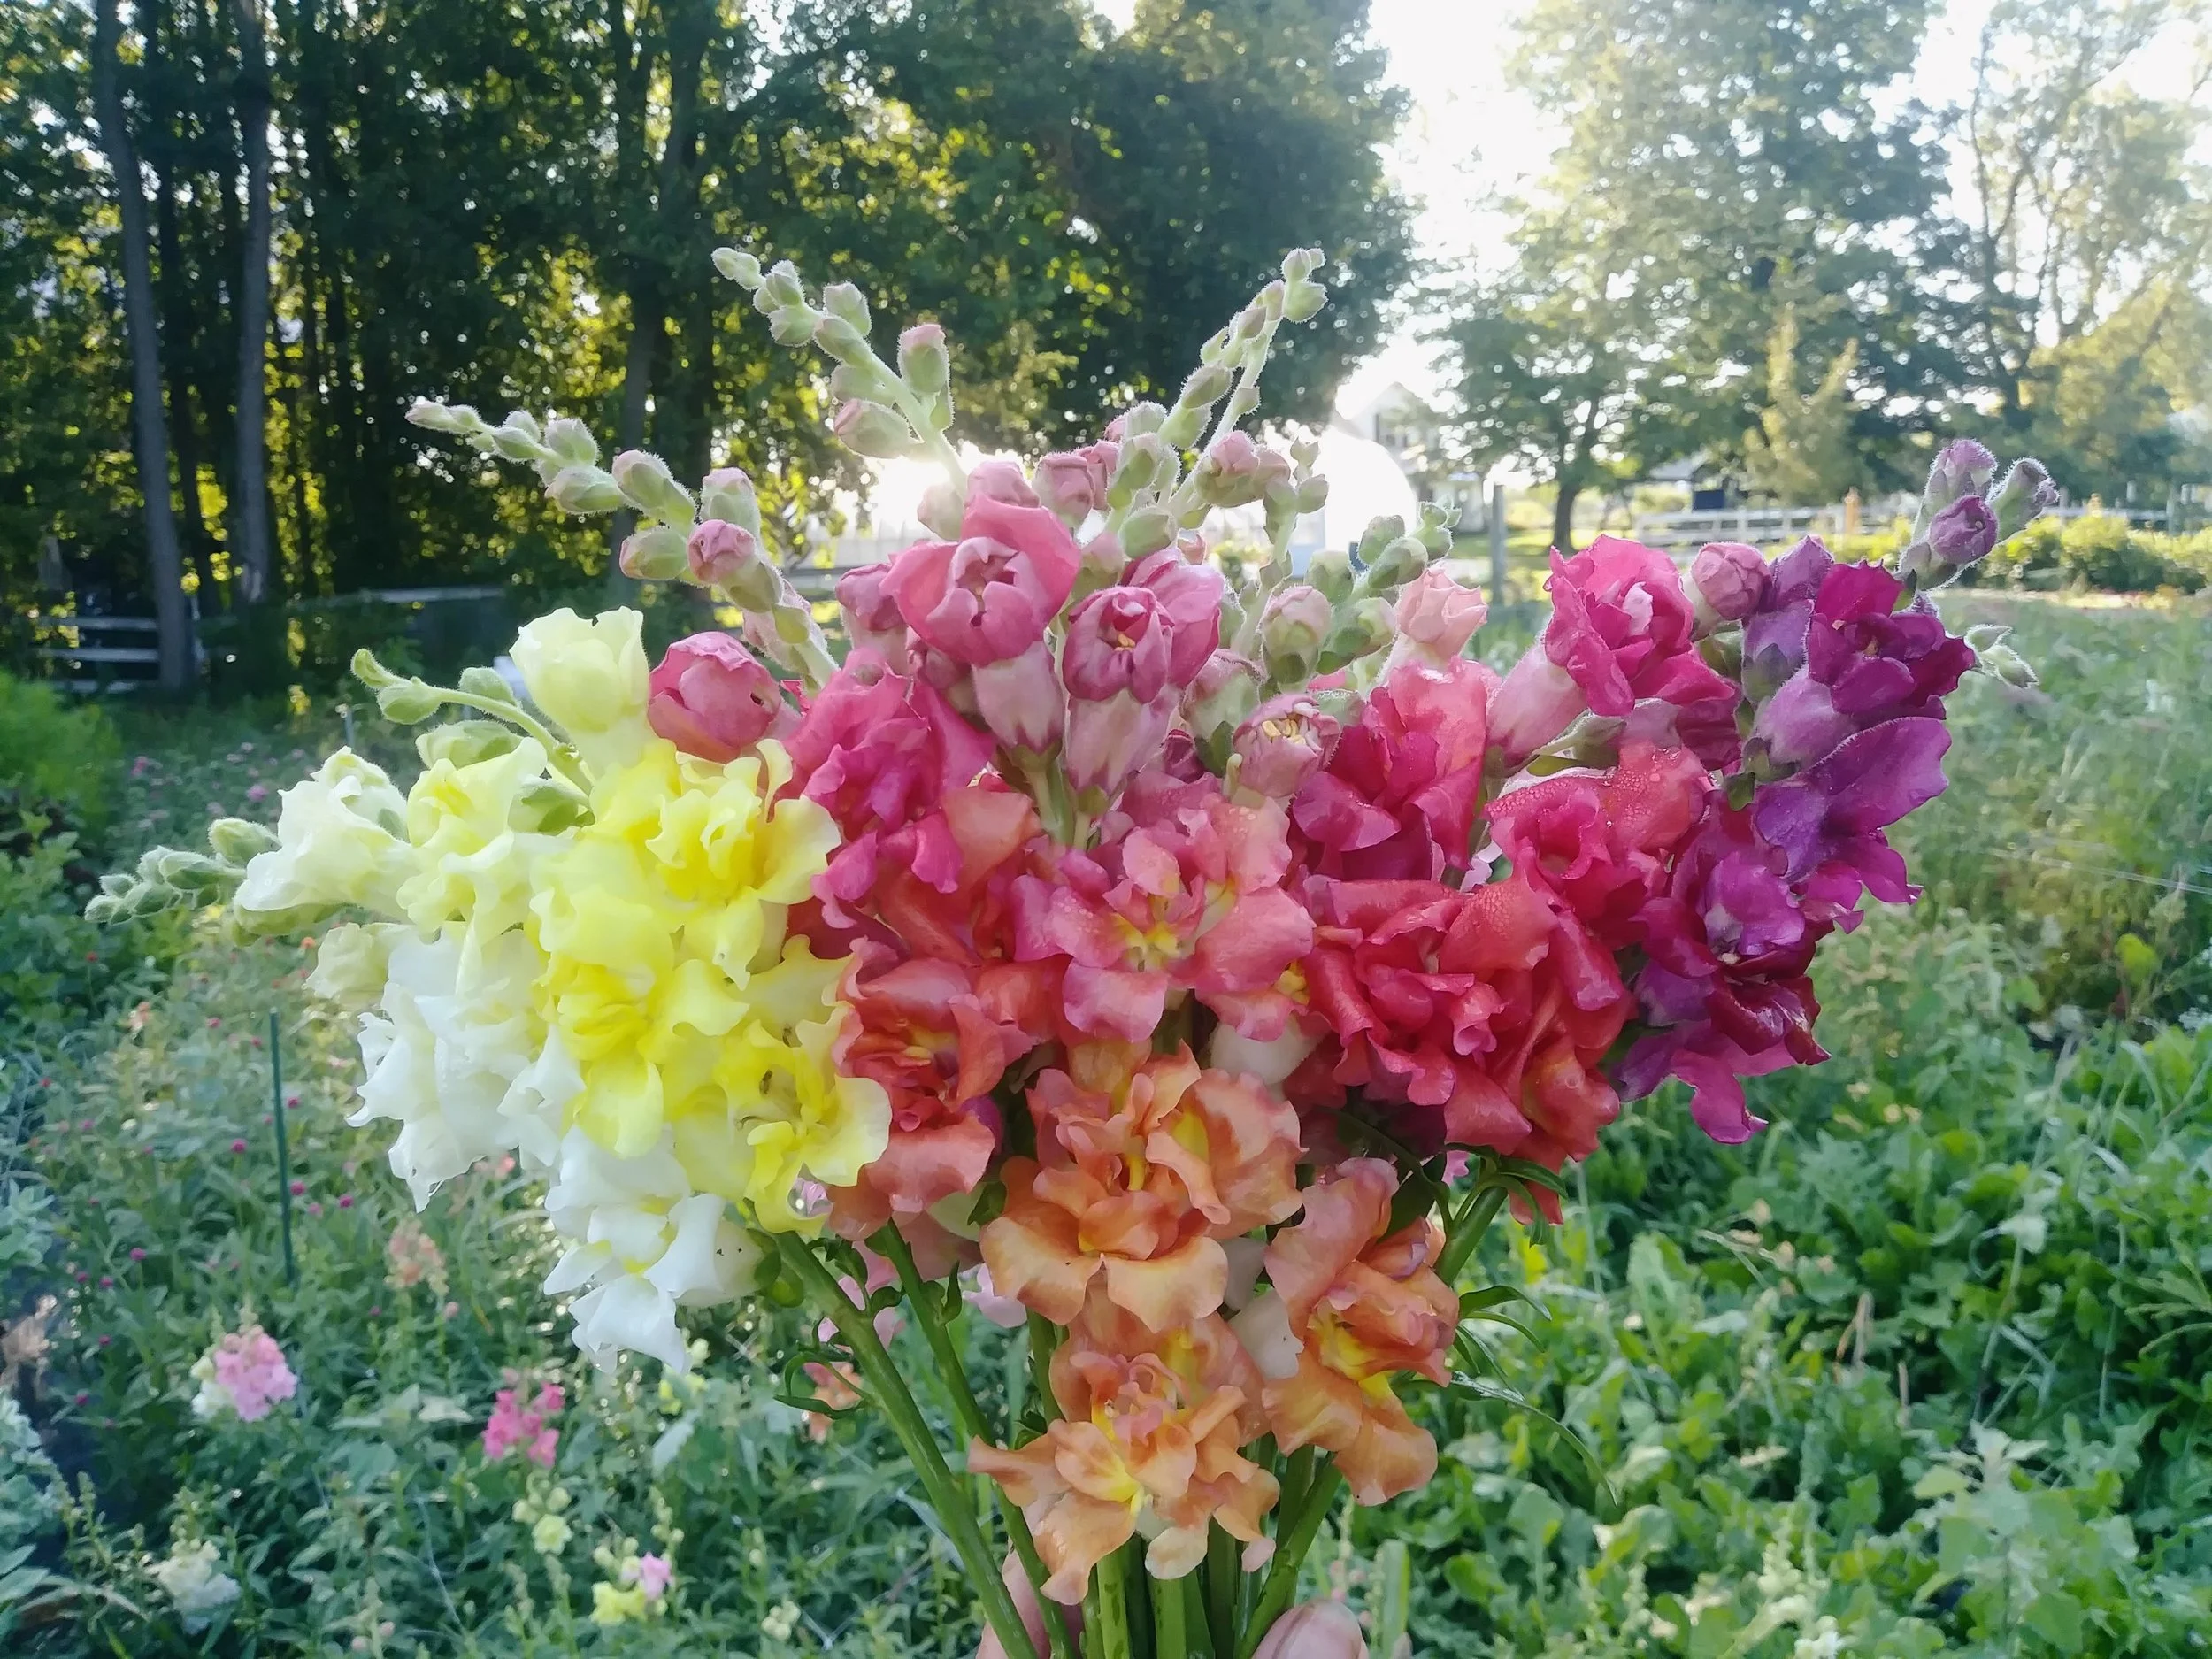
They come in a multitude of colors.
They are perfect for bouquets.
They have an excellent vase life, sometimes lasting 2 weeks if harvested at the proper stage.
CONS
They can be a little tricky to start from seed. If you are a beginner at seed starting, I recommend skipping these until you’re more skilled and confident.
They can be difficult to find as transplants. You might be able to find transplants at your local nursery, but many of the varieties offered at nurseries are bred for landscape use, not cut flower use (you want to choose varieties that reach at least 18” tall).
They slow down in the heat. If you live in a place with hot summers, they may stop blooming. Here in Michigan, they bloom in June, slow down considerably in July/August, then bloom again in September. They are frost hardy and I’ve even had Snapdragon blooms all the way into November!
“Madame Butterfly Mix” Snapdragon

“Rocket White” Snapdragon
CHOOSING SEEDS
As mentioned above, you want to choose varieties that will reach at least 18” tall for cut flower use.
Snapdragon seeds often come in a mix of assorted colors, as well as single colors. Here are my favorite Snapdragons to grow for cut flower use:
“Rocket Bronze” Snapdragon
HOW TO SOW
Snapdragons can be a little tricky to start from seed. For best results, I like to keep the seeds in the freezer until I’m ready to sow them. This mimics their natural life cycle of germinating after a season of cold temperatures.
Snapdragon seeds are absolutely tiny. Seriously, they look like dust. It will make your eyes cross when you’re planting the seeds! Be sure to put on your glasses!
I sow 2 seeds per cell (they don’t need to be thinned, if both germinate).
To sow them, I put the seeds in a small dish or jar, lick the end of toothpick and use the toothpick to pick up 2 seeds. No, I am NOT joking! I wish I was! This is the best method for sowing tiny seeds, like Snapdragons and Poppies.
Gently transfer the seeds to the cell and sprinkle a dusting of soil over them, so they are not completely covered.


Because Snapdragons take so long to grow, direct sowing is not recommended.
Transplants should be started 8-10 weeks before your Average Last Spring Frost. For example, our Average Last Spring Frost is May 15, so I need to start my Snapdragon seeds indoors in early to mid March.
PLANT SPACING
Transplants should be spaced at 6-9” apart. Close spacing encourages longer stem growth.
GROWING ON
Once the transplants have a few sets of leaves and have been hardened off, they can be planted outside. They are “frost hardy” and can handle a light frost.
After the transplants are established and growing, it’s important to “pinch back” the plants. To pinch, simply use a clippers to remove the top of the plant, only leaving 2-3 sets of leaves behind.
Pinching signals the plant to go into overdrive and send out multiple branches, with multiple blooms.
Check out the plant in the photo below - this was taken a few weeks after pinching and now the plant has tons of branches that produce lots of blooms.

Some people leave a few unpinched on purpose, simply to get early blooms. This is a good way to extend the bloom time of your Snapdragons.
After the spring/early summer flush of blooms, Snapdragons take a break during the summer heat. You can pinch back the plants again to 2-3 sets of leaves… and they will bounce back in the fall, sending up another flush of blooms.
STAGE OF HARVEST
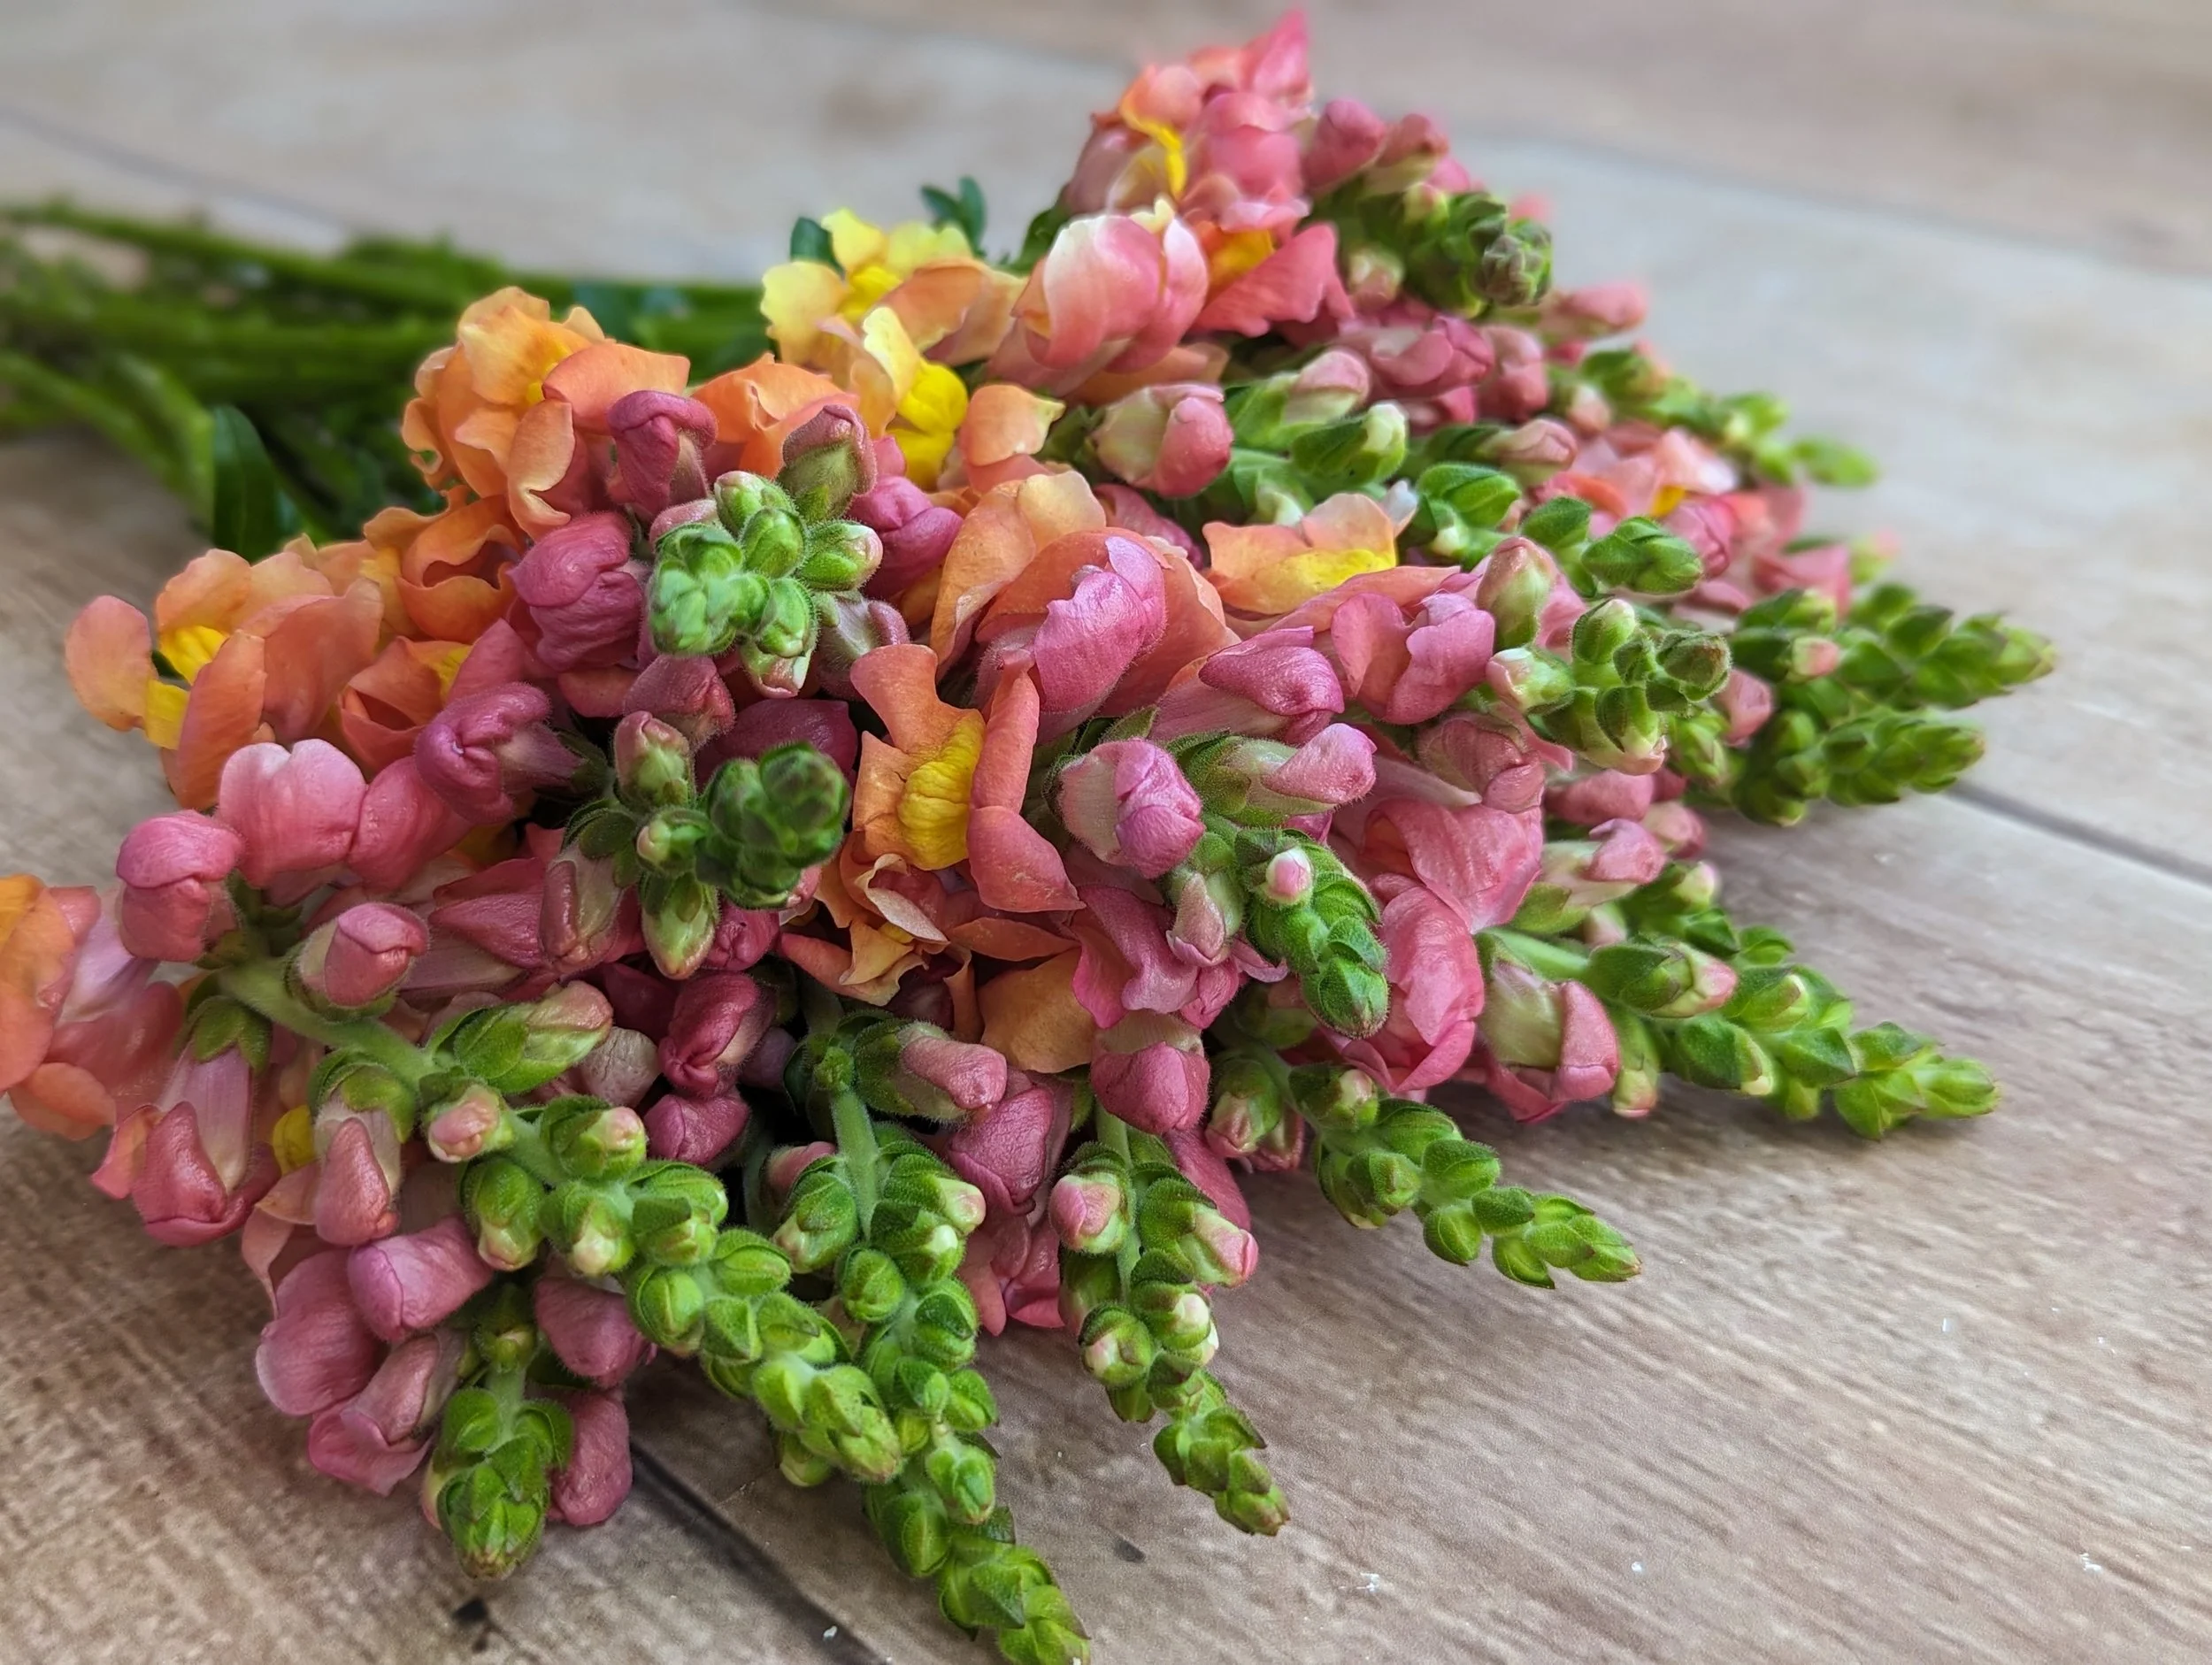
Snapdragons should be harvested when 1-2 florets on the stem has opened. The rest should still be closed. As always, harvest in the cool of the day - morning or evening.

“Madame Butterfly Bronze with White” Snapdragon
POST HARVEST CARE
Snapdragons require no special care after harvesting.

QUESTIONS?
Questions or comments? Leave them below and I’ll get back to you!
Ready for more?
If you’re serious about growing the garden of your dreams this year, register for my online course, “Backyard Cutting Garden 101”. You’ll find everything you need to plan, grow, harvest and arrange your stunning blooms. I can’t WAIT to help you grow! Click on the button below for all the details.
How to Grow Statice
How to Grow Statice

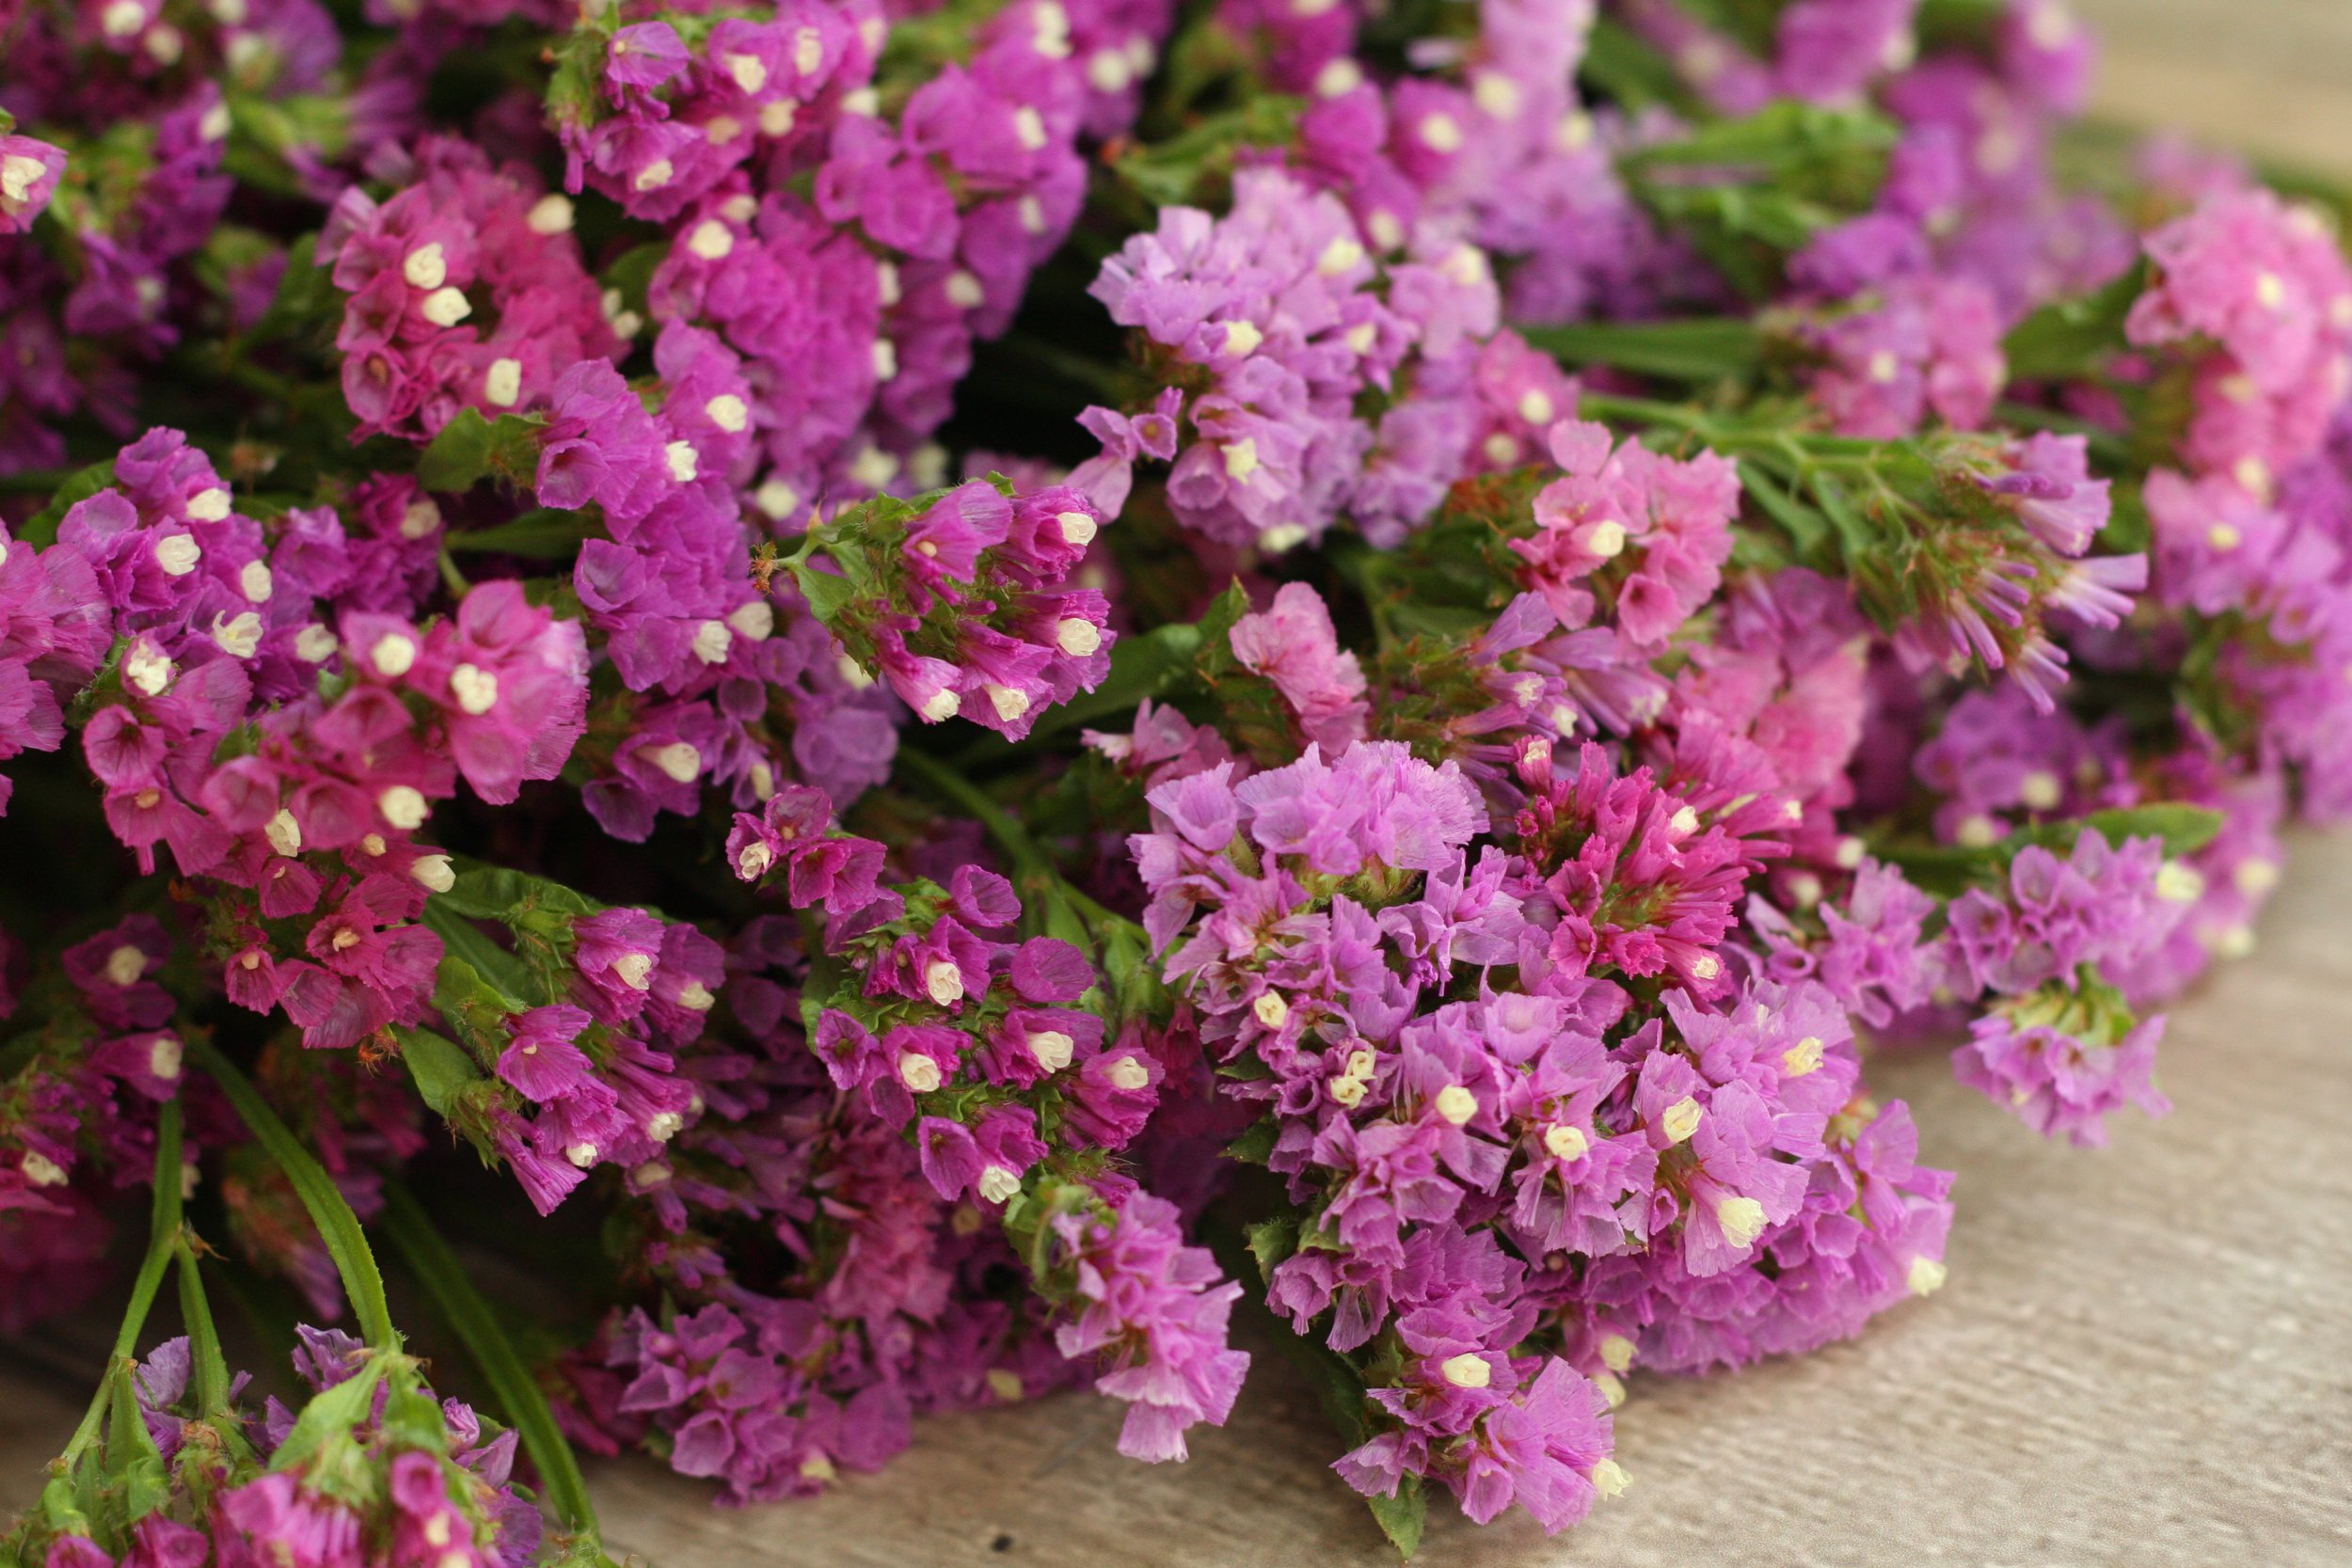
Rose Shades
On our farm, we consider Statice our bouquet-making MVP (most valuable player). During the growing season, we harvest bucket loads of it every single week and we use every single stem in our bouquets.
I find Statice to be one of the most useful “Filler” type flowers you can grow. The role of Filler flowers is to complement and enhance the “Focal” flowers (the big flashy flowers that get all the attention). Statice doesn’t mind playing a supporting role.
Statice also is a dual-purpose flower. Not only does it look great in fresh flower bouquets, but it also dried beautifully for dried flower arrangements. The papery-looking clusters will last for years.
I sure hope you try Statice and learn to love it as much as I do. We use it nearly every summer and fall bouquet we make on the farm!

QIS Apricot
Let’s look at the Pros and Cons of growing Statice for cut flower use.
PROS
They are very long-lasting in the vase. Once all the other flowers have died, Statice is still standing. You can pluck out the stems, hang them to dry and keep them for years as an “Everlasting Flower”.
They are a perfect filler flower to enhance and “fill out” a bouquet that is looking a bit sparse.
They are versatile and look good with almost any other flower.
They are easy to grow.
They are productive over a long period of time. While many sources say they are NOT “cut-and-come-again”, we find that plants will continue blooming for 2-3 months if harvested/deadheaded on a regular basis. This is likely climate-dependent and your experience may be different.
They come in a wide range of colors (although I do find some of the colors garish, so I stick to just a few super versatile colors).

Rose Shades
CONS
They can be susceptible to Aster Yellows disease. Botrytis (fungal infection) can also be a problem.
They do not like overhead watering. This, along with wet poorly draining soil, can cause them to rot.
They don’t produce a lot of stems at the same time (so you’ll need to plant a decent amount of them to harvest from).

QIS Apricot
CHOOSING SEEDS
When choosing seeds, decide if you want to grow a mix of colors or stick with just a few colors. It’s really about personal preference.
Personally, I dislike most of the colors in the mixes and I now only grow 3 different varieties:
A white variety (goes with EVERYTHING),
an apricot variety (goes with all our warm-toned bouquets),
and a rose pink/violet variety (goes with all our cool-toned bouquets).
The following Statice series are a great choice for cut flower use:
“QIS” series (wide variety of colors)
“Seeker” series (wide variety of colors)
Here are the 3 Statice varieties I grow:
“Seeker White”

Seeker Rose in Everlasting Bouquets
HOW TO SOW
Statice is a summer-blooming Annual flower. However, it does like a cool start to establish, so try to get the plants out into the garden before the heat of summer
Transplants or Direct Sow?
Direct sowing is not recommended. Instead, start seeds in trays about 6 weeks before your Average Last Spring Frost Date. Transplant outdoors into well-composted beds after your Average Last Spring Frost Date.
Plants have a tap root, so take care to nestle them in the ground carefully when transplanting.
We usually plant 3-4 successions of Statice, about 2-3 weeks apart to make sure we have an abundant supply of Statice in bloom from June - October.

Statice seedlings a few weeks after transplanting

Statice about a month after transplanting
PLANT SPACING
9-12 inch spacing is recommended.
GROWING ON
Once the seedlings are well established, reduce the amount of watering, if possible.
Overwatering and overhead watering (sprinkler, hose, etc) can cause the plants to rot. Watering with drip irrigation or soaker hoses is best.
Netting or support is not necessary for Statice.
Pinching is not required. Most plants that have a “rosette” type growth habit (low-growing leaves radiating from the center of the plant, like Foxglove and Statice) do not require pinching.

QIS Apricot, ready for warm bouquet making
STAGE OF HARVEST
Harvest when most of the papery blooms on the stem are open, but before they begin to turn brown and look “tired”.

QIS Apricot in warm bouquets, Seeker Rose in cool bouquets
POST-HARVEST CARE
Like most cut flowers, always harvest in the cool of the day and allow the flowers to rehydrate in water in a cool location overnight before arranging.
Statice requires no other special care.
For dried flower use, hang small bundles of Statice upside down in a warm, dry location out of direct sun for about 2 weeks until they are fully dry. Dried flowers will last for years if kept out of direct sunlight.
QUESTIONS?
Ask them here and I’ll get back to you!
Ready for more?
If you’re serious about growing the garden of your dreams this year, register for my online course, “Backyard Cutting Garden 101”. You’ll find everything you need to plan, grow, harvest and arrange your stunning blooms. I can’t WAIT to help you grow! Click on the button below for all the details.

How to Grow Stock
How to Grow Stock
How to Grow: Stock (Matthiola incana)
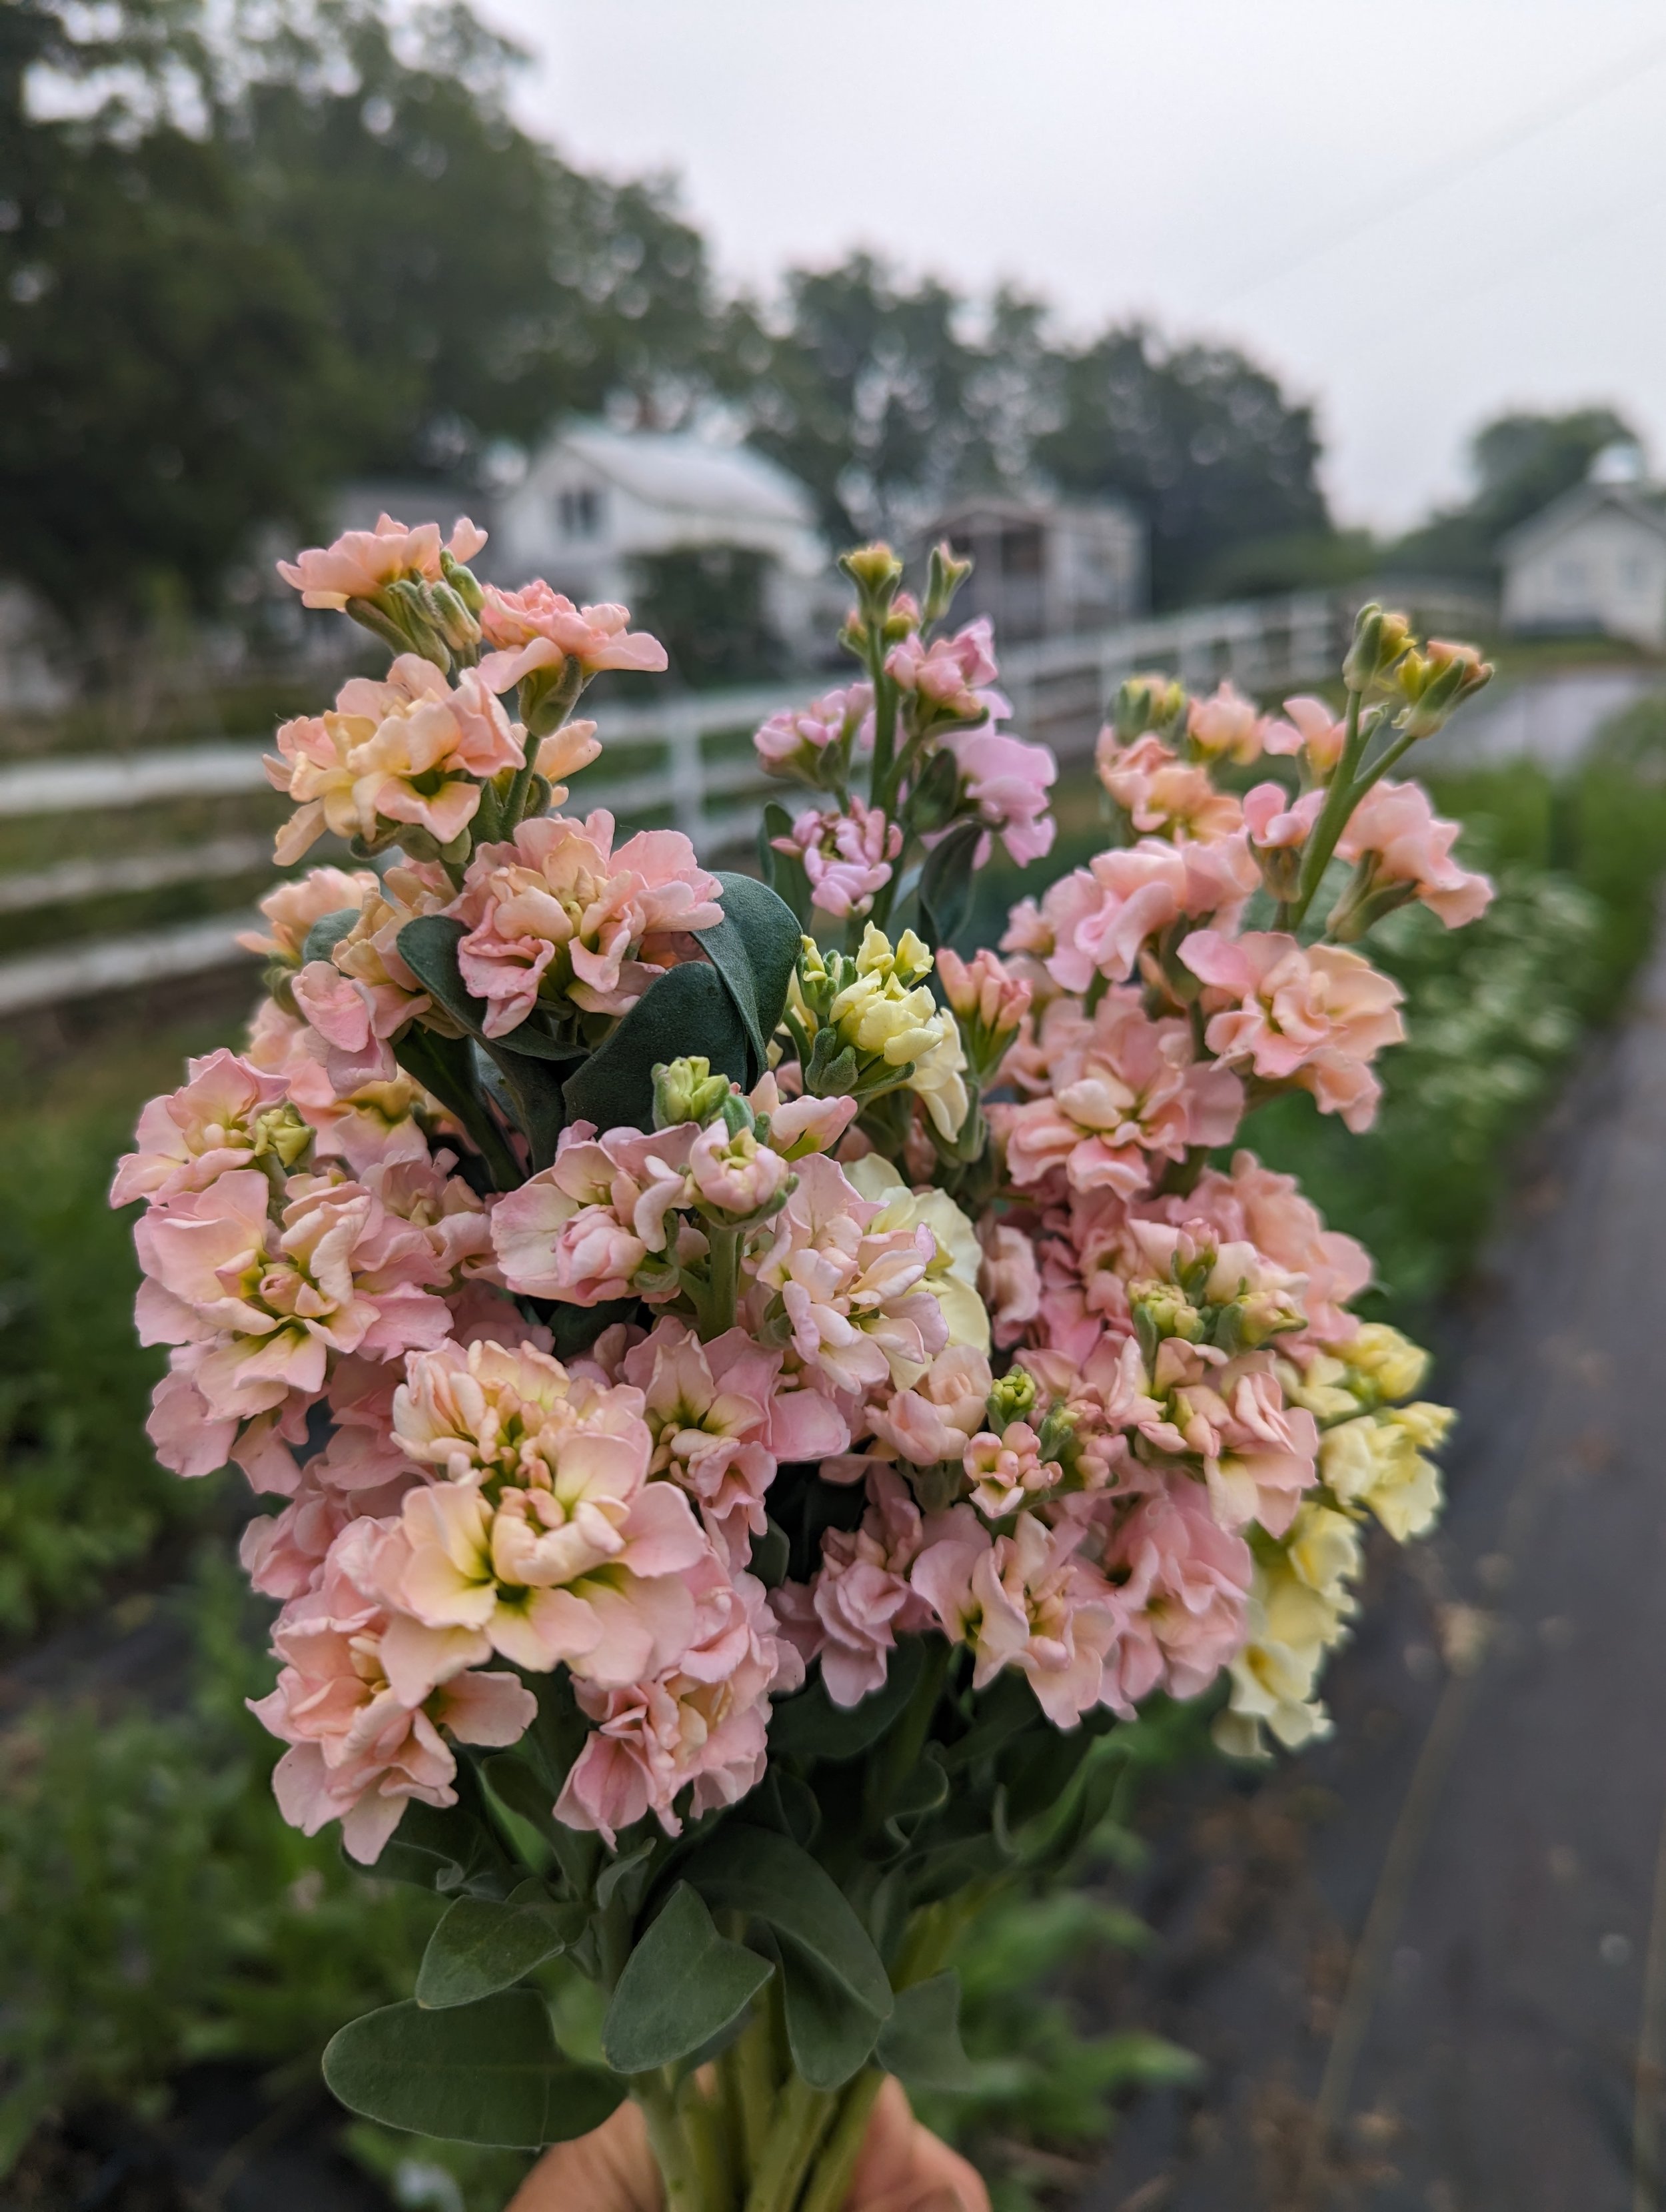
Once you smell the intoxicating aroma of Stock, you’ll know EXACTLY why they are loved and adored! The smell is hard to describe… sweet… peppery… clove-like… However you choose to describe it, it's memorable and delightful!
It’s hard to believe that this beautiful flower is actually in the Brassica family, related to broccoli, cabbage, kale, and cauliflower.
Stock can be a bit tricky to grow, as it generally grows best in cold temperatures… and let’s face it, most growers are not thinking about planting flowers in late winter/early spring when they need to go in the ground. If planted too late in the season as temperatures are rising, the plants will fail to thrive.
Thankfully, there has been a recent introduction of a variety called “Anytime” Stock that has much more heat tolerance and can be planted later in the season.

Stock "Anytime Mix"
It’s important to note that most Stock seeds will produce about 50% “Double” flowers and 50% “Single” flowers. Some growers will start 2x as many seedlings as they need and rogue out/eliminate the single flowering seedlings (there are very slight differences at the cotyledon stage. It requires years of experience to be able to tell the difference). Others just grow all of the seedlings and simply discard the stems with singles.
On our farm, we just grow them all and tuck the singles into bouquets. While they don’t look as pretty as the doubles, they still have a lovely scent.
PROS
They have a wonderful strong scent. Very few cut flowers have a scent, so this makes Stock especially valuable in bouquets.
They are beautiful in mixed bouquets or in vase by themselves.
They have a good vase life of 7-10 days
They are easy to grow IF you start them at the right time (very early in the season).
They are the perfect spring bouquet flower!
CONS
They are a one-and-done plant. They will not rebloom.
They need to be grown and planted early in the season, which can be hard for some people.
They do not tolerate heat. Once it gets warm, the plants decline rapidly (except the “Anytime Stock”, which has better tolerance).
Some plants will produce single flowers, which are not as desirable as the double flowers.

Stock Anytime Mix
CHOOSING SEEDS
The following Stock series are a great choice for cut flower use:
Cheerful
Iron
Katz
StoX
Here are a few of my favorite Stock to grow for cut flower use:
“Anytime Mix” (bred to have better heat tolerance, which allows a wider range of planting time. Ideal for home growers)
“Iron Mix”
“Iron Rose Pink”
“Iron Pink”
“Iron White”
“Stox Champagne”
“StoX Rose”…
Stock "StoX Champagne"

Stock "Iron Mix"
HOW TO SOW
Stock is easy to start from seed. The trick is to remember to start the seeds early enough in the season!
Transplants or Direct Sow?
Start seeds as transplants about 8-10 weeks before your Average Last Spring Frost. Do not direct sow.
Sow 2 seeds per cell. Stock doesn’t mind growing with a buddy. Germination should take about 10-14 days.
Plant out the seedlings when they are about 4-6 weeks old. It should be cool (about a month before your Average Last Spring Frost), as they require about 2-3 weeks of temperatures between 40-55F to promote flowering. They are frost tolerant, but if it gets well below freezing the plants may need to be covered with a sheet at night.
Since Stock is a one-and-done plant, you may want to plant 2-3 successions about 2 weeks apart. However, remember that planting them too late in the season will often fail because of excessive heat.
If you have a long, cool spring, you may be able to squeeze in 3 successions. But if your weather goes from freezing to broiling (like ours does in Michigan!), you may only get one planting.

Stock seedlings ready for transplant
PLANT SPACING
Stock can (and should!) be spaced close together. We plant 2 seedings in the same planting hole, every 6 inches. This year, I’m going to try 4 inches because even at 6 inches, there is wasted space.

Stock "Iron Mix"
GROWING ON
Stock likes to grow in well-composted, fertile growing beds. Fertilizing is minimal since it’s a one-and-done plant.
Netting or support can be helpful but not completely necessary.
Pinching is NOT recommended for Stock, unless you are growing a variety that is listed as “branching” or “spray-type”, such as “Quartet”.

Stock "Iron Mix"
STAGE OF HARVEST
Harvest the stems when about ⅓ of the blooms are open. The other blooms will open up slowly in the vase. Strip the leaves from the stem to make sure there are no leaves in the bucket or vase that could rot (remember that they are related to broccoli and cabbage… and you know what rotting broccoli and cabbage smell like!)

Stock "Anytime Mix" (Unheated hoophouse grown on the left, field grown on the right)
POST-HARVEST CARE
Besides frequent water changes, Stock requires no other special post-harvest care.

Stock "Anytime Mix" blooming in August!
QUESTIONS?
Ask them here and I’ll get back to you!
Ready for more?
If you’re serious about growing the garden of your dreams this year, register for my online course, “Backyard Cutting Garden 101”. You’ll find everything you need to plan, grow, harvest and arrange your stunning blooms. I can’t WAIT to help you grow! Click on the button below for all the details.

Winter Solstice
On December 21, we celebrate the power of light over darkness… and prepare our hearts for the miracle of Christmas.
Winter Solstice
December 21 marks the Winter Solstice… and the First Official Day of Winter.
In case you are unfamiliar with the term Winter Solstice, it is the time of year with the shortest amount of daylight and the longest night of the year - 9 hours of sun and 15 hours of darkness (except those of us in Michigan know the days feel even shorter than that because the sun rarely shines in Michigan in the winter!).
It’s opposite is the Summer Solstice (the First Official Day of Summer), which occurs on June 21, exactly 6 months apart. On this day, we observe the longest amount of daylight and the shortest night of the year - 15 hours of sun and 9 hours of darkness.

Before I became a farmer, these 2 dates held no significance for me. Sure, I knew the days were longer in the summer and shorter in the winter, but I never paid close attention to the patterns.
Now… my life and livelihood revolve around these days. My year is planned according to daylight hours and the changing of the seasons.
Once I started to pay attention I was surprised to discover that lots of living things are daylight length sensitive…
Plants. Did you know that plants need a certain amount of light/darkness on order in bloom? Poinsettias, for example, need short days/long nights… hence their popularity during the winter.
Animals. Did you know birds only lay eggs when the daylight hours are long enough? Hence the reason chickens don’t lay eggs (or slow down) in the winter. It’s really starting to cramp my style because I want to make lots of Grandma Hamm’s Peanut Butter Cookies!
People. Did you know that SAD (Seasonal Affective Disorder), a type of depression that afflicts many people in northern climates in the winter, is related to lack of light? Yup. I’m one of them.
Many people feel a sense of melancholy, discomfort, restlessness… or maybe even fear during the dark days of the winter.
Gayle Boss, a Grand Rapids, MI based author, describes this haunting feeling powerfully in her Advent book, “All Creation Waits: The Advent Mystery of New Beginnings”.
![20171103_093141[1].jpg](https://images.squarespace-cdn.com/content/v1/582b872529687fd6acb7423d/1544632180242-QP2TIB6ISI1GYD3YBOPA/20171103_093141%5B1%5D.jpg)
According to Boss, those feeling stem back to the days of the early agricultural peoples. In the not so distant past, nearly everyone was intimately connected to the earth and it’s rhythms. Completely and totally dependent on the growing season and the harvest.
After the big fall harvest, it was time to relax and celebrate… but as the days became shorter and the darkness more prevalent, that ancient fear of darkness and death began to creep.
“In December the dark and cold deepen, and our rational minds dismiss it as nothing. We know that on December 21, the winter solstice, the sun will begin it’s return to our sky. But our animal bodies react with dis-ease. We feel, The light - life- is going. Those particularly afflicted know themselves as SAD - Seasonal Affective Disorder - suffers. Some of us cope by seizing distractions the marketplace gleefully offers: shopping, parties and more shopping....
...for us also, as for our ancestors, the dark end of the year brings unrest. It is an end. It comes without our asking and makes plain how little of life’s course we control. The uncertainty, we don’t know how to mark. And so it marks us. We feel weighted, gloomy even, and we feel guilty because voices everywhere in myriad ways sing our “It’s the Most Wonderful Time of the Year.””

I have felt this “dis-ease” that Gayle talks about, the guilt of feeling quiet, inward and reserved when the rest of the world seems to be pressing outward - embracing loud music, glitter, and non-stop parties.
I’ve learned to accept my dis-ease and make space to lean into it.
All through Advent, I have a ritual of turning on lights in our windows at dusk, while saying a short prayer “Come, oh come, Immanuel. Push back the darkness.”
It’s a small assurance to me that the days WILL get longer, that He will come to push back the darkness, figuratively… and one day, literally.
But… this IS the season of celebration, after all! As we inch closer to Christmas, my heart begins to lighten.
On the Winter Solstice, December 21, I like to fill my house with people I love and all things warm, cozy and comforting, as we celebrate the day when the darkness no longer reigns… the day that we start moving toward the light.
During our Winter Solstice party, we illuminate the house with only candles and Christmas lights. We serve heavy, warm comfort foods. We feast, we drink, we share warmth, we share light, we share laughs, we share hope for the future.

It’s our way of celebrating that the darkness no longer has power over the light. That even when the darkness seems to be overwhelming, we trust that brighter days are coming.
What a powerful way to prepare our hearts for the Celebration of the Birth of Immanuel, “God with Us”. The solstice fills us with hope, excitement and anticipation.
On the Winter Solstice, we will fill our home with light, love and laughter. We celebrate the power of light over darkness. We rejoice in hope, even when the darkness presses in all around us.
“The people walking in darkness have seen a great light;
on those living in the land of deep darkness a light has dawned.”
- Isaiah 9:2

P.S. If you don’t have a copy of Gayle’s book, I highly recommend it. Each day is a short reading to prepare for Advent. It’s written for adults, but appropriate for children and families too. In fact, the book is based on Advent reading Gayle wrote for her own children.
I think you’ll love it as much as I do.
![20181205_122107[1].jpg](https://images.squarespace-cdn.com/content/v1/582b872529687fd6acb7423d/1544632147946-HBYM8RBLF507QW5O0GNK/20181205_122107%5B1%5D.jpg)