
How to Grow: Poppies
How to Grow: Poppies
Poppies might be the most swoon-worthy flower ever. Their delicate blooms unfurl each morning and bring delight to all who encounter them.
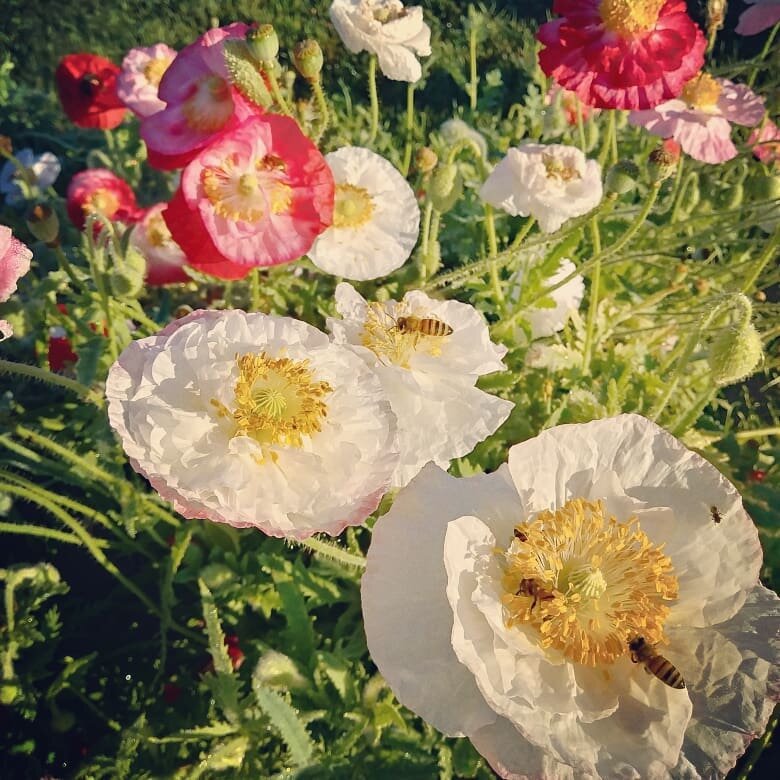
Pollinators also love poppies. In the morning, I like to sneak out to the garden right before sunrise and wait by the poppy patch. As the sun peeks over the horizon, the flowers pop out of their casings and the honeybees begin to crawl all over the blooms. It’s humbling, fascinating and quite possibly the best way to start the day.
Most Poppies are easy to grow and I think everyone should try growing a few.
But let’s get this out in the open: Most types of poppies are NOT good cut flowers. At best, they will last 2 days in the vase… but they are so beautiful, I don’t care!
Let’s look at the Pros and Cons of growing Poppies for cut flower use.
PROS
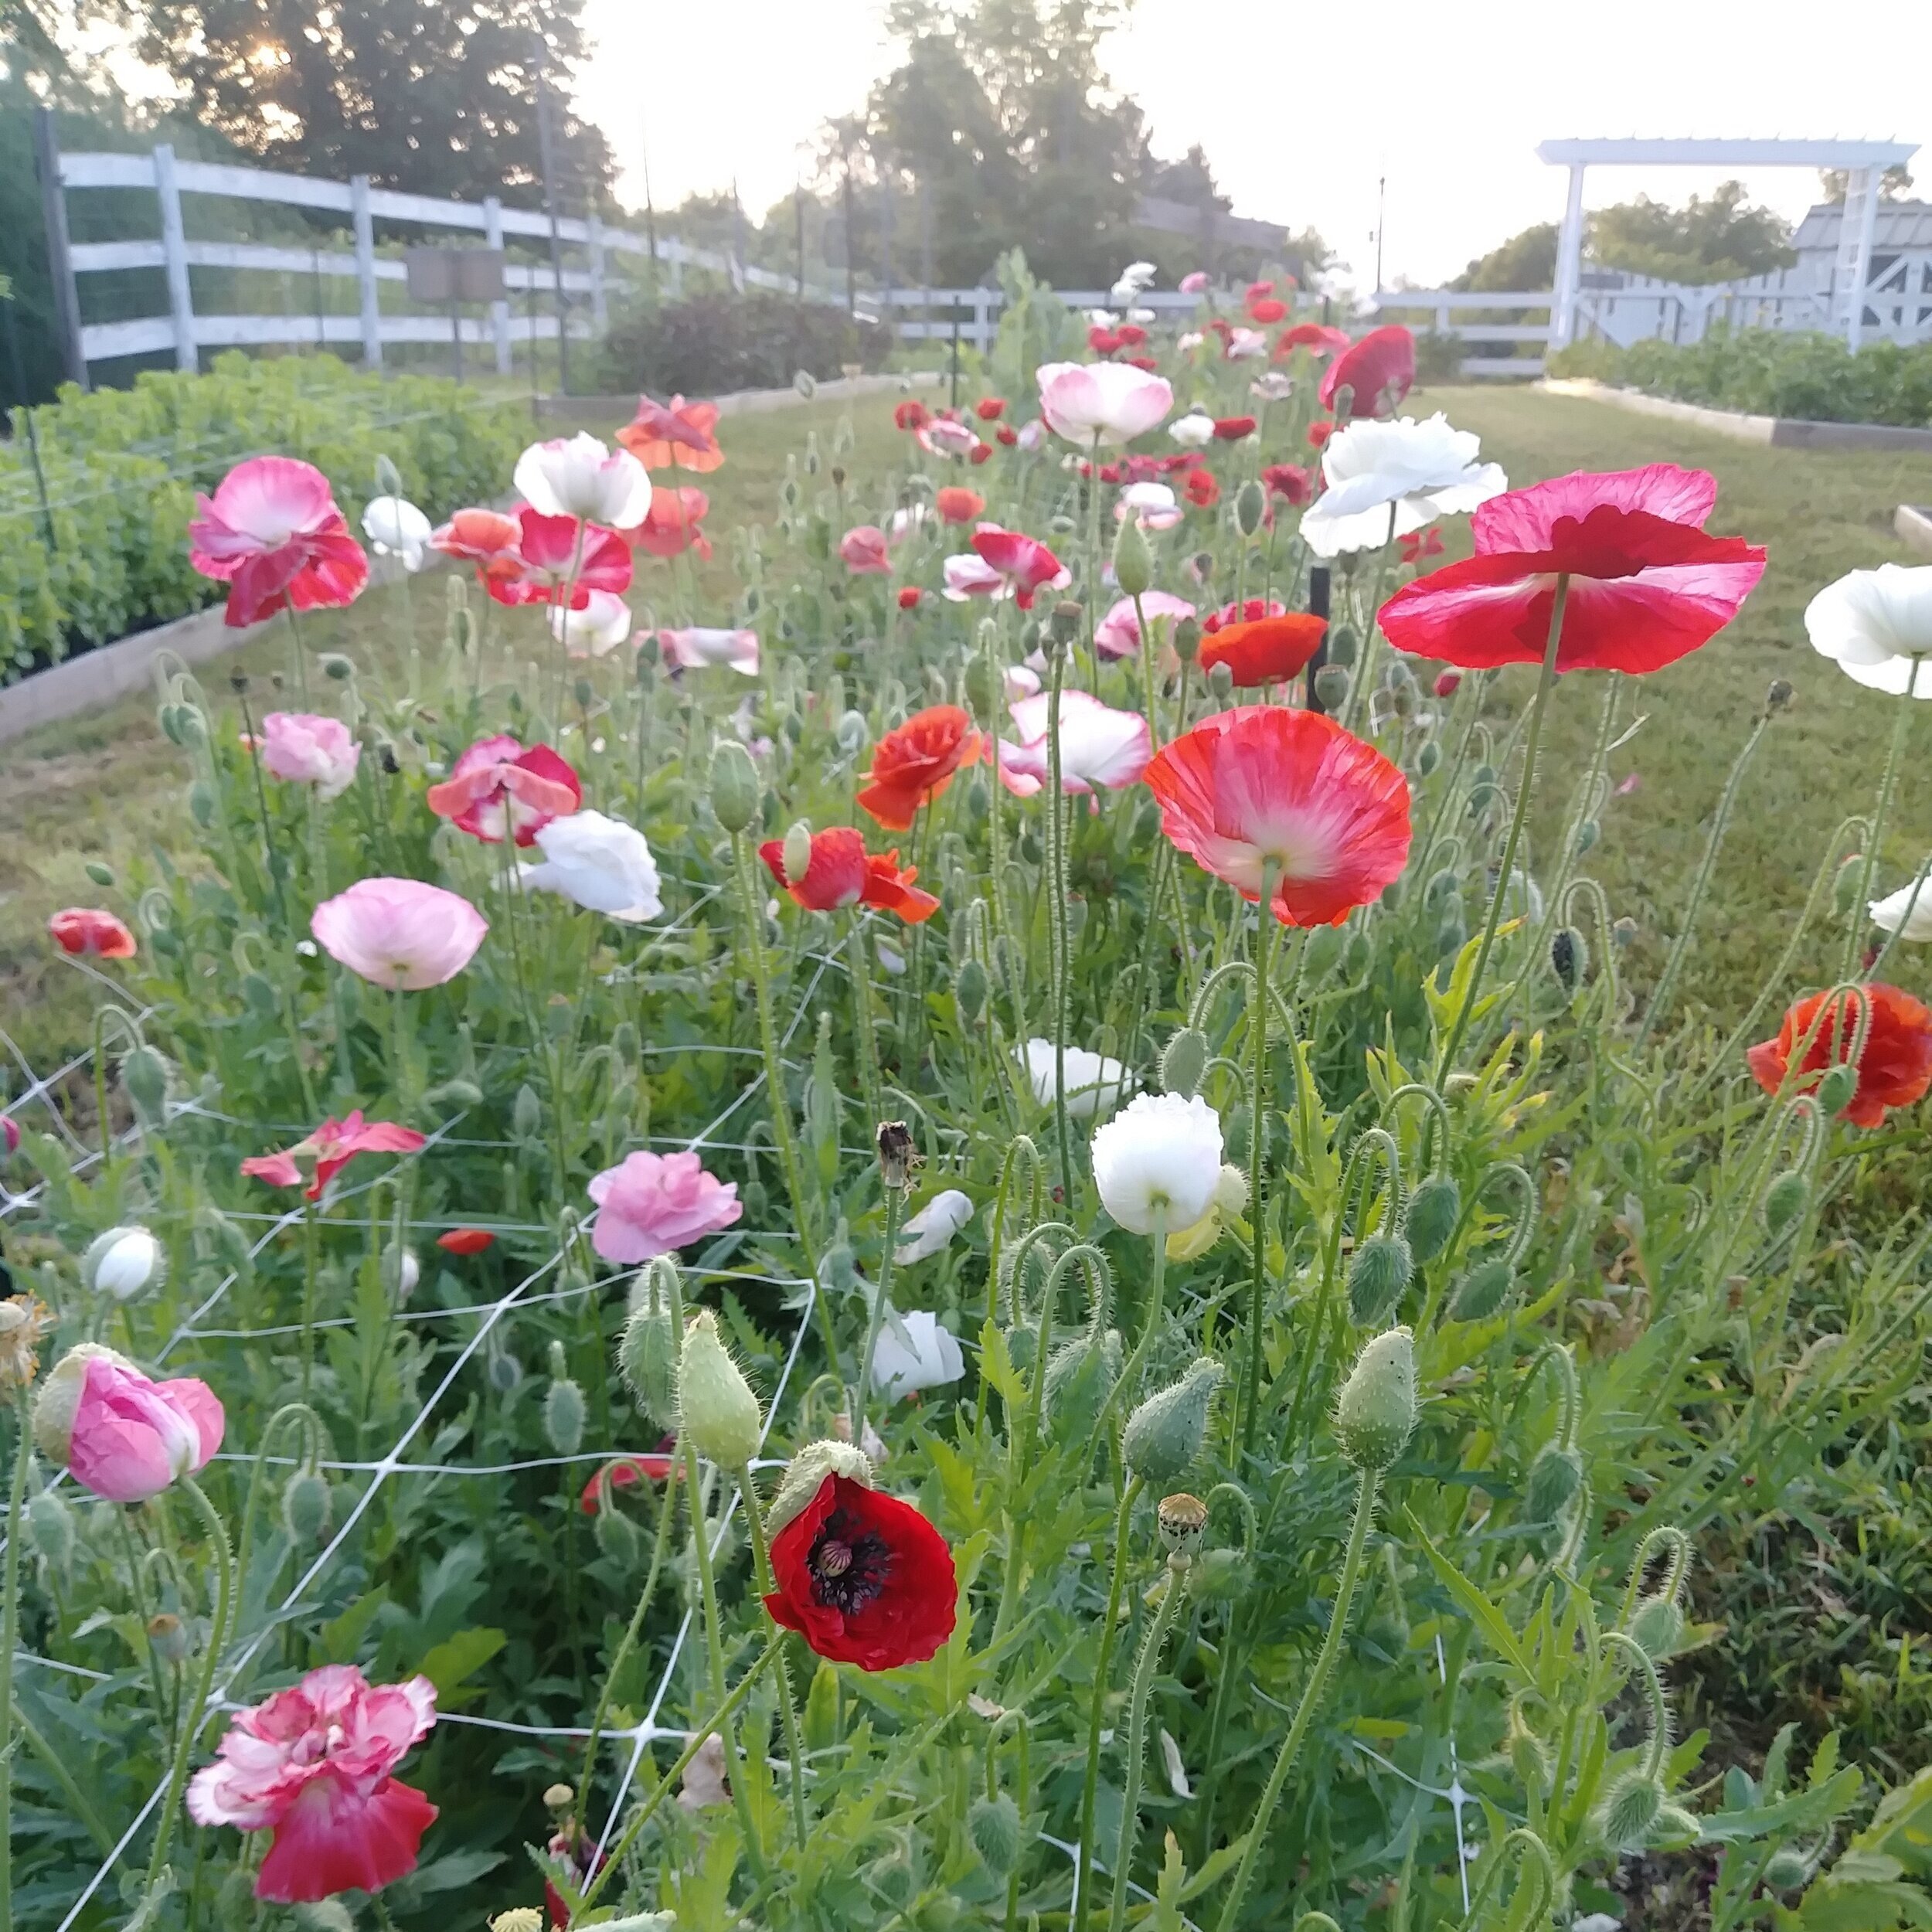
They come in a multitude of colors.
They are fairly easy to grow (most types).
They are loved by pollinators.
CONS
They prefer cool weather (days below 60 degrees Fahrenheit) and can be difficult to grow in climates with big temperature swings.
They stop blooming in hot summers.
They can be tricky to start from seed (I’m looking at you, Iceland Poppies!).
They are not long lasting.
They need to be harvested at precisely the right time and it can be difficult to do this.
They need special post-harvest treatment to prolong vase life (Iceland Poppies).
CHOOSING SEEDS
As I mentioned above, most poppies are not a good cut flower. However, they are so irresistible that people insist on cutting them anyway.
It’s helpful to think of Poppies as an “Event” flower, not a “Bouquet” flower. They are perfect for an event, like a dinner party or wedding, where they only need to last a day or two. They are not generally not a good choice for a bouquet intended for display for a week or more.
Poppies are divided into 4 main categories:
1. Shirley Poppies (Papaver rhoeas): Also called Field Poppy, Corn Poppy or Common Poppy. Grown as an Annual. These are easy to grow, but not long lasting. Expect about 2-3 days maximum. 1 day is more realistic.

“Shirley Double” Poppy
2. Breadseed Poppies (Papaver somniferum): Grown as an annual. These are mainly grown for their interesting seed pods, not as a cut flower. Allow the flower to bloom and die, then harvest the pods for dried arrangements.

“Peony Double” Breadseed Poppy
3. Oriental Poppies (Papaver orientale): A perennial type of poppy that is popular for landscape use. Usually not used as a cut flower, but also has interesting pods.
4. Iceland Poppies (Pavaver nudicaule): The best type of poppy for cut flower use. Technically a perennial, but short lived and doesn’t like heat, so it’s usually grown as an annual or biennial. Of all the poppies, Iceland Poppies have the longest vase life of about 5 days if harvested at the correct stage and treated to prolong vase life (more about that later).

“Nudicaule Blend” Iceland Poppy
In my experience, Iceland Poppies are more temperamental to start from seed than other poppies. If you are a beginner, I recommend sticking to Shirley Poppies and Breadseed Poppies until your skill level increases.
Here are a few of my favorite Poppies to grow for cut flower use:
“Shirley Double” (Shirley)
“Angel’s Choir” (Shirley)
“Falling in Love” (Shirley)
“Mother of Pearl” (Shirley)
“Pandora” (Shirley)
“Peony Double” (Breadseed)
“Lauren’s Grape” (Breadseed)
“Champagne Bubbles” (Iceland)
“Nudicaule Blend” (Iceland)
HOW TO SOW
There are few flowers that seem to respond best to the S.T.U.N. growing technique.
S.T.U.N. stands for “Sheer, Total, Utter Neglect”. Ha! Poppies tend to fall into this category.
I swear, the harder you try to grow them, the worse they do. But toss the seeds in the air out of frustration and they will take off like crazy! Seems like don’t like to be fussed with.
Poppies are a great candidate for the “hands off” growing method of Winter Sowing. I’ve had much success with growing Poppies this way. You can find out more about it HERE.

Transplants or Direct Sow?
Poppies are not a big fan of being transplanted and prefer to be direct sown.
However, they can be grown as transplants. If you are growing them as transplants in trays, be sure to “bottom water” the tray by setting it in a pan of water. Overhead watering can wash away the tiny seeds.
They may be slow growing, especially Iceland Poppies, so be patient.
You can plant them using the “toothpick method” (pour seeds into a bowl/jar, lick the toothpick and dip it into the seeds. Transfer seeds to your prepared trays) or you can evenly sprinkle the seeds over the tray.

Direct Sowing is the easiest method. The seeds are tiny, so just stand over the spot you want them to grow and sprinkle them like fairy dust.
Where you live determines how you direct sow poppies. If you live in Zone 6 or warmer, you might have the best luck preparing your growing area in the fall and sprinkling the seeds. They will lay dormant over the winter and germinate in the early spring.
If you live in Zone 5 or colder, you can sprinkle the seeds in the soil as soon as it’s thawed out in the spring (March, for most of us). They can handle frost and even some snow.
PLANT SPACING
Poppies can be spaced at 6” or less.
Obviously, when you sprinkle seeds over an area, it’s difficult to control the spacing. I’ve found my Poppies don’t seem to mind VERY crowded conditions and don’t bother thinning them out.

GROWING ON
If flowers are harvested and spent blooms are “deadheaded” (removed), the plants will continue to bloom until it gets too hot (mid July, around here). Of course, you can always leave them and allow the seed heads to form.
STAGE OF HARVEST
For the longest lasting blooms, Poppies need to be harvested at the correct stage. They move from “not quite ready” to “too late!” very quickly… and by quickly, I mean minutes, not hours!
Poppies should be harvested at the “cracked bud” stage. This is right before the flowers “pop” out of their casings. You’ll be able to see the color of the bloom through the crack in the casing.
The bloom will open up in the vase and you’ll get the longest vase life possible this way.
As soon as they pop out of their casing, Poppies are covered in pollinators…. And unfortunately, once they have been pollinated, they are basically useless as a cut flower. If the Poppy is fully open, don’t bother harvesting it. Leave it for the bees instead.
Be sure to cut deeply right into the base of the plant. Deep cuts signal the plants to produce MORE flowers to replace the one you just cut.

POST HARVEST CARE
Immediately after harvest, sear the stem ends of the poppies. The stem ends drip sap. Searing seals them and makes them last longer in the vase. You sear them out in the field as you harvest or do it as soon as you get back to your house.
You can do this with:
Boiling Water: Bring water to boil and dip stem ends in the water for about 10 seconds.
Flame: Use your gas stove, a lighter or a propane torch (the most fun! Ha!) to burn the stem ends for about 10 seconds.
After searing, place in cool water and keep them in a cool, dark place until ready to arrange.
QUESTIONS?
Ask them here and I’ll get back to you!
Ready for more?
If you’re serious about growing the garden of your dreams this year, register for my online course, “Backyard Cutting Garden 101”. You’ll find everything you need to plan, grow, harvest and arrange your stunning blooms. I can’t WAIT to help you grow! Click on the button below for all the details.