

How to Grow: Ageratum
How to Grow: Ageratum
Pronunciation: ah-jer-rah-tm
Ageratum is a wonderful addition to the cutting garden. While it never steals the show like other flowers, I like to think of it as a “supporting character”. It’s reliable, dependable and always shows up when you need it.
The blooms are cheery, adorable and delightful in bouquets. With multiple blooms per stem, they quickly add mass, texture and visual interest to your arrangements.

Ageratum "Timeless Mix"
Many varieties of Ageratum are bred as short “bedding plants” used in landscaping. You’ll want to avoid these varieties for the cutting garden and choose varieties bred for cut flower use instead (varieties that grow at least 24 inches tall).
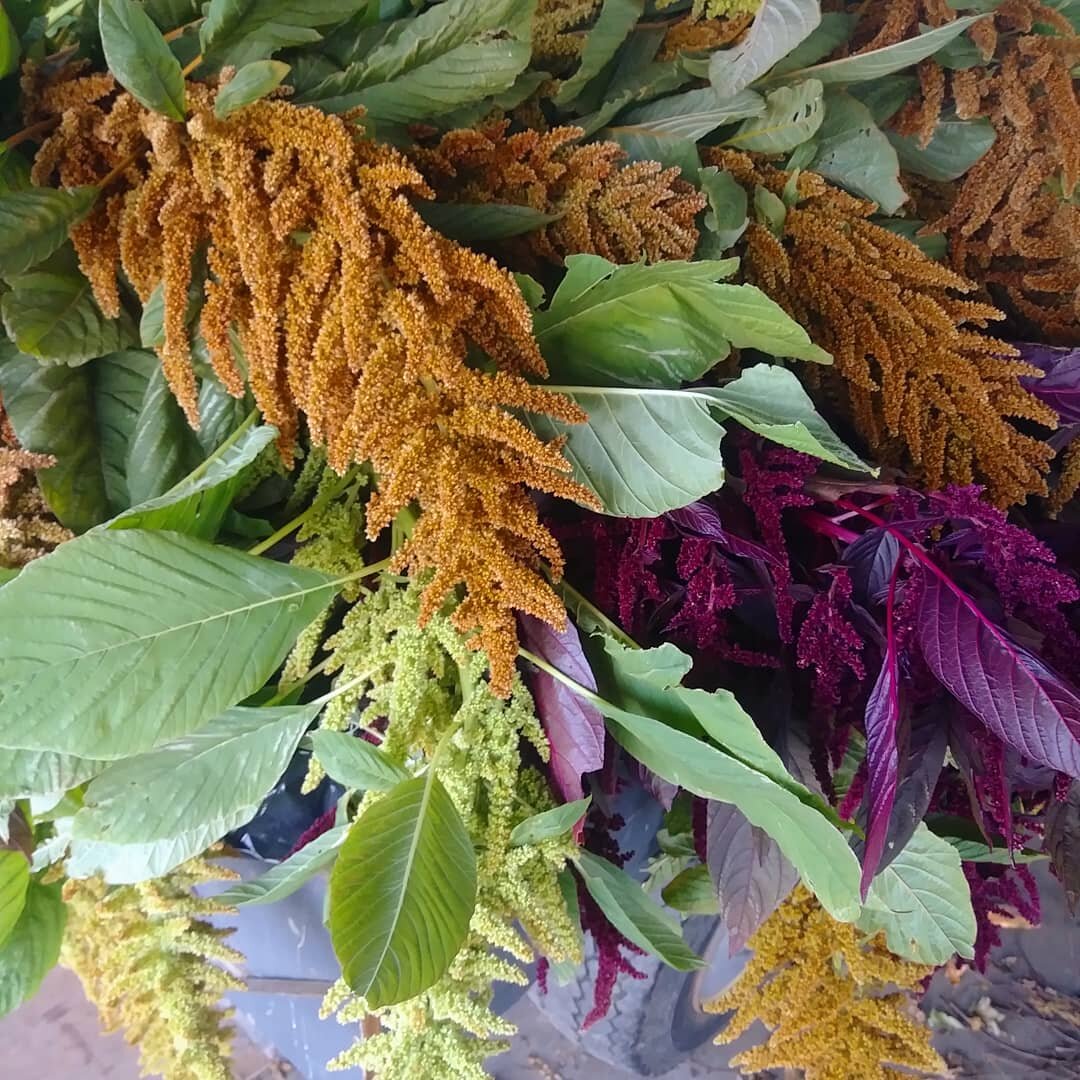
A few years ago, I heard another flower farmer mention she grows Ageratum almost exclusively for its beautiful, prolific foliage.

Ageratum Foliage
In the photo below, you can see that we used Ageratum foliage as our primary foliage for these beautiful bouquets!

Ageratum foliage used as our primary foliage in these beautiful bouquets!
If you’ve ever grown a cutting garden, you know that finding good Annual type foliage sources is quite difficult! Lack of good foliage options seems to be a nearly universal problem for cut flower growers. Ageratum is a perfect solution to this problem. The more you harvest from the plants, the more they will grow.
Since Ageratum is a “dual-purpose” plant (flowers AND foliage), it earns a place of honor in every cutting garden.
Ageratum is sometimes called “Floss Flower”, which I assume refers to the fact that the flowers are thread-like and resemble embroidery floss… but I could be wrong. ;)
Let’s look at the Pros and Cons of growing Ageratum for cut flower use.
PROS
They are easy to grow from seed. In fact, Ageratum self-sows so well on my farm that I don’t even sow seeds in trays anymore. I simply go look for “volunteer” seedlings coming up each spring, dig them up and transplant them where I want them.
They are one of the best cut-and-come-again plants that will continue blooming for a long period of time if harvested regularly. The more you harvest, the more they will keep growing flowers and foliage.
They are very heat tolerant and perform well in hot climates.
They add wonderful texture and interest to bouquets.
They are easy to harvest and long-lasting in the vase.
They have little to no pest or disease issues. If you’re looking for a carefree, no-fuss flower, Ageratum fits the bill!
CONS
They come in a limited color palette (mostly cool colors such as white, purple, blue, violet and pink).
They will stop producing flowers if you stop harvesting them (which is true for most cut flowers).
They are not the most exciting flower. If your space is very limited, you may want to choose a flower with impact.
CHOOSING SEEDS
Here are a few of my favorite Ageratum to grow for cut flower use:
“Tall Blue Planet”
‘White Bouquet” (particularly useful as a white flower. White goes with everything!)
HOW TO SOW
Ageratum is a heat-loving, summer-blooming flower. It’s best to plant them outdoors after the threat of frost has passed.
Transplants or Direct Sow?
Ageratum can be started in seed trays and transplanted or direct sown in late spring. Transplanting is the preferred method, as the seeds are very tiny and difficult to direct sow.

Sow seeds in trays about 6-8 weeks before your Average Last Spring Frost Date. Keep them in a warm place while they are growing.
Transplant the seedlings outdoors after your Average Last Spring Frost Date.
Seeds are tiny and I recommend sowing them using the “toothpick method.” Pour the seeds into a container, lick the end of a toothpick and use the toothpick to remove seeds one at a time. Sow 1-2 seeds per cell. Barely over the seeds with a sprinkle of potting soil or vermiculite.
Like many Annuals, I recommend sowing 2-3 successions of Ageratum, 2-3 weeks apart to ensure you have a steady supply of blooms over the season.
PLANT SPACING
Grow Ageratum at 9-12 inch spacing for best results.

GROWING ON
Ageratum is quite carefree and easy to grow. Like most cut flowers, they appreciate consistent feeding and watering.
Plants should be netted or supported to prevent them from falling over.
Pinching is not required but can be useful as it causes the plants to branch more abundantly. I usually pinch half of the plants and leave the other plants as is. This helps to stagger the blooming time, so I don’t have all the plants in bloom at the same time.
STAGE OF HARVEST
Harvest when the flowers are ¾ of the way open, not in “bud” form. Be sure to cut low into the plant to encourage future growth.
If harvesting for foliage, cut stems before the flower buds form. Cut deep into the plant to encourage branching and more growth.

POST-HARVEST CARE
Ageratum does not require any special post-harvest care.
Like most cut flowers, always harvest in the cool of the day and allow the flowers to rehydrate in water in a cool location overnight before arranging.
QUESTIONS?
Ask them here and I’ll get back to you!
Ready for More?
If you’re serious about growing the garden of your dreams this year, register for my online course, “Backyard Cutting Garden 101”. You’ll find everything you need to plan, grow, harvest and arrange your stunning blooms. I can’t WAIT to help you grow! Click on the button below for all the details.

How to Grow: Amaranth
How to Grow: Amaranth
Pronunciation: am-ah-ranth
Amaranth is a beautiful and unique flower to add to your cutting garden. Their velvety flowers are elegant looking in the vase and add some real drama to your cut flower arrangements.
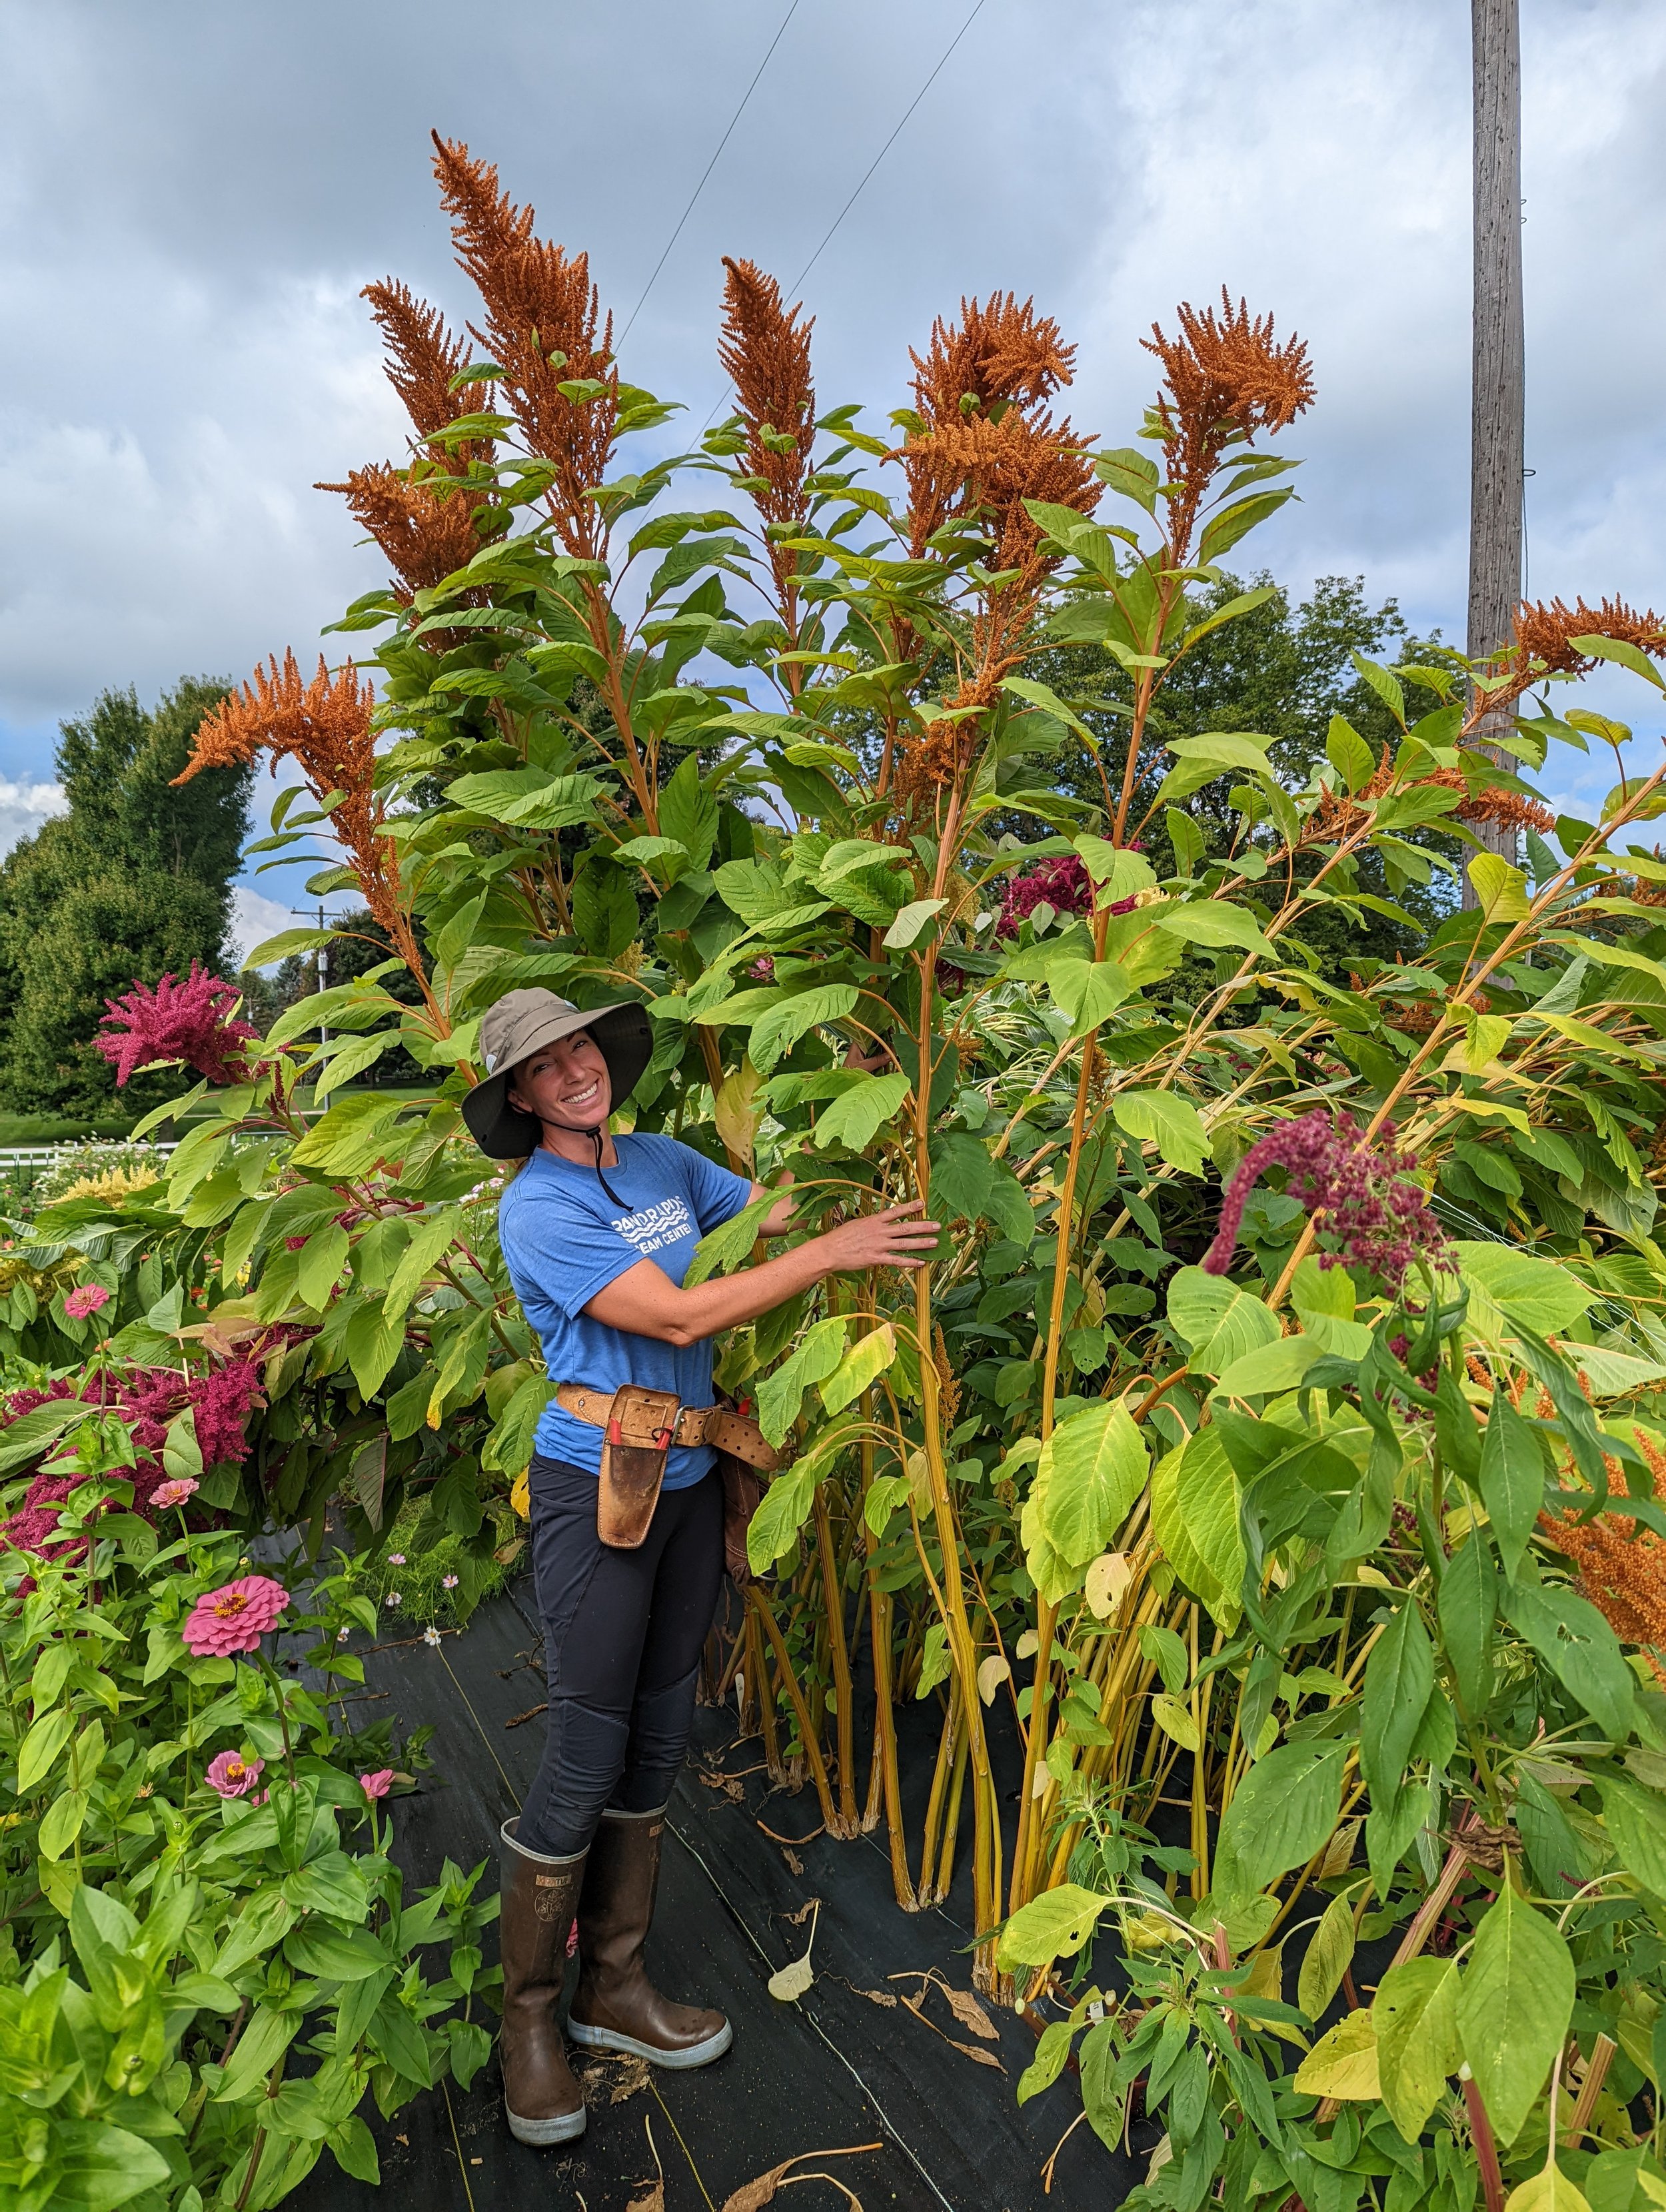
It’s also fun and easy to grow. Amaranth plants can tower in the garden and some even make great ornamental plants, if you decide you’d rather enjoy them in the garden rather than the vase.

“Coral Fountain” Amaranth
Another bonus of Amaranth is it makes a great dried flower. I dried Amaranth two seasons ago for fall decor arrangements and it still looks great!
You may have heard of Amaranth before or even seen it’s seeds in the grocery store! Yes, there are several different species of Amaranth and they can be used for food, foliage or flowers. Amaranth seeds are tiny and often cooked/prepared like quinoa (another “ancient grain” that is popular today).
Let’s look at the Pros and Cons of growing Amaranth for cut flower use.
PROS
They are easy to grow.
They are very unique and fun to look at.
The plants are productive for a long period of time.
They add elegance and drama to arrangements. No other flower has the same draping, trailing quality.
They have a good vase life of 7-10 days, with proper harvest and care.
CONS
They can shed their seeds on your table if harvested too late.
They can sometimes grow so large that they can be unwieldy and difficult to use in arrangements (more about how to prevent that later…).
CHOOSING SEEDS
There are 2 main types of Amaranth grown for cut flower use.
“Spike” type Amaranth has an upright growing habit and the plants produce “spikes” or “plumes” that add height and drama to arrangements.
“Trailing” type Amaranth has a draping growth habit and the plants produce “ropes” that hang and drape in arrangements.
Both types are useful and worth growing. Here are a few of my favorite Amaranth to grow for cut flower use:
“Love-Lies-Bleeding” (trailing)
“Green Cascade” (trailing)
“Red Spike” (spike)
“Hopi Red Dye” (spike)
HOW TO SOW
Amaranth loves heat. They do not like cold temperatures and can’t handle frost, so don’t plant them too early. Don’t worry - they grow quickly when the soil warms up. They will begin to bloom in mid/late July and bloom until the fall frost.
Transplants or Direct Sow?
Amaranth is versatile and can be transplanted or direct sown.
The seeds are tiny, so you may need to use the “toothpick method” for planting seeds. Pour the seeds into a small bowl, wet the toothpick with your tongue, then dip it in the seeds to pick up 1-2 seeds on the toothpick. Transfer seeds to your trays or desired planting spot.
Transplants should be started indoors about 4-6 weeks before the last spring frost. They love heat, so be sure to keep them warm while they are growing indoors.
Direct sowing is another option (my preferred method!), as the plants grow very quickly. Direct sow in warm soil, after the threat of frost is passed. Sprinkle a couple seeds in spots spaced about a foot apart. You can thin the plants later (pluck out the unneeded seedlings).

PLANT SPACING
Amaranth plants can get quite large, so they should be spaced at about 12-15” apart.
GROWING ON
It is wise to provide support or netting to keep the plants from falling over. If you are growing just a few plants, large tomato cages may be sufficient. If you are growing a block or row of them, netting or metal supports would be best (like our “cattle panel supports” featured below).

“Coral Fountain” Amaranth
For best results and more manageable blooms, it’s advisable to “pinch” the plants. If they are not pinched, they tend to grow very large (over 6 foot tall!) and have thick stems that are much too big to use in most floral arrangements (below, you will see an example of Amaranth plants I forgot to pinch! Whoops).
To pinch Amaranth, cut back the center bud/stem when plants are about knee high. This will signal the plant to produce multiple stems that are smaller and easier to use.
If flowers are harvested and spent blooms are “deadheaded” (removed and not allowed to go to seed), the plants will continue to send up blooms until frost arrives.
“Chinese Giant Orange” Amaranth
STAGE OF HARVEST
Amaranth can be harvested after the color forms on the spikes or tassels, when about ¾ of the tiny little flowers are open. The spikes or tassels will continue to grow in size as they mature and they have a long harvest window.
However, be sure to harvest before they are too mature or they will drop their seeds all over your table!

“Fercita” Amaranth
Amaranth can be used fresh in arrangements or you can dry it to be used as an “Everlasting” flower.
To dry, simply place them in a bucket in a warm, dry place out of direct sunlight, and let them drape naturally… or hang them upside down. They should dry in about 2 weeks.

POST HARVEST CARE
After harvesting, remove most of the leaves to help the stems re-hydrate more quickly. This also allows the flowers to be more visible.
Amaranth requires no other special care.
“Coral Fountain” Amaranth in a wedding arrangement
QUESTIONS?
Ask them here and I’ll get back to you!
Ready for More?
If you’re serious about growing the garden of your dreams this year, register for my online course, “Backyard Cutting Garden 101”. You’ll find everything you need to plan, grow, harvest and arrange your stunning blooms. I can’t WAIT to help you grow! Click on the button below for all the details.

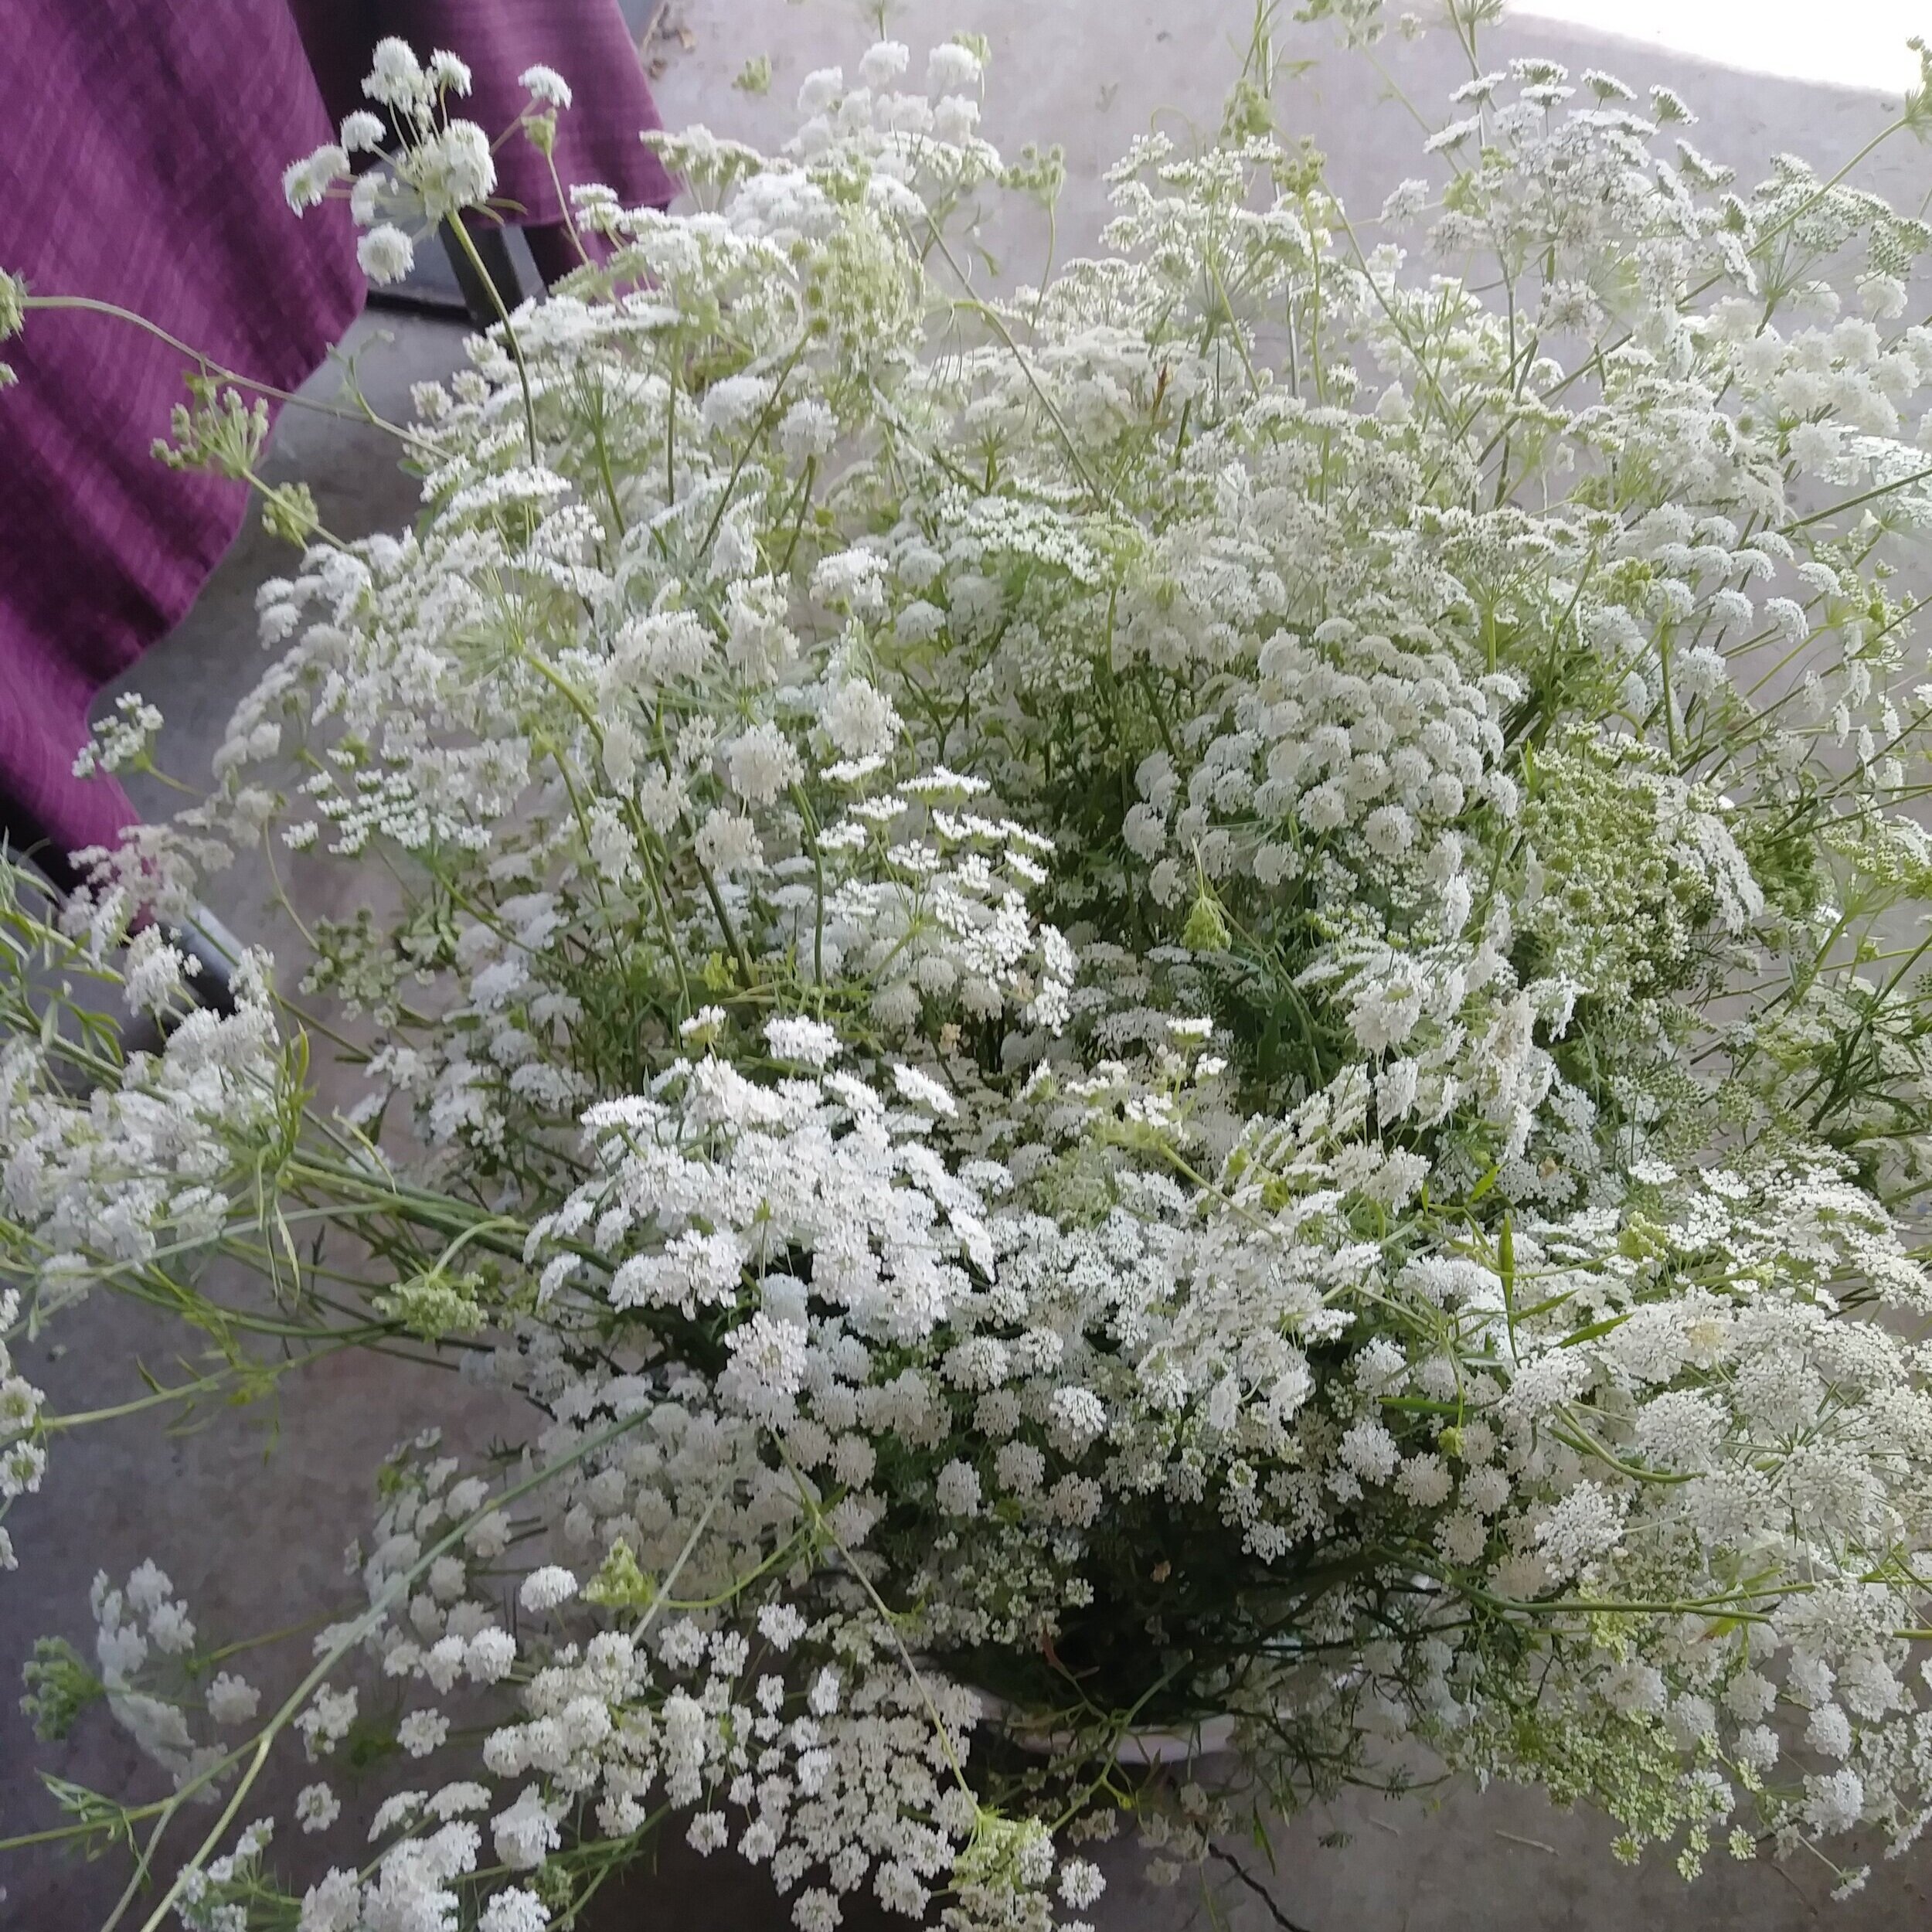
How to Grow: Ammi (False Queen Anne's Lace)
The perfect filler for all your arrangements!
How to Grow: Ammi (False Queen Anne’s Lace)
Pronunciation: am-ee
One of the biggest “newbie” flower gardening mistakes I see is not growing enough “filler” type flowers for bouquets.
I know, I know… it’s easy to get starry eyed over all those big blooming “focal” flowers, like Sunflowers, Zinnias and Dahlias… but a bouquet made with only big focal flowers can easily look a tad gaudy and overpowering.
In order to have well balanced bouquets and arrangements with visual interest, it’s important to grow some flowers whose soul purpose is to complement and enhance the focal flowers.
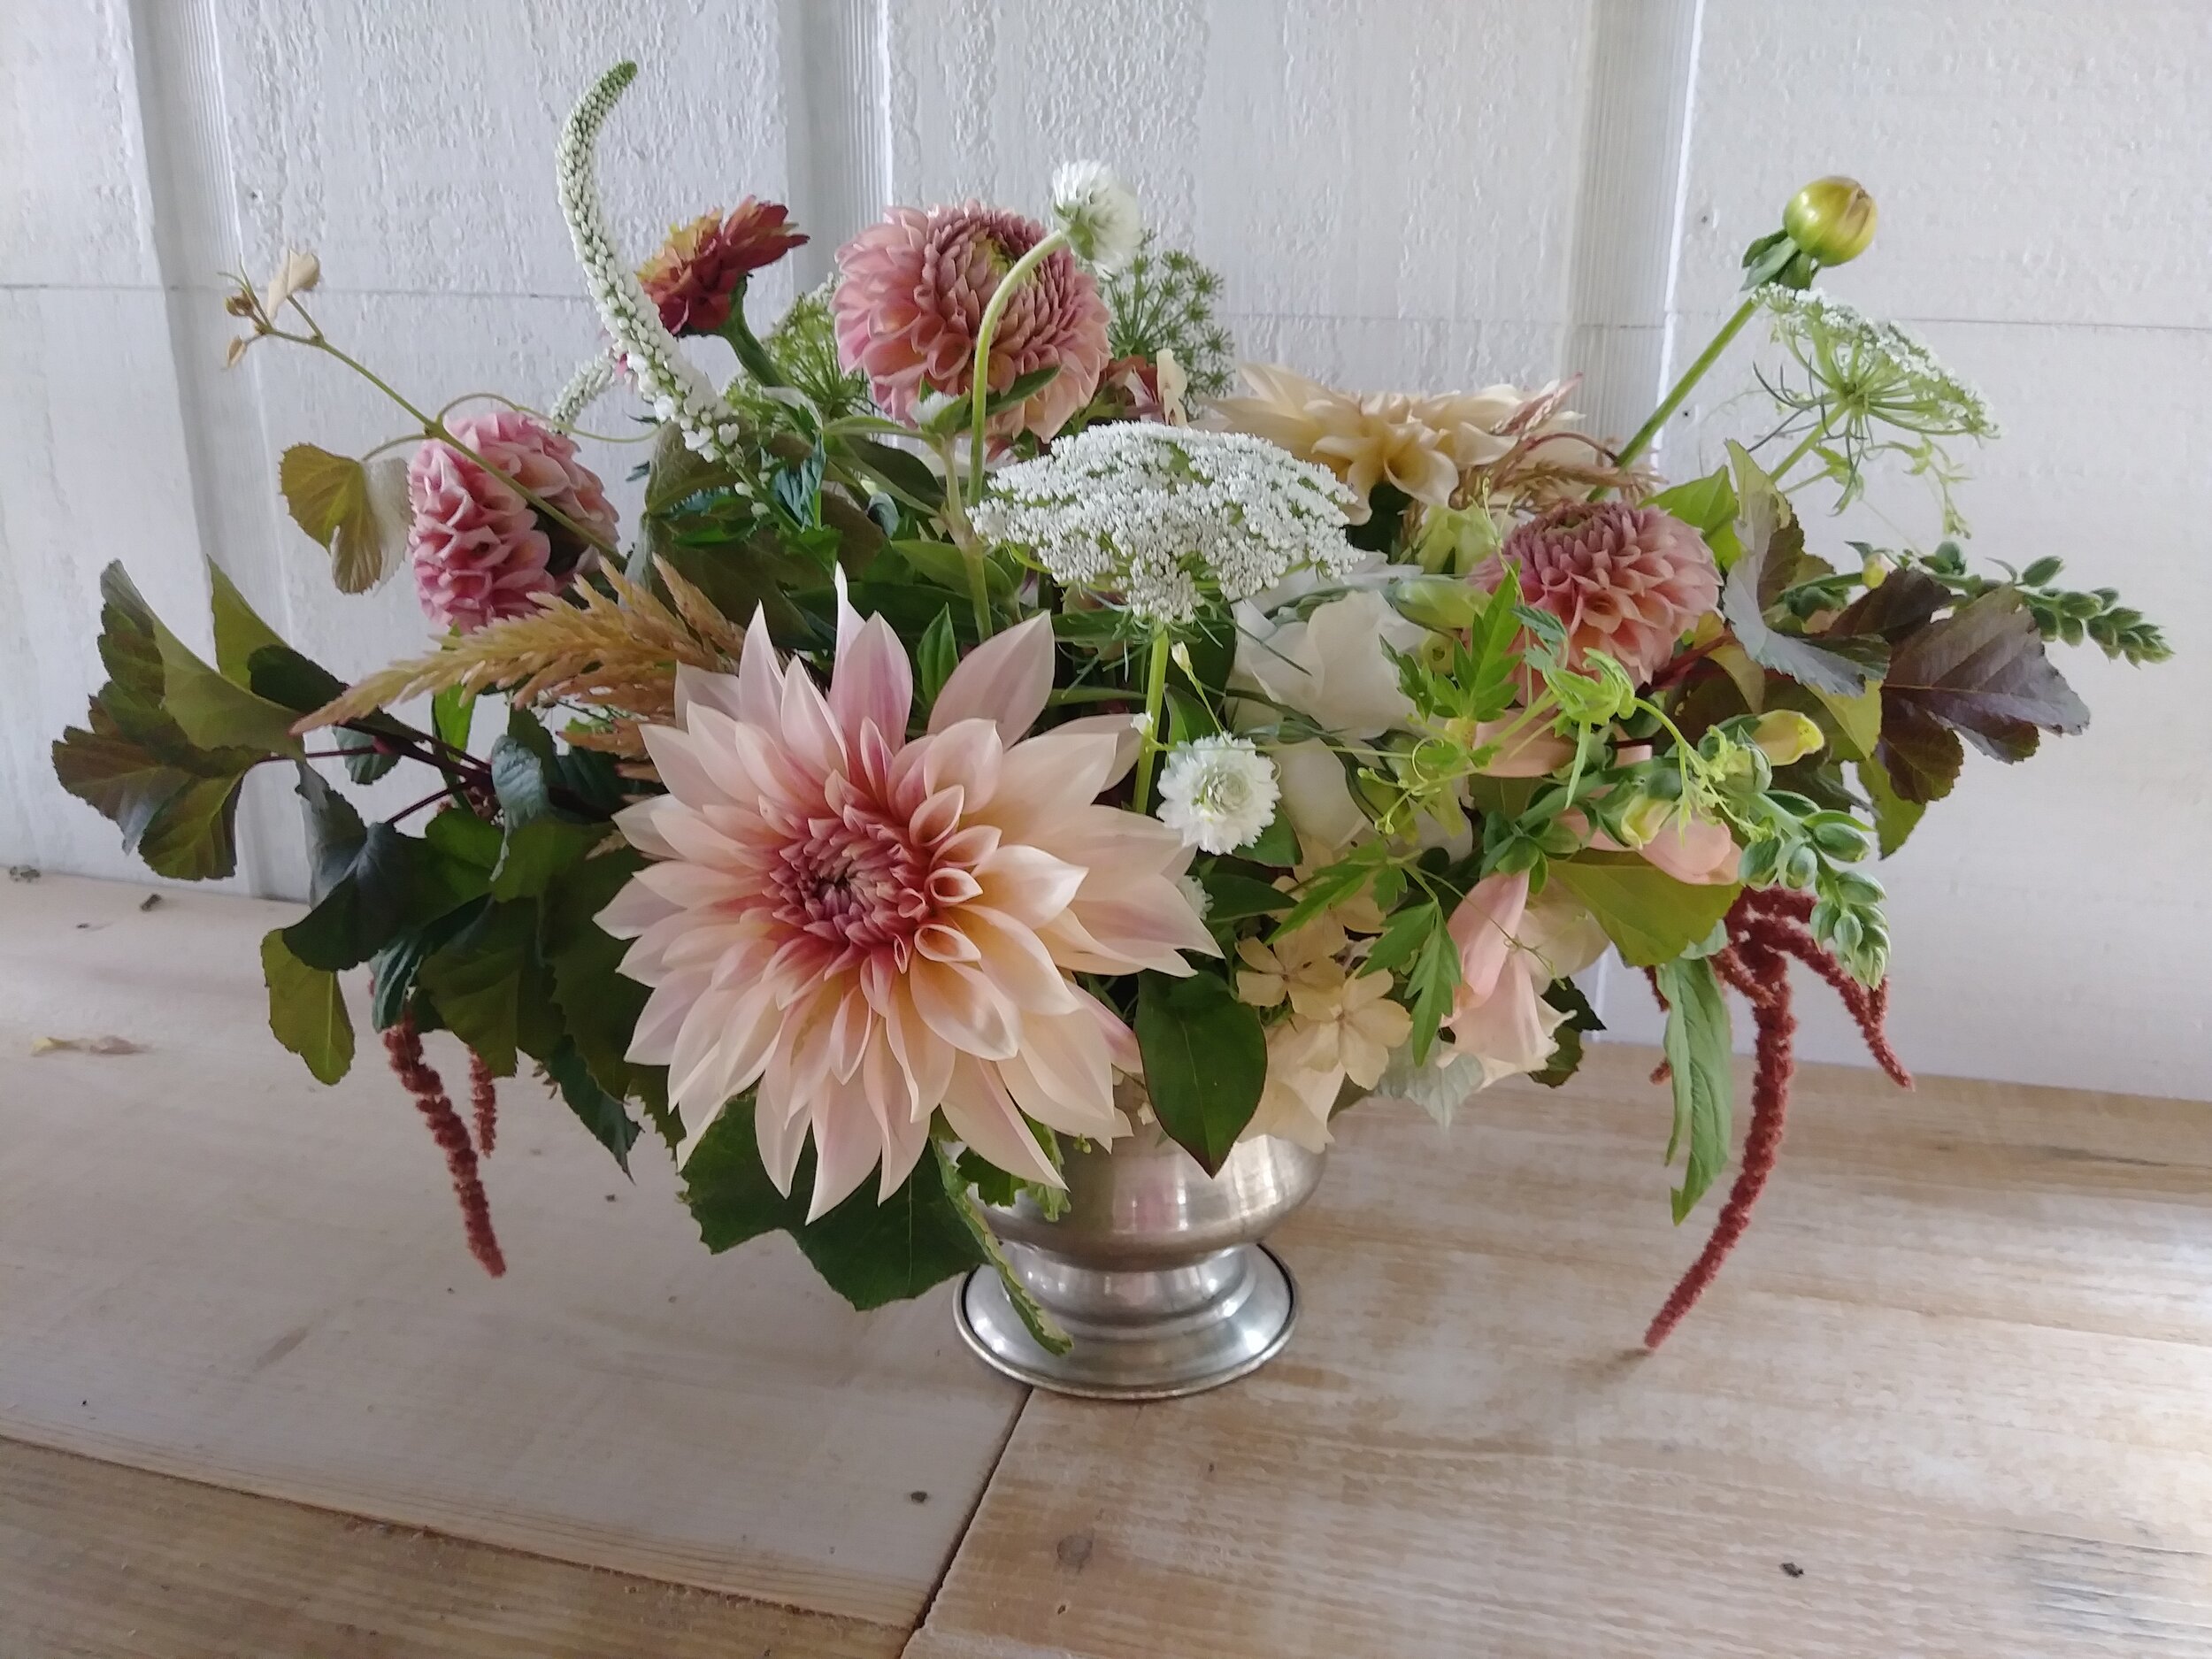
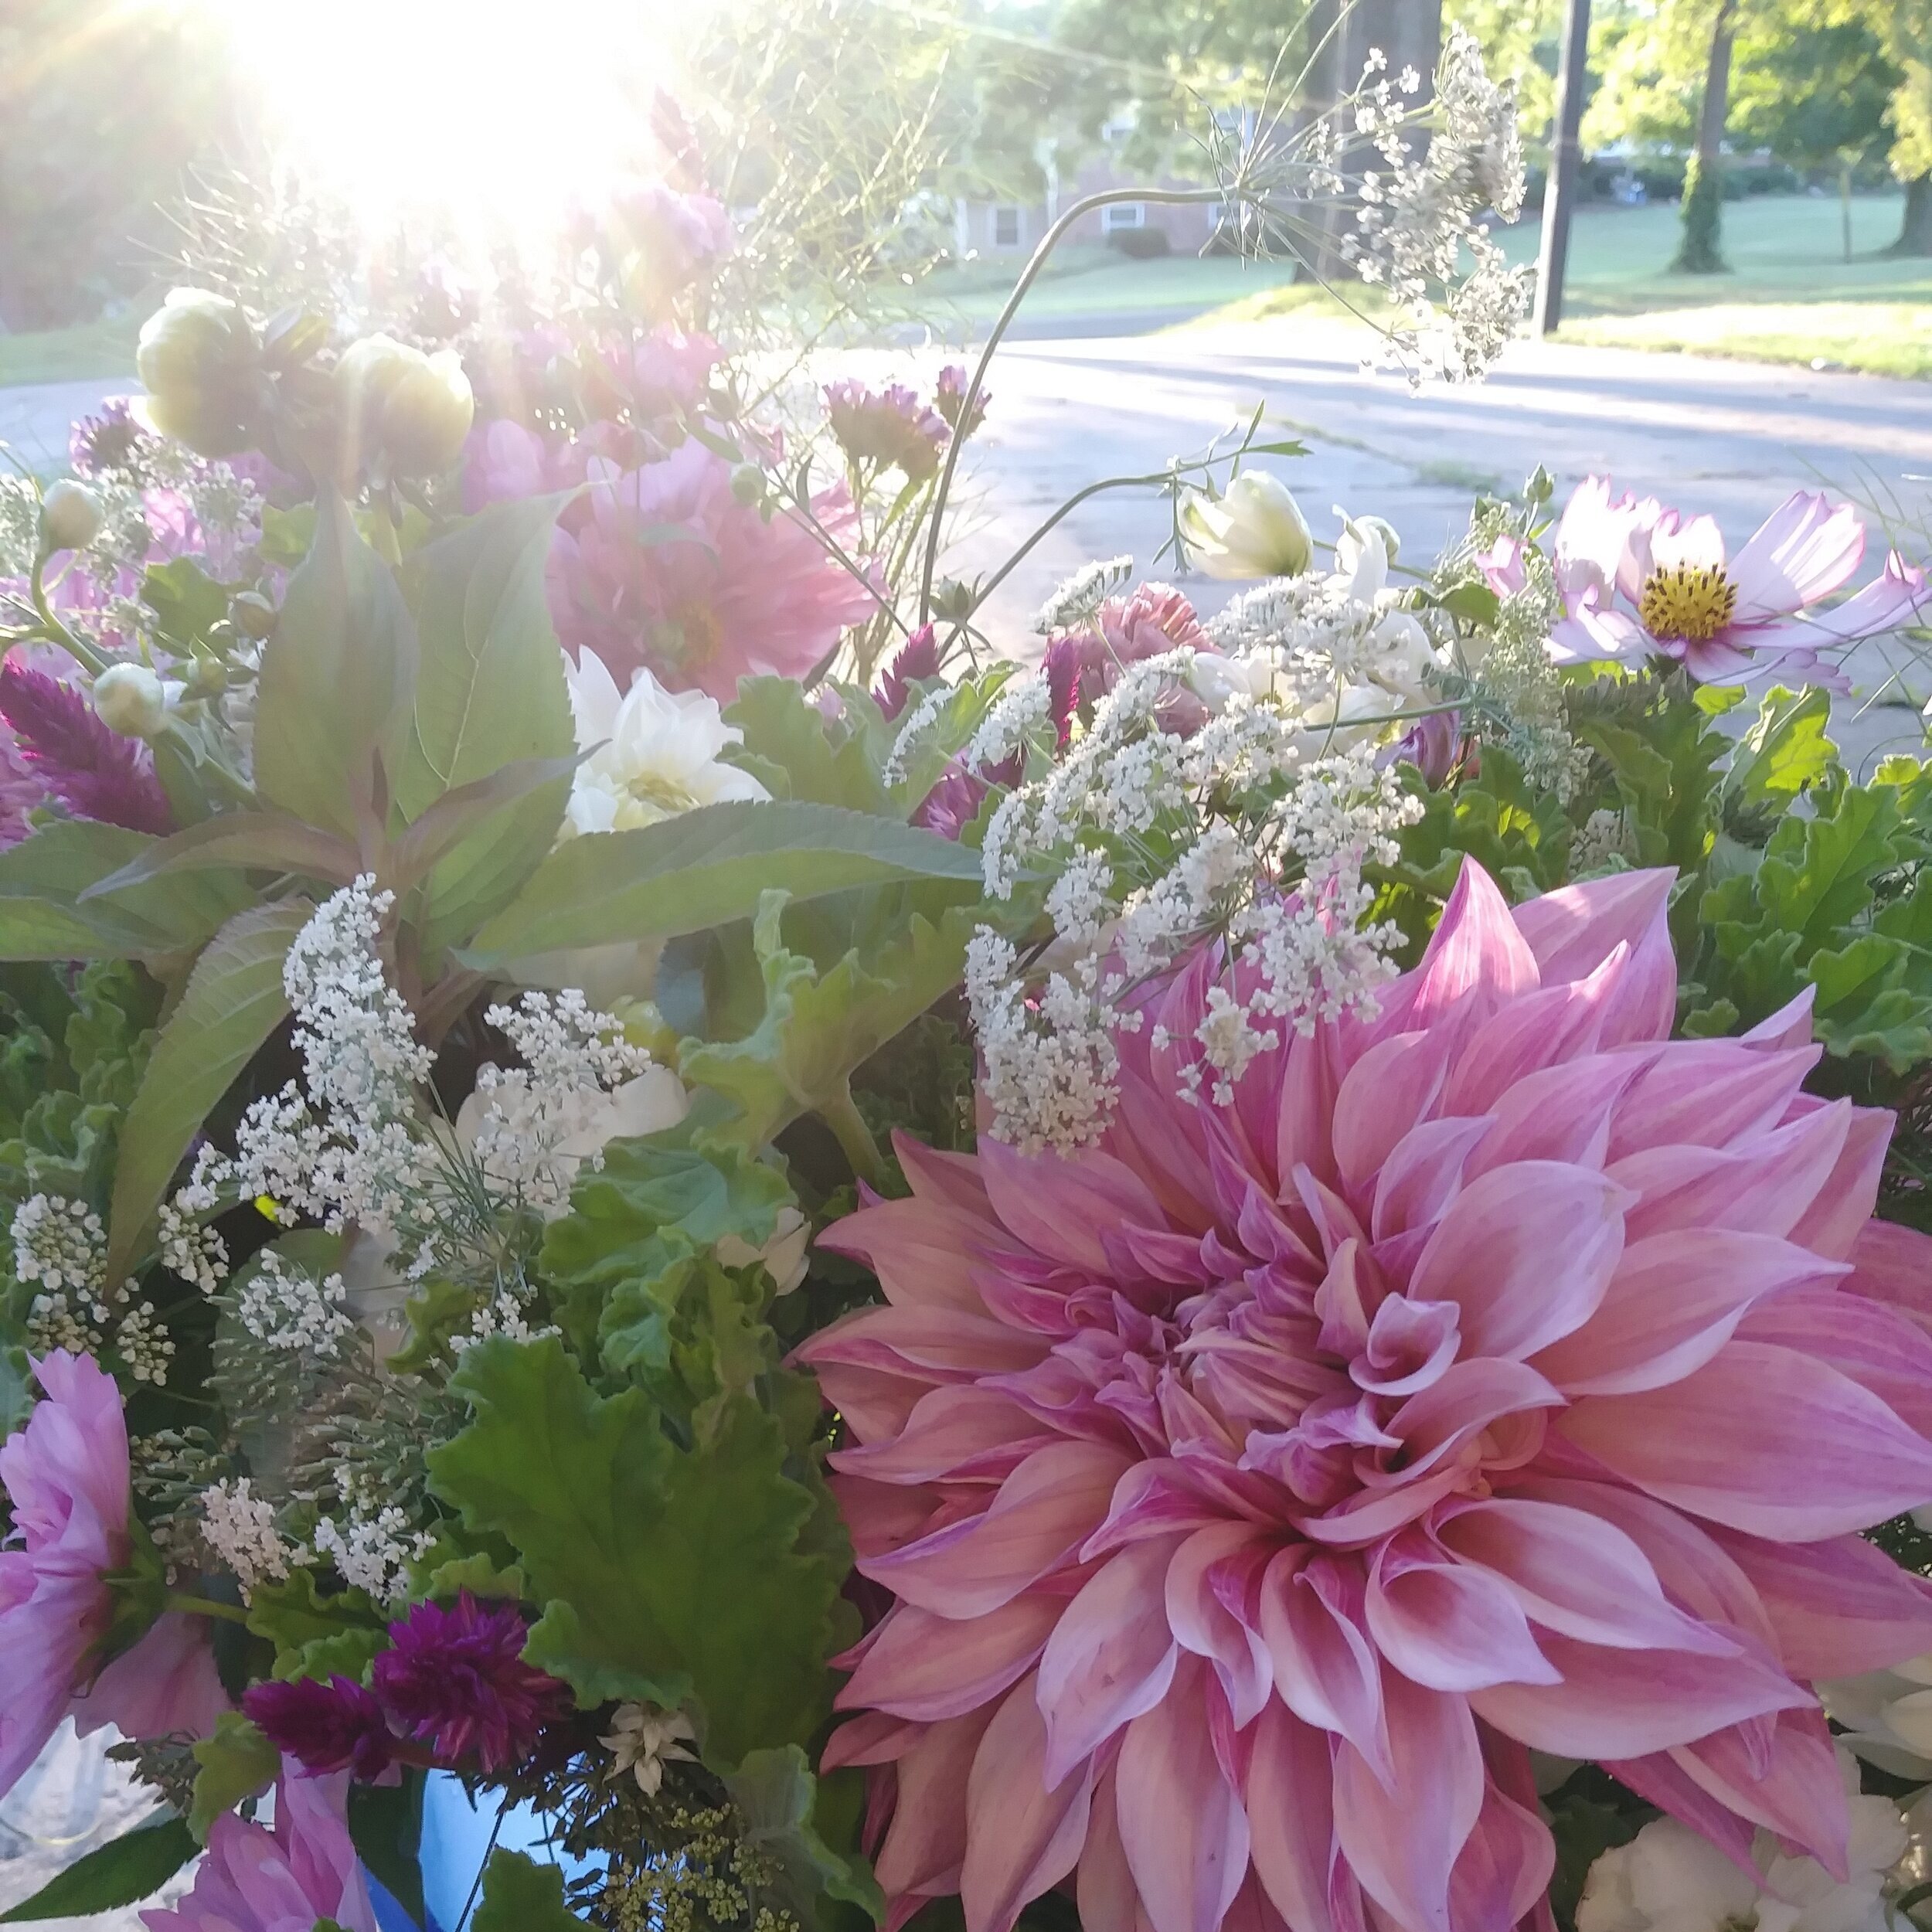
Ammi (False Queen Anne’s Lace) does this beautifully. It looks great with almost any type of flower and adds some much needed volume, texture and whimsy.

You may have noticed the wild Queen Anne’s Lace (Daucus carota) growing in meadows and roadsides. Another name for this plant is Wild Carrot, and yes, if you pull up the root, you’ll see and smell that it is indeed a white carrot!
Queen Anne’s Lace grows wild in our area. In fact, the field that is currently our U-Pick Flower Garden was an entire field of Queen Anne’s Lace when we moved to farm nearly a decade ago. It certainly was beautiful!

Gah! My kids were just babies. Now my son has a mustache and is taller than me… and my daughter is the same size as me. People, how does this happen?!? Excuse me while I have a moment…

For floral use, though, most people prefer to grow the more sophisticated and cultivated varieties of Ammi, which are related to wild Queen Anne’s Lace.
Let’s look at the Pros and Cons of growing Ammi for cut flower use.
PROS
They are fairly easy to grow.
They are versatile in bouquets and arrangements.
They attract pollinators.
They will reseed themselves, if you allow them to.
CONS
They are not the longest blooming flower. You’ll need to plant them a few times over the spring/summer to have a continual harvest.
They should be netted to keep them from falling over.
They have irritating sap that can cause contact dermatitis when harvested on a sunny day (more about this later!).
CHOOSING SEEDS
There are 3 main categories of Ammi that are used for floral work.
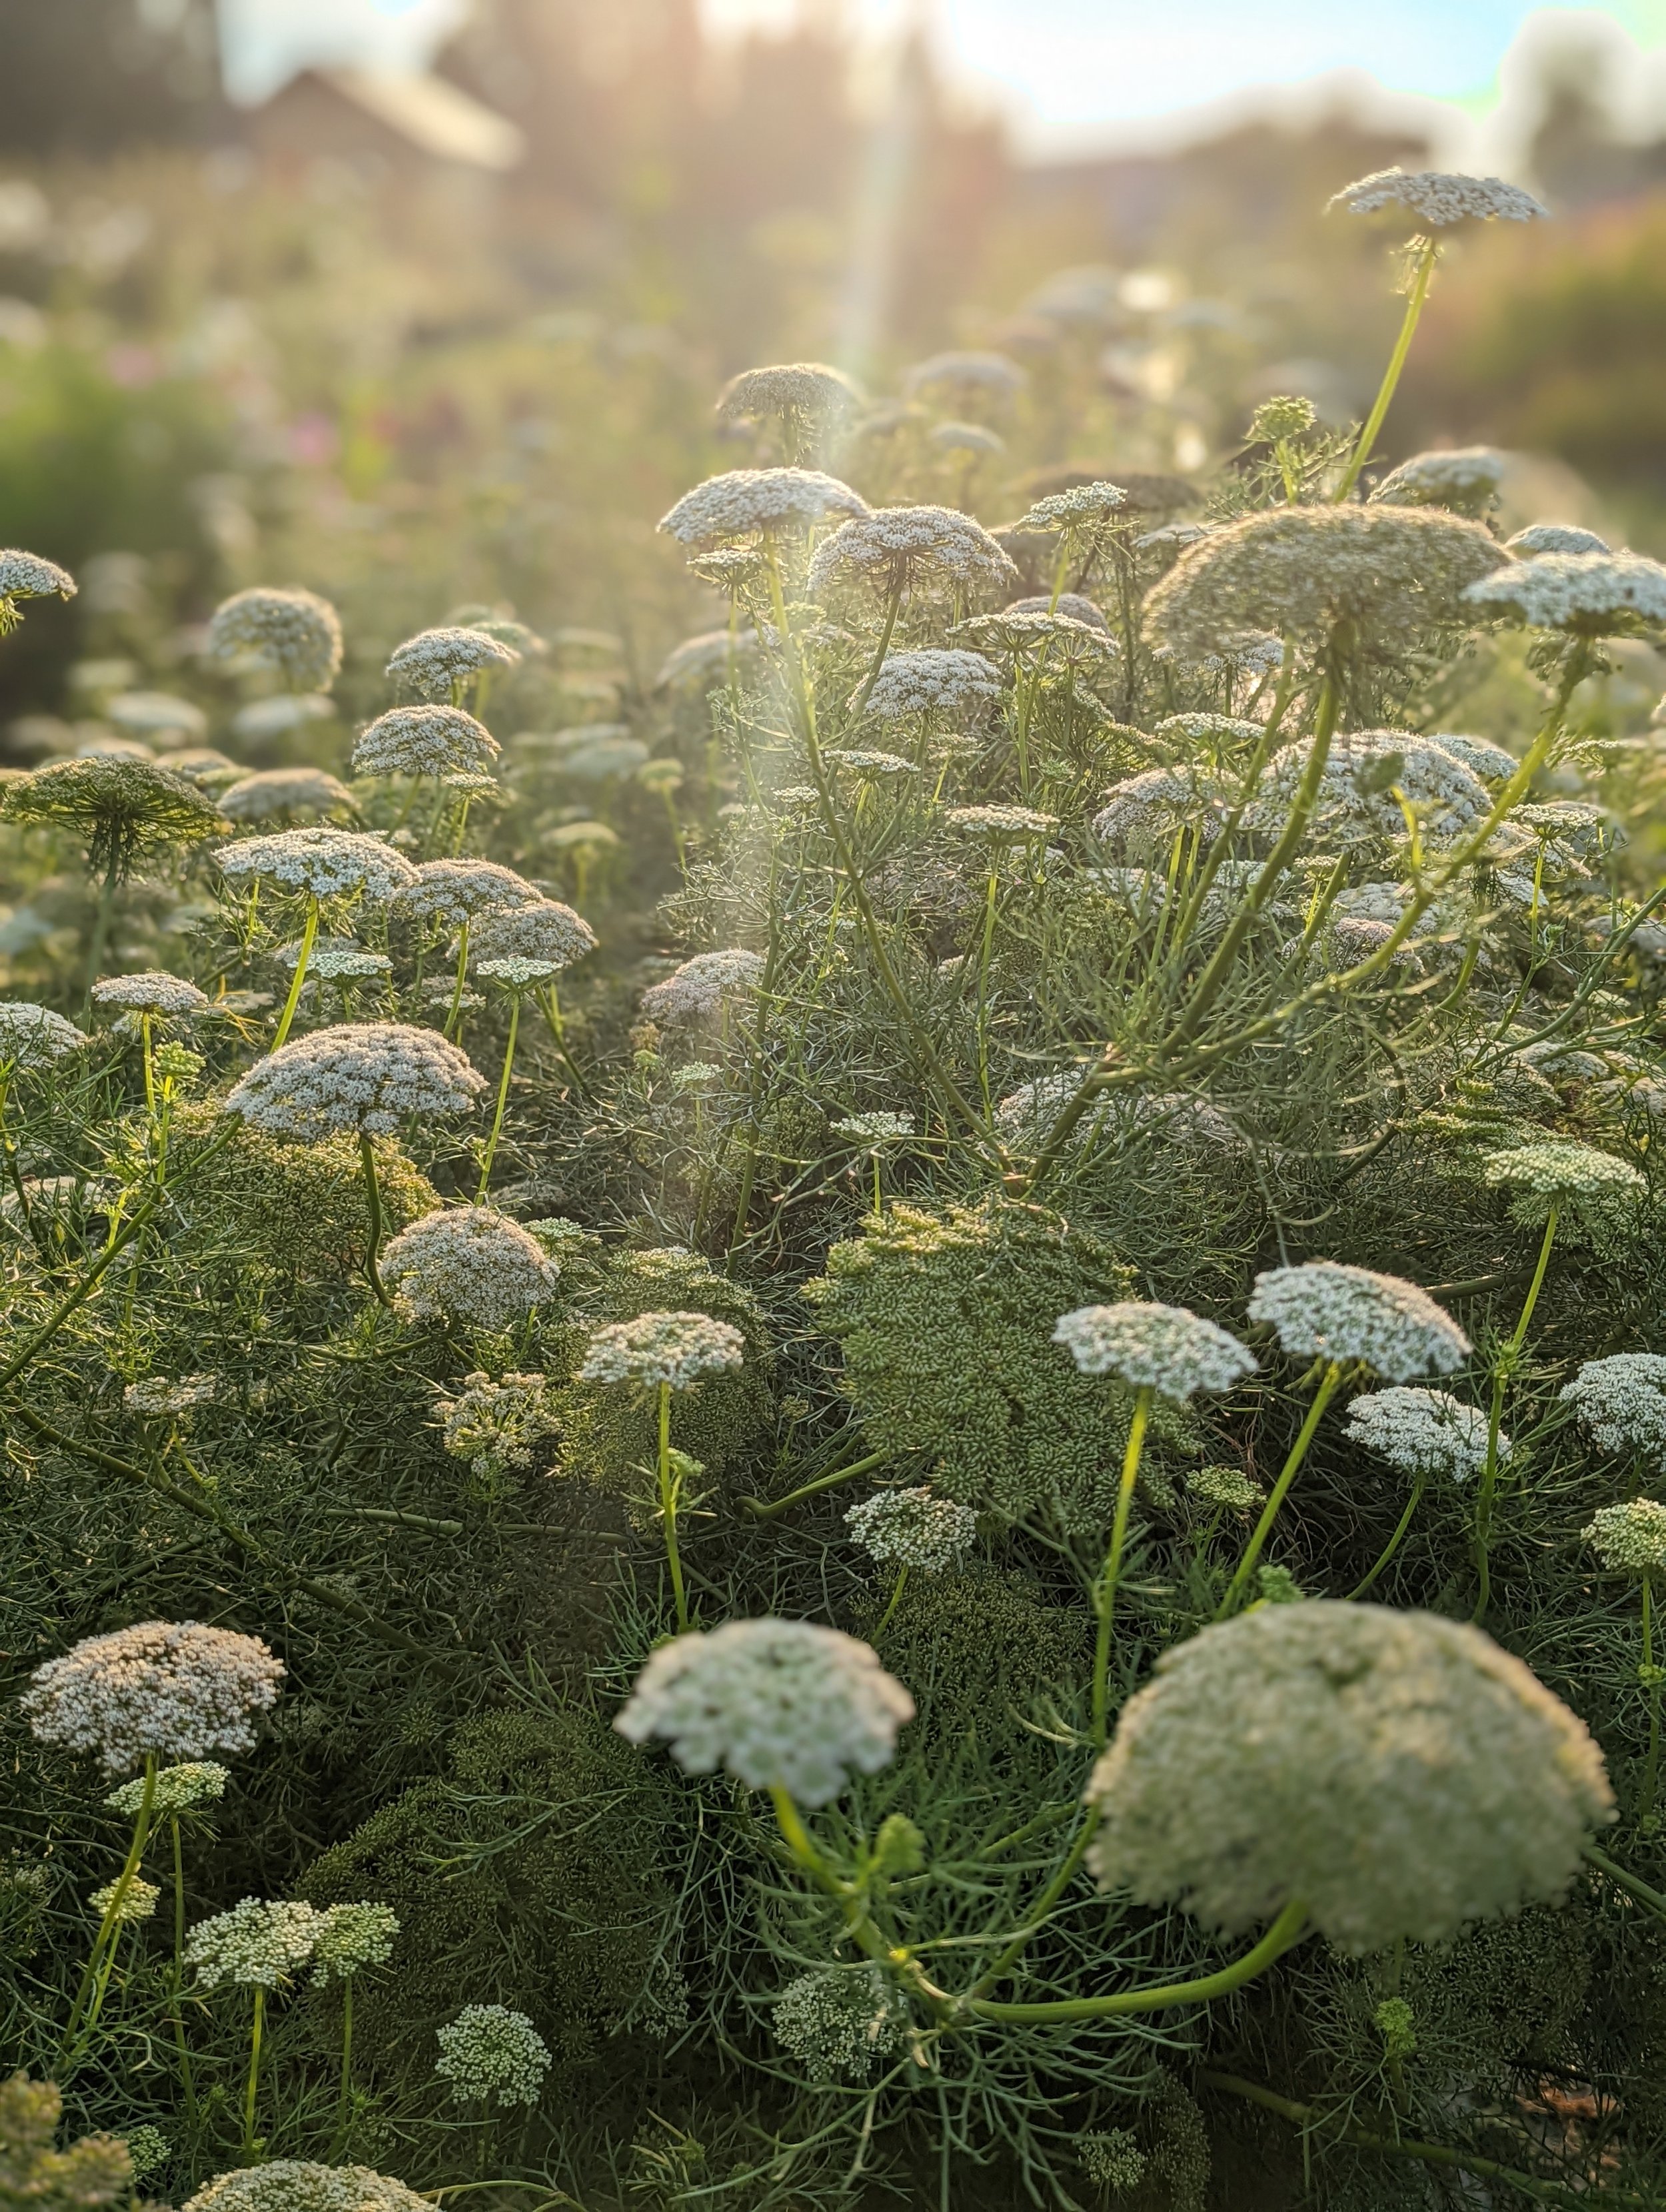
1. Ammi majus: This type most closely resembles wild Queen Anne’s Lace - light, airy and delicate. On our farm, this type does best in the spring/early summer.
2. Ammi visnaga: This type is much more robust and fuller than Ammi majus. It also tends to be more green than white. This type is sturdy and adds lots of structure to bouquets. Unfortunately, it also has a distinct smell that some people don’t like. On our farm, this type blooms well even in the heat of summer and into fall.
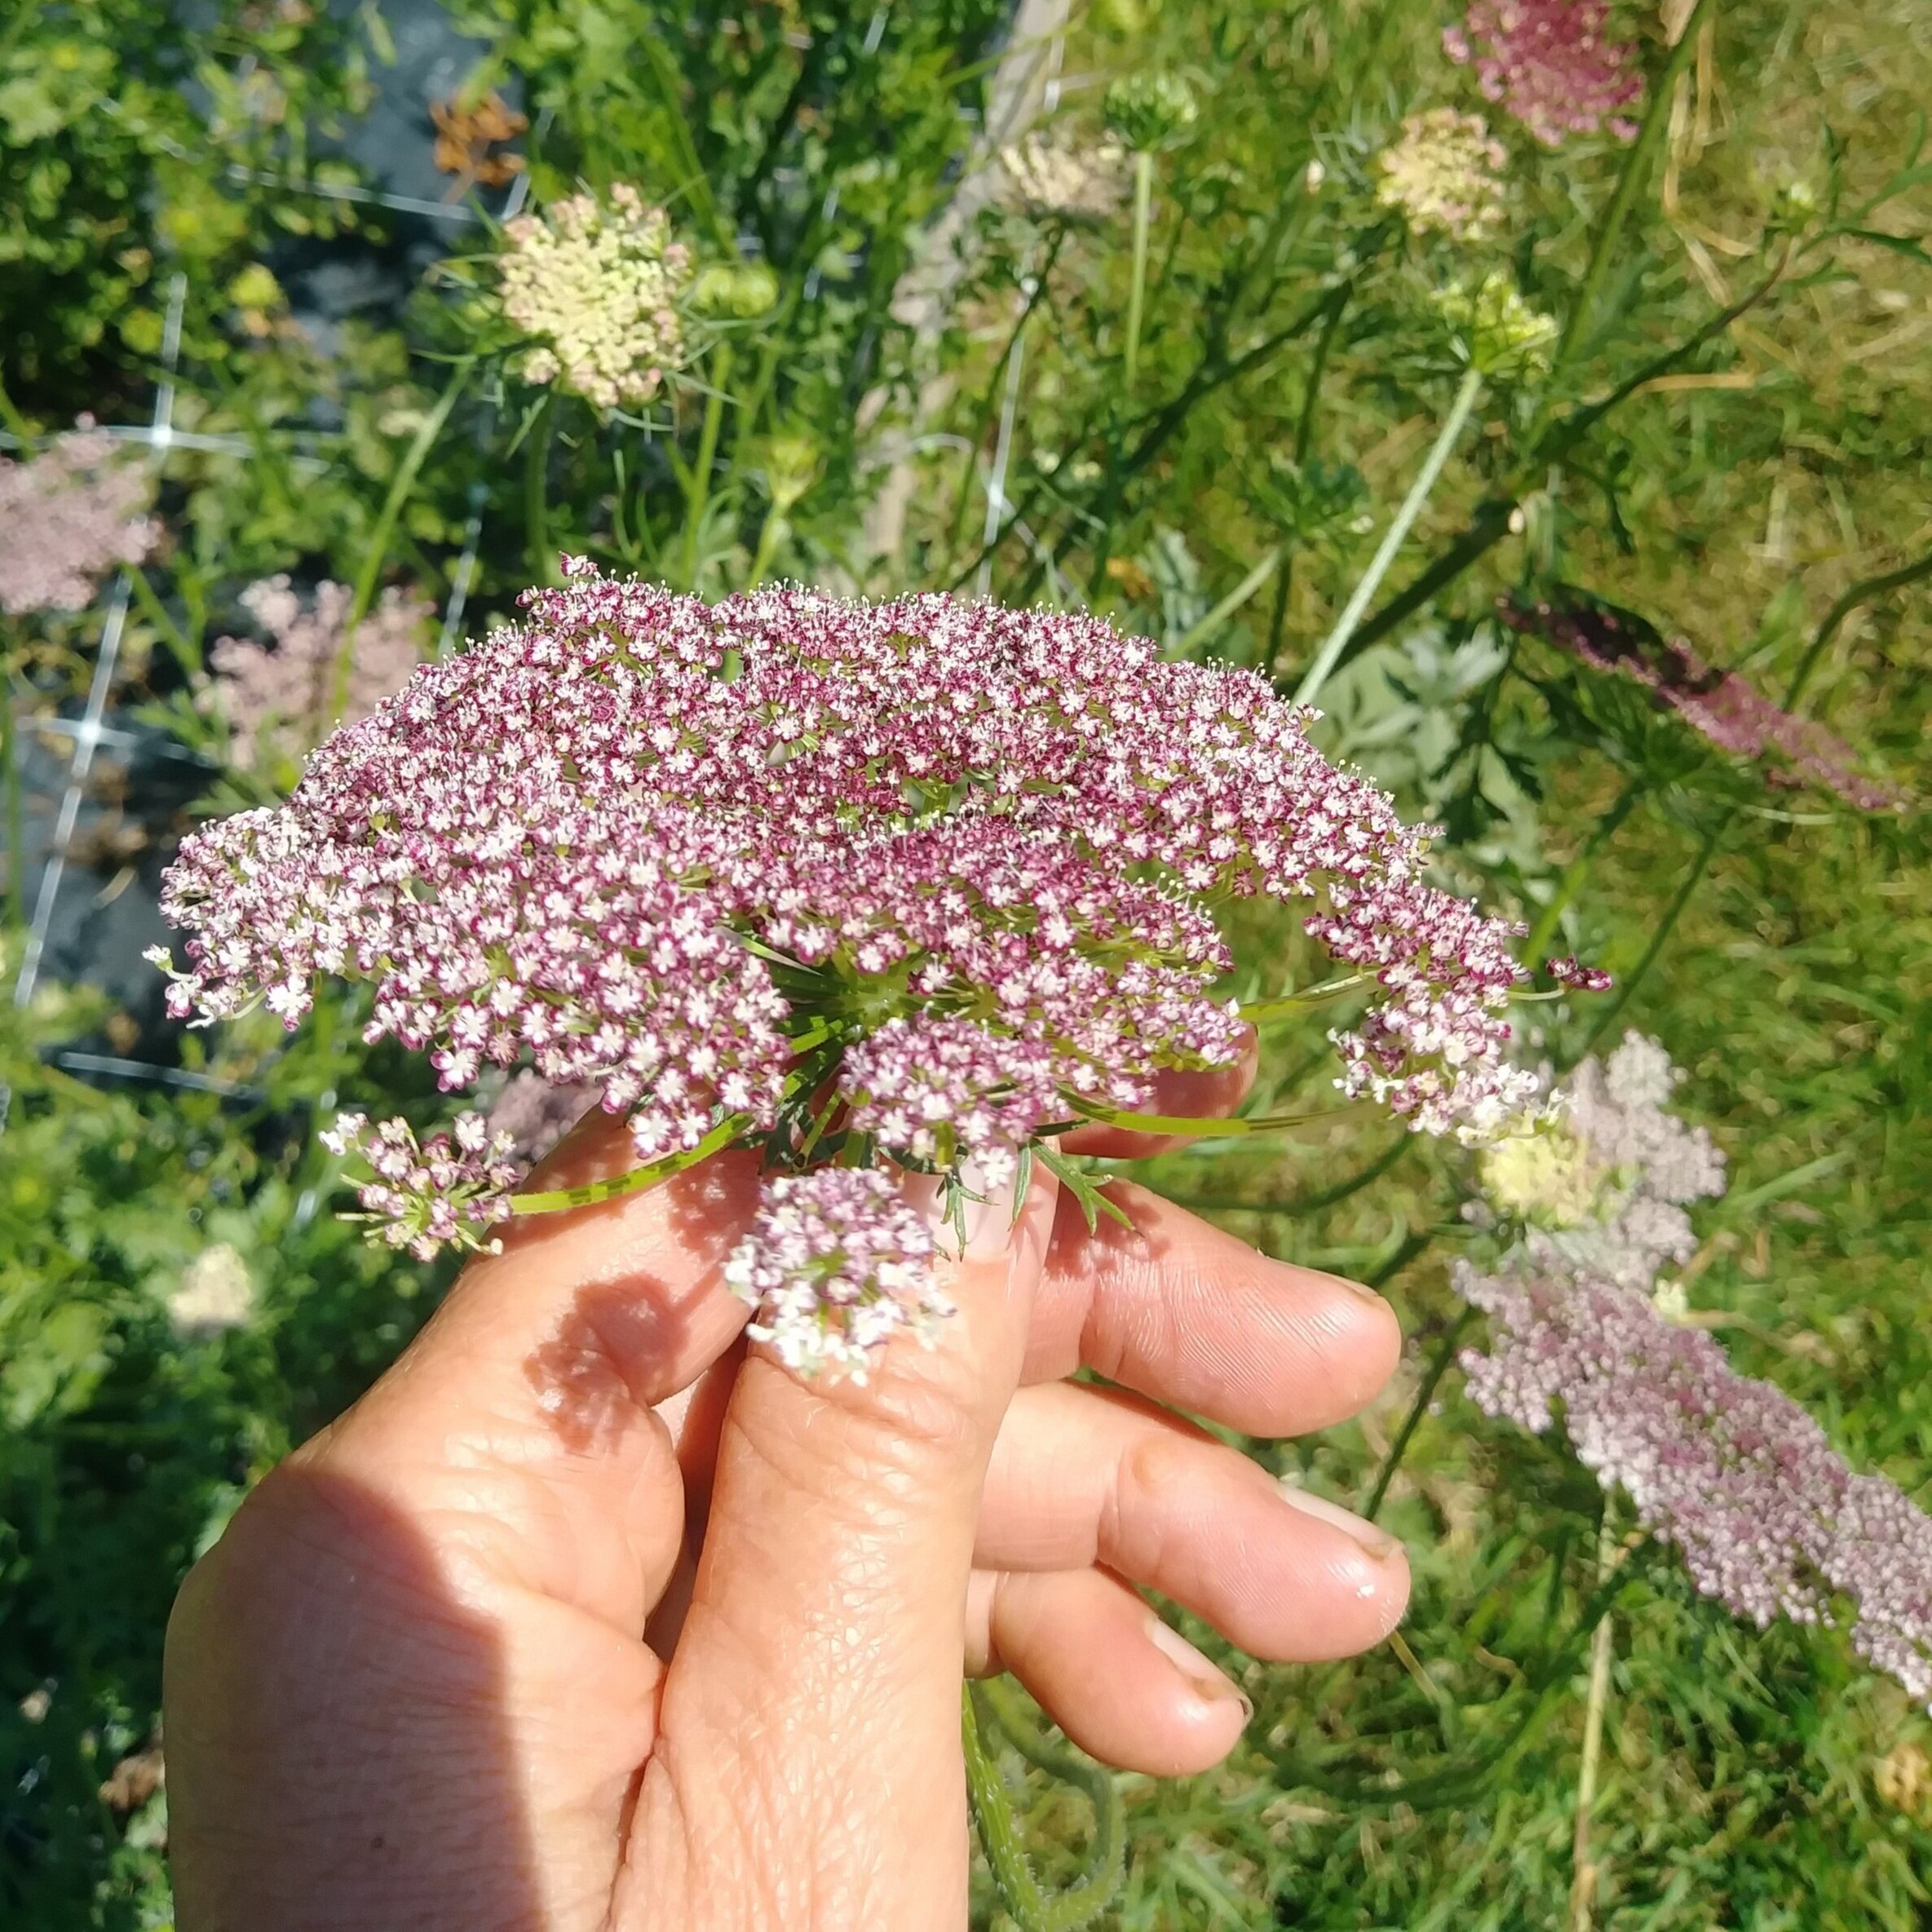
3. Dara/Daucus carota: Technically not “Ammi”, you’ll often find this in seed catalogs under the Ammi category. This type is a unique variety of wild carrot. The blooms come in a range of pink, purple and white. I’ve seen all sorts of names for this flower (no one seems to know exactly what to call it!), so search for “Dara”, “Ammi dara”, “Daucus”, “Daucus carota”, “False Queen Anne’s Lace”, “Chocolate Queen Anne’s Lace”, “Ornamental Carrot”, “Chocolate Flower” and even “Chocolate Lace Flower”!

Here are a few of my favorite Ammi to grow for cut flower use:
“White Dill” (Ammi majus)
“Graceland” (Ammi majus)
“Green Mist” (Ammi visnaga)
“Dara” (Daucus carota)

HOW TO SOW
Ammi generally prefers cooler weather and really shines in the spring/early summer. While it can handle warm days, it wants cool nights.
The plants are quite cold hardy and can handle some frost.
If you live in a warm climate, sow the seeds in the fall and they will take off early next spring. If you live in a cold climate, sow the seeds as early as you can in the spring (when the soil has thawed).
Transplants or Direct Sow?
Ammi can be transplanted or direct sown.
Transplants should be sown indoors 4-6 weeks before you plant them out. Keep the seeds in the fridge or freezer for 2 weeks before sowing (this mimics winter weather).
Remember, they want cold nights, so if you are using heat mats for your seedlings, be sure to turn off the heat at night or remove the tray at night. They can be transplanted out BEFORE the threat of frost is over, since they are cold hardy.
If you don’t want to mess around with moving trays every day (I don’t!!!), then simply direct sow when you want them to grow as early in the spring as possible.
Ammi prefers to be direct sown, so this method is the simplest and easiest. You might as well save yourself some time and growing space, and simply direct sow the seeds!
If you want to try Winter Sowing, Ammi is a great candidate for this method.
Ammi is a “self-sowing” hardy annual, which means if you leave a few seed heads to mature on the plants, new plants will pop up the following spring. Bonus!
PLANT SPACING
Ammi can be grown at 3-12” spacing… so if you direct sowed and your plants are crowded, don’t fret.
I find Dara needs the least amount of spacing (grows very upright), Ammi majus needs about 6-9” spacing, and Ammi vignaga does better at 12” spacing (widely branching plants).
Netting is helpful, as plants will grow 36” or more. We use Hortonova trellis netting stretched tight over the bed with stakes.
Yup. It’s a real pain harvesting those stems in the netting… But it’s better than having the plants falling over! Hint: Pull the stem down through the netting, not up.

Update: Recently, we switched to using “cattle panel support” pictured below for growing Ammi and Dara… and it is a GAME CHANGER. You can learn how we make the “cattle panel supports” in this blog post.

GROWING ON
Ammi is not a particularly long lasting flower in the field. Don’t expect it to bloom all summer long.
In order to harvest Ammi longer, I like to plant 2 successions of Ammi majus (spring/early summer blooming) 2-3 weeks apart, followed by 2 successions of Ammi visnaga (summer/fall blooming) 2-3 weeks apart.
Dara seems to do better as a spring/early summer blooming plant, but occasionally I can get some to bloom into the fall.

STAGE OF HARVEST
Recognizing the correct stage of harvest for Ammi can be a little tricky.
Harvest too early, and they will droop over and never recover.
It’s better to err on the side of too mature than too early. Fortunately, even if you harvest them too mature, they still look beautiful with their seed pods.
Take a look at the bloom. If it is flat or concave (sides higher than center), it is not ready.
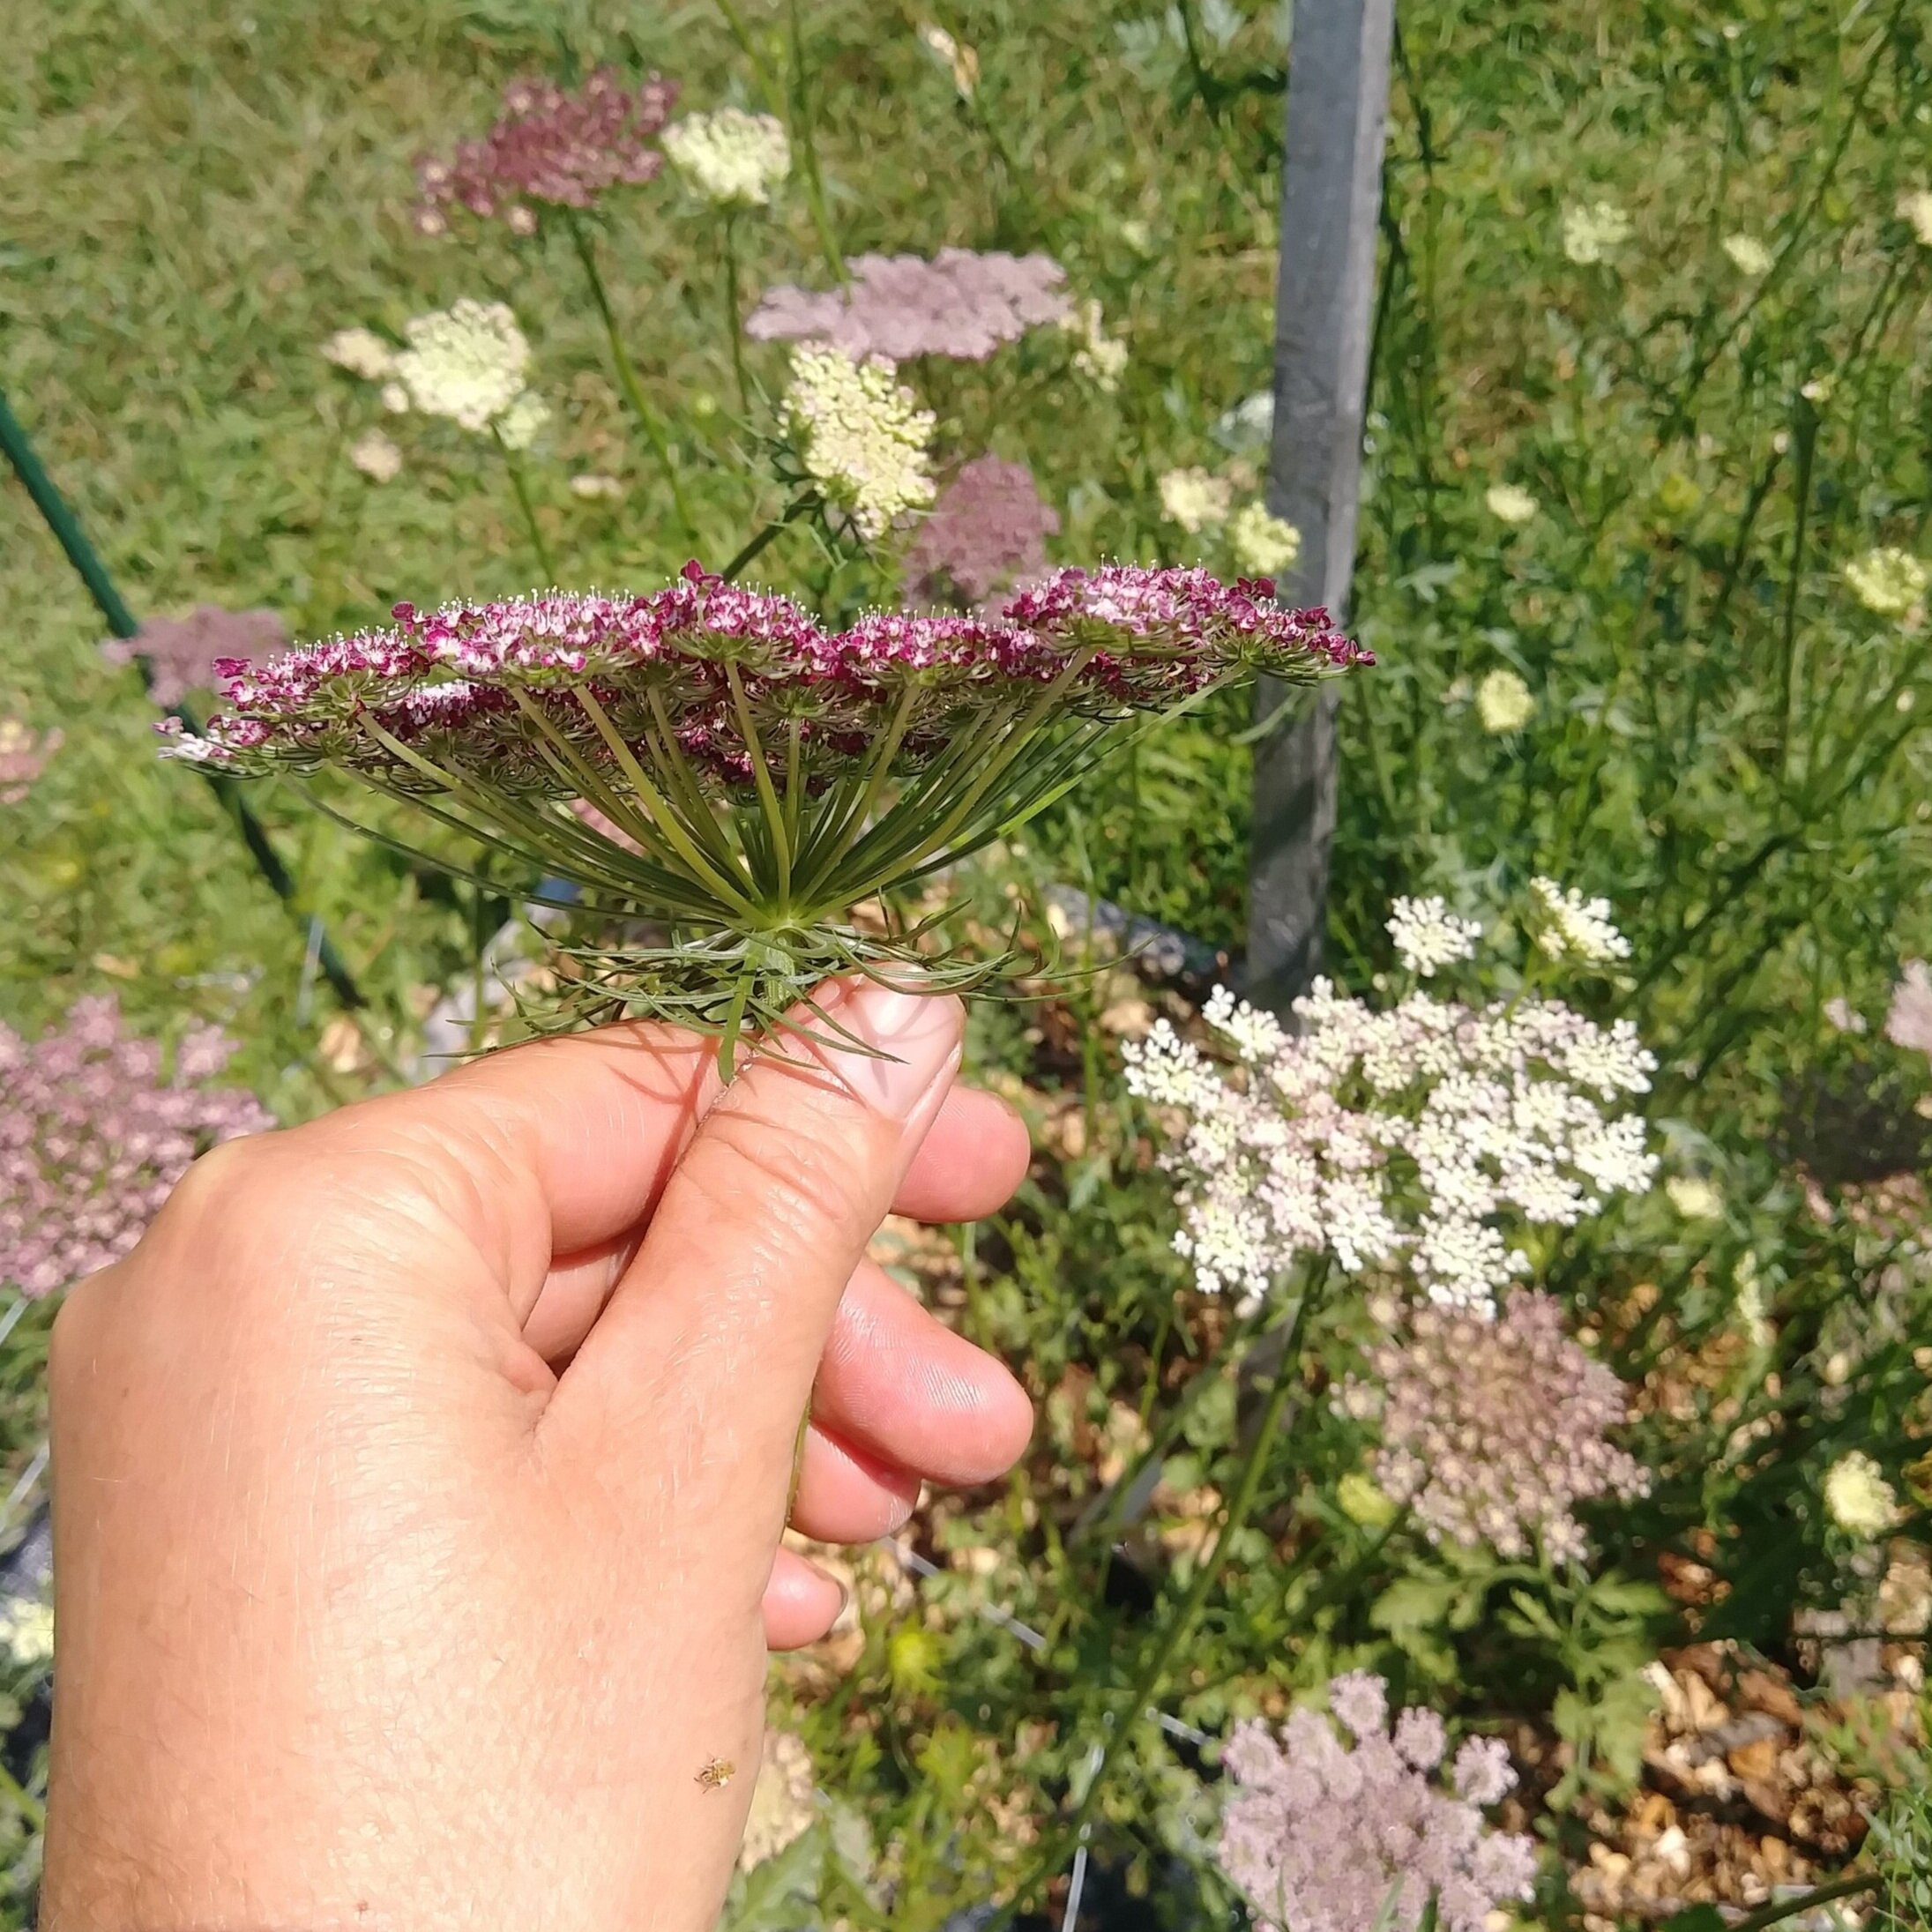
If the bloom is domed or convex (sides lower than center), then it’s ready!
SPECIAL NOTE:
When you cut a stem of Ammi, sap will come out of the cut end. Do NOT allow this sap to come into contact with your skin, especially on a sunny day. Ammi can cause contact dermatitis on some people, called Phytophotodermatitis, a reaction caused by contact with a plant sap/substance that reacts to sunlight.
When the sap gets on your skin and is exposed to the sun, it can cause burns and blisters. While usually not painful, it can cause scarring that lasts for months. Ask me how I know this.
Usually, I wear long pants, long sleeves and gloves when harvesting (AND harvest it before sunrise or after sunset), but on this one day, we had to harvest it 9am and it was 90+ degrees. I learned a hard lesson to always wear long pants/sleeves, even when it’s suffocating (and this is exactly why farm workers wear long pants/sleeves when harvesting carrots, celery and other plants).
The blisters were not painful, but I had scars/dark patches on my legs/forearms for about 3 months.

POST HARVEST CARE
Immediately upon harvest, allow the Ammi to rest in a bucket of water in a cool, dark place.
After resting overnight, stems should be ready for arranging!

QUESTIONS?
Ask them here and I’ll get back to you!
READY FOR MORE?
If you’re serious about growing the garden of your dreams this year, register for my online course, “Backyard Cutting Garden 101”. You’ll find everything you need to plan, grow, harvest and arrange your stunning blooms. I can’t WAIT to help you grow! Click on the button below for all the details.

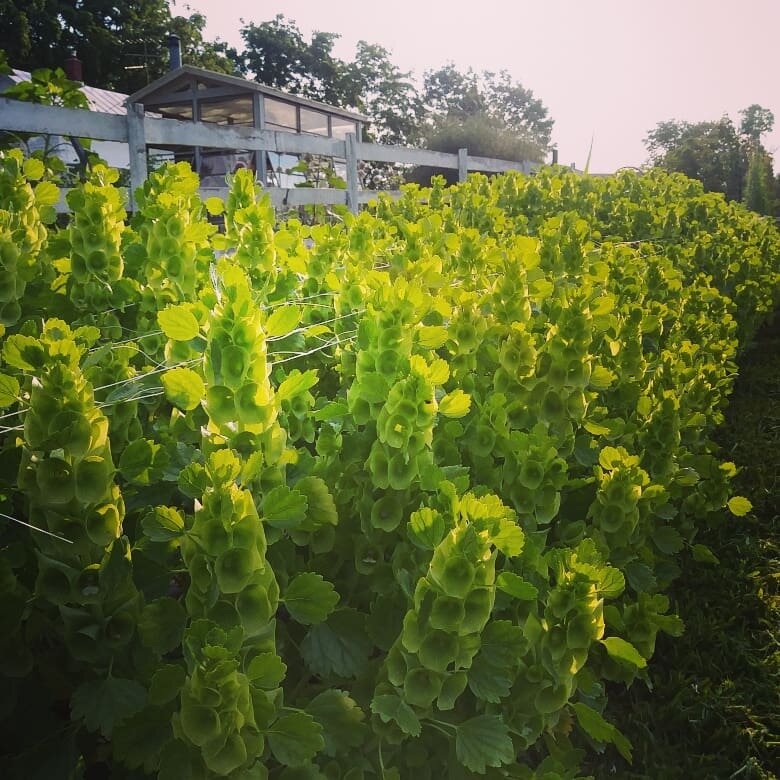
How to Grow: Bells of Ireland
How to Grow: Bells of Ireland
Bells of Ireland have to be one of my favorite foliages/greenery to grow on the farm.
Not only do they add incredible texture and color to arrangements, they are also long-lasting in the vase... and bonus! They smell delicious! To me, they smell exactly like lime flavored Skittles.
Bells of Ireland are often considered a “Hardy Annual”, which means they prefer cooler weather and have some frost tolerance. This also means they are a late spring/early summer blooming flower (they usually die out by mid/late July, when it gets hot).
Let’s look at the Pros and Cons of growing Bells of Ireland for cut flower use.
PROS
They last a long time in the vase (in fact, they can even be dried and used as an “Everlasting Flower”).
They are an excellent foliage/greenery for bouquets and compliment nearly every flower type.
They smell good - clean and fresh, with a hint of citrus.
They are beautiful, unique and provide visual interest.

CONS
They can be notoriously tricky to start from seed. If you’re a beginner, maybe put this one on hold until you have more experience.
They need to be supported with netting or they will be flattened in a rain/wind storm.
They develop “spines” that can prick your hands if they are not harvested early enough.
The plants are not particularly long lasting. They are finished on our farm in mid-July. We pull up the plant and put in sunflowers to fill the beds.
They prefer cooler weather and do not handle heat well. For those living in climate with weather extremes, growing Bells of Ireland successfully can be difficult. Here in Michigan, it’s not uncommon in the spring for our temperatures to fluctuate over 60 degrees in a matter of days. Bells of Ireland do not handle these extremes well - they can get stressed and succumb to disease.
CHOOSING SEEDS
Choosing seeds is easy, because there is only one variety of Bells of Ireland (Moluccella laevis) that is generally used for cut flowers.
HOW TO SOW
The most difficult part about growing Bells of Ireland is starting the seeds.
They seem to be quite unpredictable and in all my research, I can’t seem to find a “Fool-Proof” method for germination. Instead, I’ll share some suggestions that may help.
First of all, storing the seeds in the freezer until you are ready to sow them is a smart idea. The freezer mimics the natural cold/dormant period the seeds need to germinate properly.
*Side Note: I store all of my seeds in the freezer, with no ill effects. I figure that if the Svalbard Global Seed Vault, the world’s seed saving experts that are preserving seeds for humanity in case of major global disaster, can store all their seeds in a freezer, so can I. As a bonus, all my hardy annual seeds are always chilled and ready to go.
Another tip is to soak the seeds in water for 24-48 hours before sowing. This helps to soften the tough seed casing.
Here is my method for germinating. It’s a bit of work and seems a little fussy…. But I’ve had good success!
1.Soak seeds in water for about 24 hours. Place seeds in a damp paper towel. Put the paper towel in a plastic bag and set it on a heat mat or in a warm spot (on top of your fridge).

2. In just a few days, the seeds will begin to sprout.

3. Carefully transfer the sprouted seeds into seed trays, tucking the "tail" (root) into the soil.

4. Seedlings can grow the trays for a few weeks until they have 2-3 sets of leaves.
Transplants or Direct Sow?
Transplants should be started indoors 6-8 weeks before the last spring frost.
Some people have better success direct sowing Bells of Ireland and don’t even attempt transplants. If you live in a mild climate, you may be able to sow the seeds in the fall or very early spring. They need a cold/dormant period to germinate properly. The freeze/thaw activity also helps to break open the tough seed casing.
For people living in colder climates, I recommend trying both methods. Start some indoors and also direct sow some seeds outdoors as soon as the soil can be worked.
Bells of Ireland can also be grown using the Winter Sowing method. Find out more about Winter Sowing.
PLANT SPACING
Bells of Ireland should be spaced 12-18” apart.
GROWING on
Bells of Ireland prefer rich soil, with plenty of nutrients and plenty of water.
If you live in a place with cooler summers, the plants may continue to produce for a few weeks. In Michigan, the summers get too hot and the plants stop producing mid-July. Enjoy them while you can!

STAGE OF HARVEST
You’ll know the Bells of Ireland are ready to be harvested when you see the tiny white flowers inside the “bells”.

Cut deep down into the plant to get long stems. You may notice the plants begin to develop “spines” as they mature. Watch out!
Strip off the leaves/bells at the bottom of the stem.

POST HARVEST CARE
Bells of Ireland don’t require any special care after harvest.
Like all flowers, store in a cool, dark place after harvesting and allow stems to rest for a few hours before arranging.
Some people like to remove all the leaves. It’s personal preference whether you do this or not. Sometimes, the leaves will turn brown or spotted, but the bells are still in great shape - in this case, simply remove the leaves.

QUESTIONS?
Ask them here and I’ll get back to you!
Ready for More?
If you’re serious about growing the garden of your dreams this year, register for my online course, “Backyard Cutting Garden 101”. You’ll find everything you need to plan, grow, harvest and arrange your stunning blooms. I can’t WAIT to help you grow! Click on the button below for all the details.

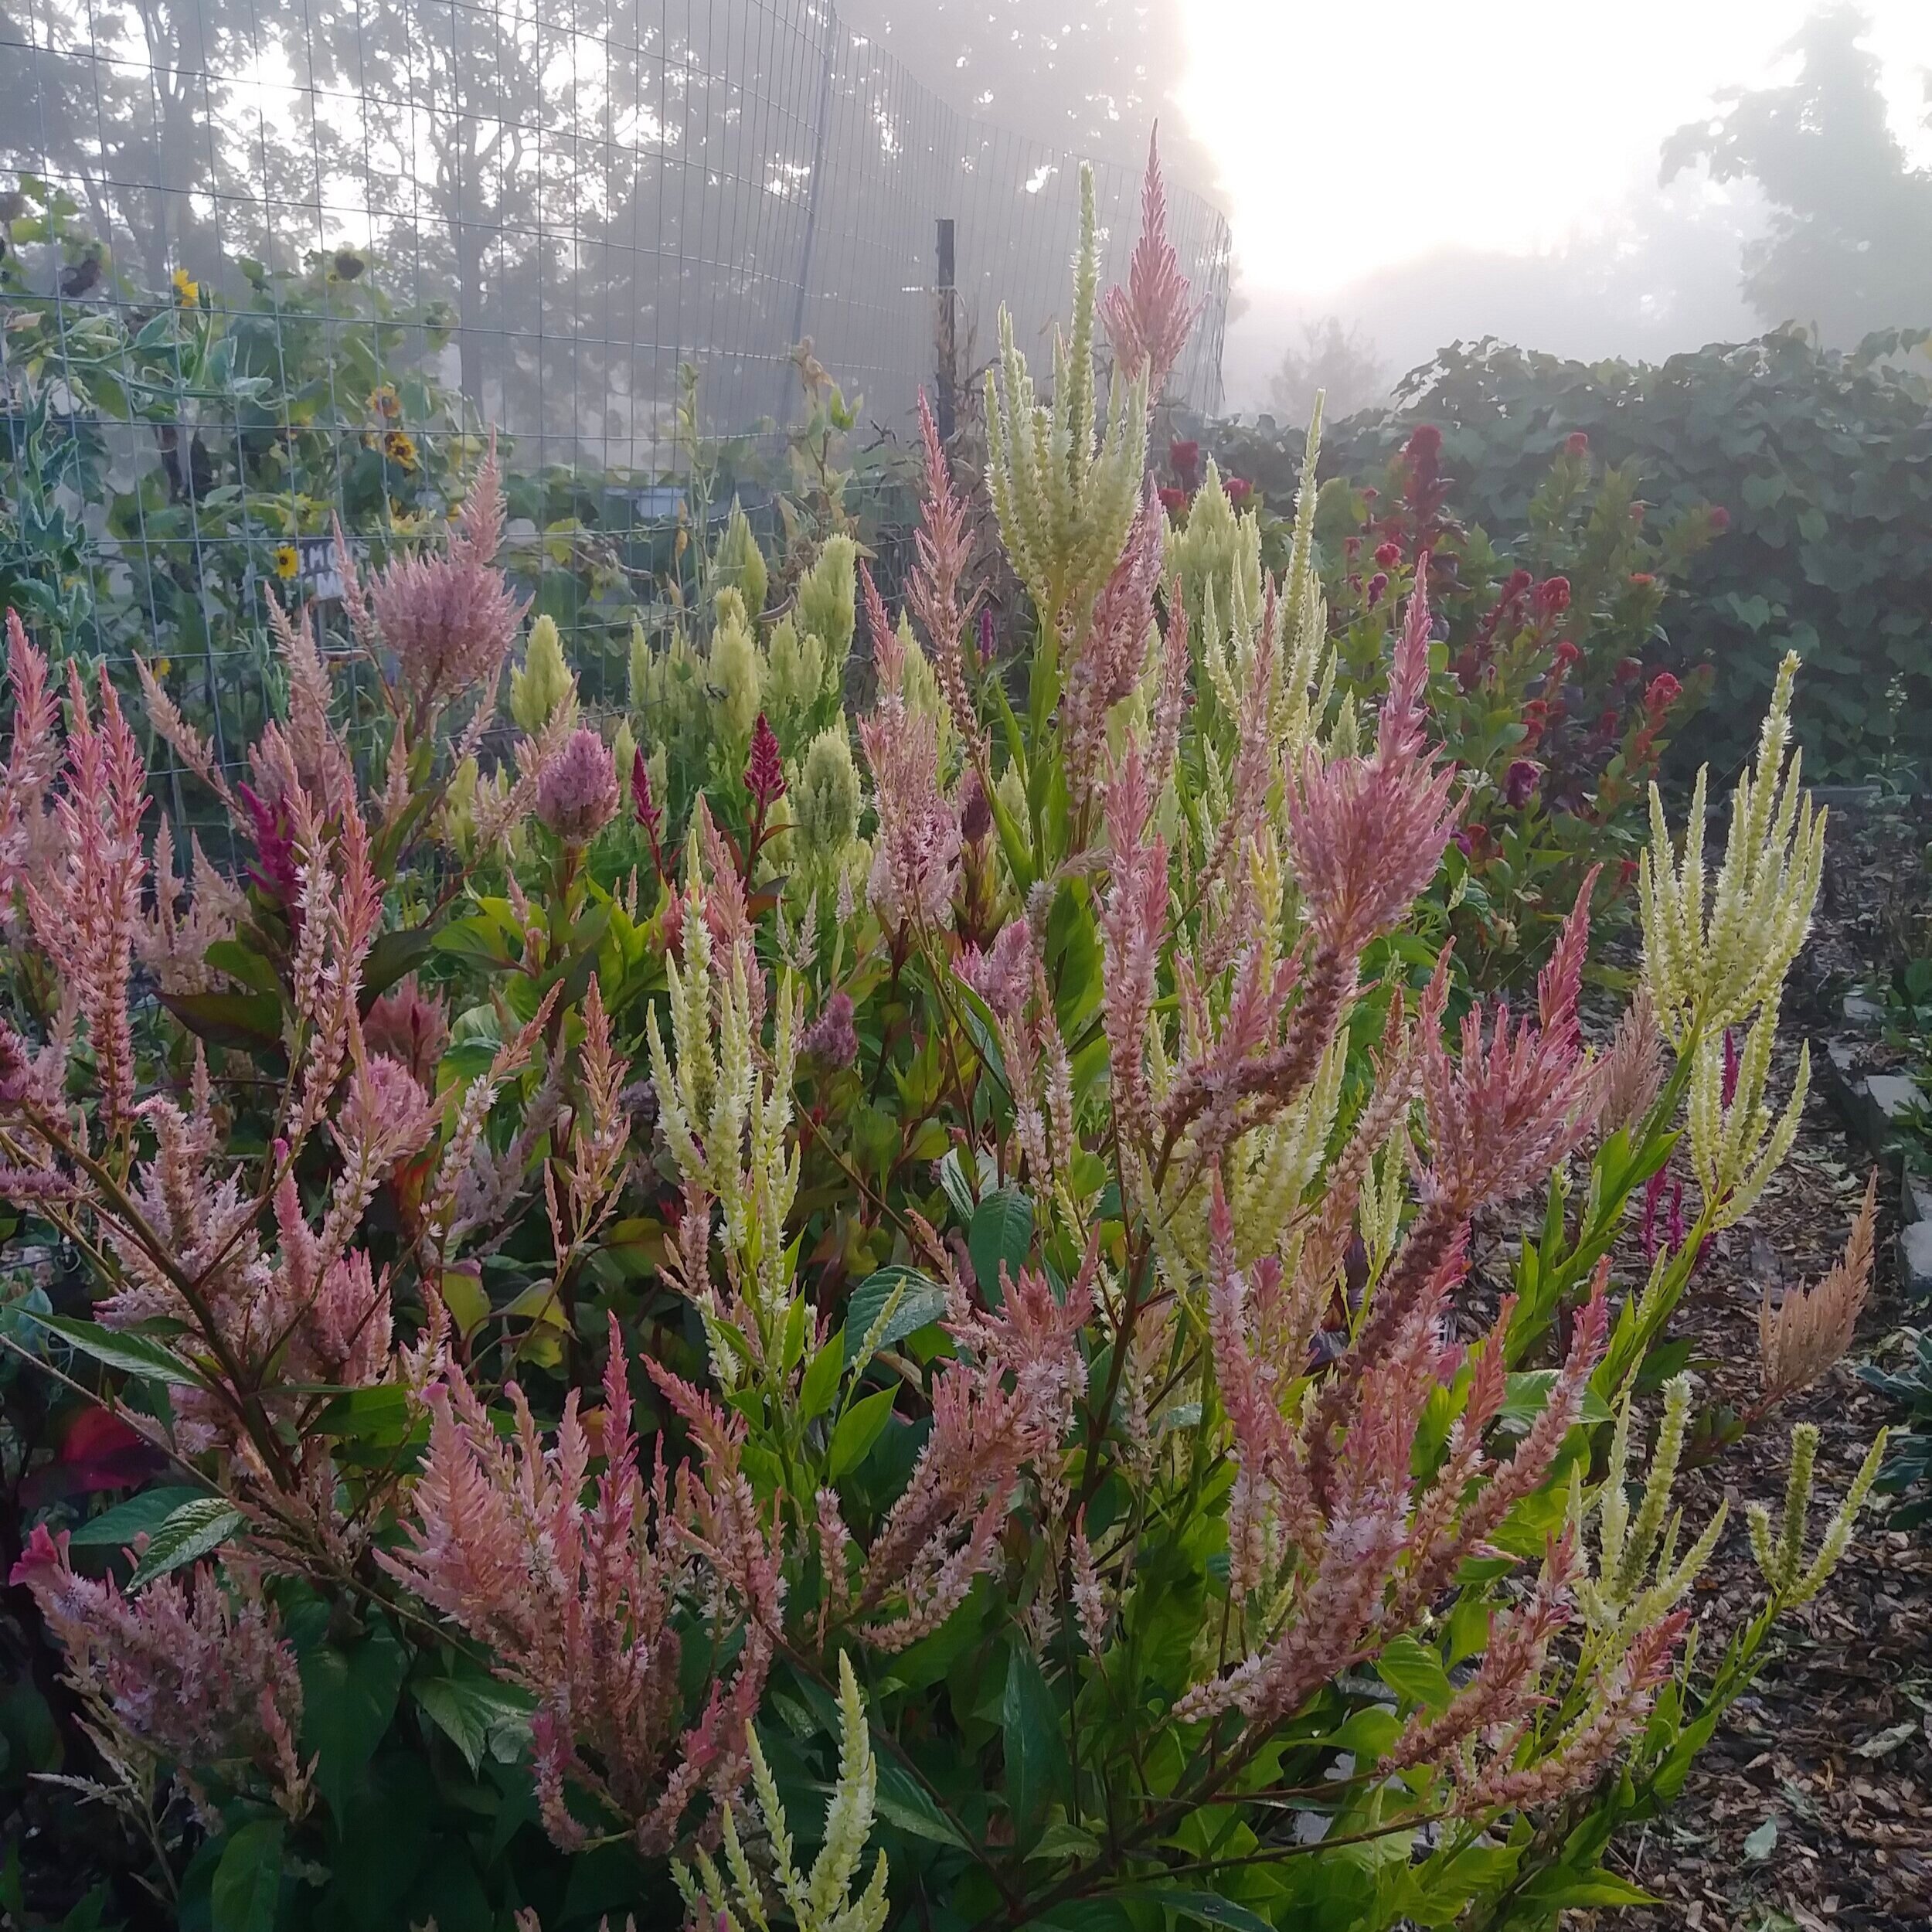
How to Grow: Celosia
A “must-have” for your cutting garden!
How to Grow: Celosia
Pronunciation: sel-oh-see-ah
Celosia is another underappreciated and overlooked cut flower. It’s unfortunate, because Celosia is beautiful, long lasting and comes in a wide variety of shapes and colors! It also makes an excellent “Everlasting Flower”.
While they are not a flower you would likely display on their own, they compliment other flowers so nicely and shine in bouquets, adding much needed texture and shape.


“Delhi Pearl” Celosia
The types of Celosia grown for cut flower use are different than the types you normally find at a garden center. This means you’ll likely have to start your own Celosia from seed.
Let’s look at the Pros and Cons of growing Celosia for cut flower use.
PROS
They come in a multitude of colors, sizes and types.
They are easy to grow.
The plants are productive for a long period of time.
They are bright and cheerful in bouquets.
They love hot weather and thrive in the summer.
They have an excellent life of up to 2 weeks or longer, with proper harvest and care.
They make a great dried (“Everlasting”) flower.
CONS
They like hot weather and won’t do well in places with cool, wet summers.
The seedlings can succumb to “damping-off” disease in cool moist conditions. Keep those babies warm!
CHOOSING SEEDS
Since most of the Celosia varieties offered at garden centers will not grow tall enough for cut flower use, you’ll probably have to start your Celosia from seed. Thankfully, they are easy to grow from seed. Even if you are not able to start transplants indoors, you can still direct sow them in some climates.
Be sure to look for varieties that reach a minimum of 24” tall.
Celosia is divided into 3 main types:
1. Crested Type (Celosia argentea cristata): These are the “Cock’s Comb”/ “Brain Coral” types.
2. Plume Type (Celosia argentea plumosa): These are feathery and wispy looking.
3. Spike Type (Celosia argentea spicata): These have an upright, spike shape.
Plume Type: “Texas Plume”
Here are a few of my favorite Celosias to grow for cut flower use:
“Chief Series” (Crested Type)
“Cramer’s Series” (Crested Type)
“Sylphid” (Plume Type)
“Pampas Plume” (Plume Type)
“Texas Plume” (Plume Type)

“Celway Salmon” Celosia
HOW TO SOW
Celosias are heat loving, summer blooming flowers. They do not like cold temperatures and can’t handle frost, so do not try to plant them too early in the season.
Transplants or Direct Sow?
Celosias can be transplanted or direct sown, but transplants are recommended for most climates.
Sow seeds indoors 6-8 weeks before your Average Last Spring Frost. Be sure to keep them in a warm place as they are growing. They can be transplanted out after the threat of frost.
The seeds can also be direct sowed into the garden well after the threat of frost has passed. Celosia will not germinate or grow well in cool weather.
Seeds are tiny and I recommend sowing them using the “toothpick method.” Pour the seeds into a container, lick the end of toothpick and use the toothpick to remove seeds one a time. Sow 1-2 seeds per cell.

PLANT SPACING
Most varieties can be pinched to encourage branching and should be spaced at 9”-18”, depending on type. I grow most Celosia at 9” spacing.
GROWING ON
After the transplants are established and growing, it’s helpful to “pinch back” the plants when they are less than 8” tall. To pinch, simply use clippers to remove the top of the plant, only leaving 2-3 sets of leaves behind. I know this seems counter-intuitive and you probably just freaked out, but trust me!
Plants that are pinched are more productive than plants that are not. Experiment for yourself - pinch half the plants and leave the other half alone. The un-pinched plants will bloom earlier, but the pinched plants will produce WAAAAAY more blooms.
Pinching signals the plant to go into overdrive and send out multiple branches, with multiple blooms.

“Ruby Parfait” Celosia

“Ruby Parfait” Celosia that has been pinched back to produce multiple stems per plant
STAGE OF HARVEST
Unlike other flowers, Celosia has a long “harvest window”, so there is no rush to harvest them. In fact, the will continue to get bigger, so harvest when they are the size you want, but before the florets on the bottom start to look dry and form seeds (like the one in the photo below - you can see how dry and “tired” it looks, and it is dropping seeds).

POST HARVEST CARE
Celosia requires no special treatment after harvest.
All types of Celosia can be dried and used as an “Everlasting Flower”. Be sure to dry/store them out of direct light to help retain color.
QUESTIONS?
Ask them here and I’ll get back to you!
Ready for more?
If you’re serious about growing the garden of your dreams this year, register for my online course, “Backyard Cutting Garden 101”. You’ll find everything you need to plan, grow, harvest and arrange your stunning blooms. I can’t WAIT to help you grow! Click on the button below for all the details.