

How to Revive Floppy Flowers
Drooping flowers? Don’t throw them out! Try this quick, simple fix first!
How to Revive Floppy Flowers
You've had it happen before.
The bloom looked perfect on the plant but within minutes of cutting, the whole stem is looking a little droopy. In fact, it looks downright sad!
What is going on?!?
Usually it's one of 3 things:
1. The flower was cut at the wrong time of the day.
Many flowers will immediately wilt if cut during the heat of the day.
Here’s why. Flowers are the most hydrated and firm in the morning, when the stems are filled with water.
As the day progresses and the heat rises , the water flows down the stems into the base of the plants and the flowers begin to dehydrate, which means the stems can get floppy and wilty.
Flowers that are harvested in the heat of the day are wilty, floppy and expire faster.
This is why we ONLY harvest flowers in the cool of the day, either early in the morning or late in the evening. On our farm, we start cutting as soon as it's light enough (around 6:00 am) and stop as soon as the sun is up over the tree line and it starts to heat up (about 10:00 am).
If the day is cool or cloudy, we can get away with cutting later in the day... but if the sun is out, forget about cutting in the middle of the day.
Evening is another good option for cutting. Start when the sun is far on the horizon and the day has cooled.
2. The plant was harvested at the wrong stage.
Every single flower has it’s own “Ideal Stage of Harvest”, which refers to how open or mature the bloom should be for optimal vase life.
Some flowers need to mature a bit more before being cut or they will flop. Really, the best way to figure this out is simply experimenting.
If the stem feels floppy on the plant before you even cut it, that is likely a clue that the stem needs to mature a few more days. Wait until the stem feels more rigid.
For example, Zinnias are easy to test. Simply grasp the stem about 9 inches below the bloom and give it a shake. If the stem flops or bends, it's not mature enough. If the stem is stiff, it's ready.
3. The plant DOESN’T hydrate easily.
Some plants simply do not respond well to being cut and have a hard time "rehydrating" and getting water flowing in the stems.
If you can manage to get these stems “drinking” water again, they will make a great cut flower and last for days. If not, they are basically worthless.
A Simple Trick for Reviving Wilted Stems
In my reading and research about post-harvest care for flowers, I came across something called the "Boiling Water Method" for reviving wilted stems.
I was truly skeptical because the idea of placing stems in boiling water seems insane. In my experiments, I was attempting the opposite - recutting the stems and placing them into cold water. It didn't work.
I decided to give the "Boiling Water Method" a shot on some stems that I was about to throw out. I had cut the stems early in the morning, but they still wilted immediately... and a day later, even after being stored in my floral cooler overnight, they still looked terrible.
![20180720_154342[1].jpg](https://images.squarespace-cdn.com/content/v1/582b872529687fd6acb7423d/1533153748180-HR5FLUZTXWSKPVBAWZ4N/20180720_154342%5B1%5D.jpg)
Time to try the "Boiling Water Method". This is what I did:
1. Boiled water on the stove and poured it into a jar.
2. Re-cut the stems at an angle with clean, sharp flower clippers.
3. Immediately plunged the stem end into the boiling water, angling the blooms out the jar to avoid "steaming" the blooms.
4. Set a timer for 1 hour and walked away (I wanted to watch, but I had work to do!)
*NOTE: This was my first attempt. I learned that it's probably best to fill the jar with about 1 inch of water, so only a small part of the stem is "cooked". That part of the stem can be cut off later.
Also, one hour is probably unnecessary - I was headed out to work and wasn't able to check back earlier.
If you are concerned about "cooking" the stems, try dipping for 10 seconds for soft stemmed flowers and up to a few minutes for "woody" stemmed flowers like hydrangeas. After "searing" in the boiling water, place the stems in cool water.
When I returned, the water was cool and this is what the stems looked like:
![20180720_173433[1].jpg](https://images.squarespace-cdn.com/content/v1/582b872529687fd6acb7423d/1533154042034-LO3T16VSTU6L95BLEXEO/20180720_173433%5B1%5D.jpg)
AMAZING. I was in shock. 2 minutes of work and these flowers were back in business!
I removed the stems from the jar and added them to an arrangement in my dining room. 6 days later, the stems were still looking GREAT.
Now obviously, if your blooms are 5-7 days old and they start wilting, you need to simply accept that they are dying a natural death. Flowers don't last forever.
However, if your blooms are freshly cut and wilting, then you can certainly give the "Boiling Water Method" a try. What do you have to lose? It's better than your other option - throwing them out.
Flowers/Foliage That Might Need a Little Help
Here are a few flower/foliage varieties that respond well to this hydration method:
Artemisia
Basil
Chinese Forget-Me-Not
Dahlias
Dusty Miller
Hollyhock
Honeywort
Hydrangea
Lilac
Mint
Scented Geranium
Shiso/Perilla
Obviously, flowers are not "one size fits all", so this method will not work on all flower varieties.
I highly encourage you to do your own experiments. Have fun with it and set up your own control group and experimental groups.
For example, label several jars - one is the control (you do nothing), one is a stem seared for 10 seconds, one is a stem seared for 2 minutes, 10 minutes, etc. Be sure to analyze and compare your results. This is the best way to learn!
If you consistently have an issue with a flower wilting, first you should make sure you are harvesting at the correct time of day and the correct stage of harvest.
If this does not help (or if you simply cannot cut that early in the day), the "Boiling Water Method" is a good option to try out.
I hope this information is helpful. Give it a try next time you encounter a floppy, sad looking stem... and let me know how it worked!
Top 3 Simple Tips for Beautiful Bouquets
These 3 simple tips will set you up for success
Top 3 Simple Tips for Beautiful Bouquets
“What are your best tips for making a beautiful bouquet? Mine never look as good as I imagine them in my head!”
I hear this question all the time!
You’re in luck - I have some simple, actionable tips that will help.
Over the past 7 years, I’ve crafted thousands of bouquets using seasonal blooms from our farm. When I first started, I’ll admit my bouquets were less-than-stellar (that's a nice way of saying it!) because I was trying to do too many things at once.
As is true with so many things in life… Simplify, simplify, simplify!
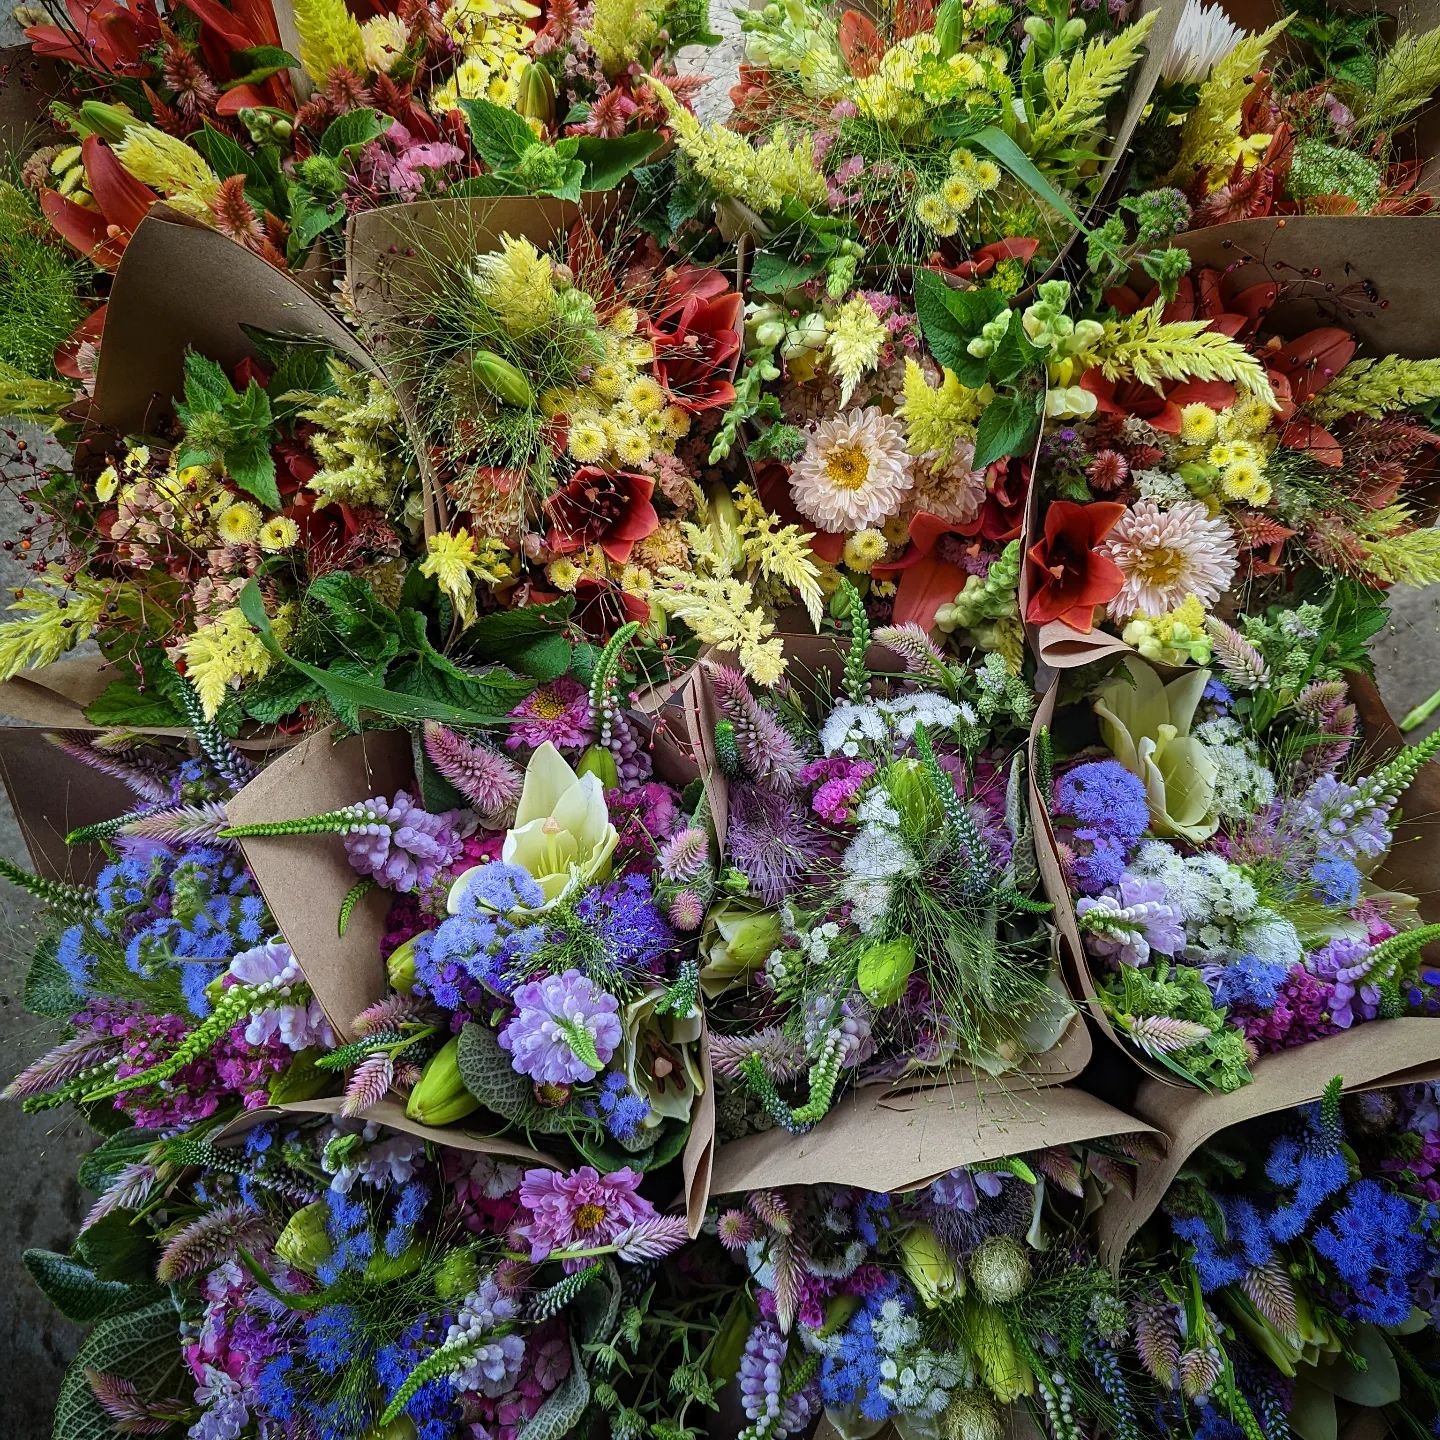
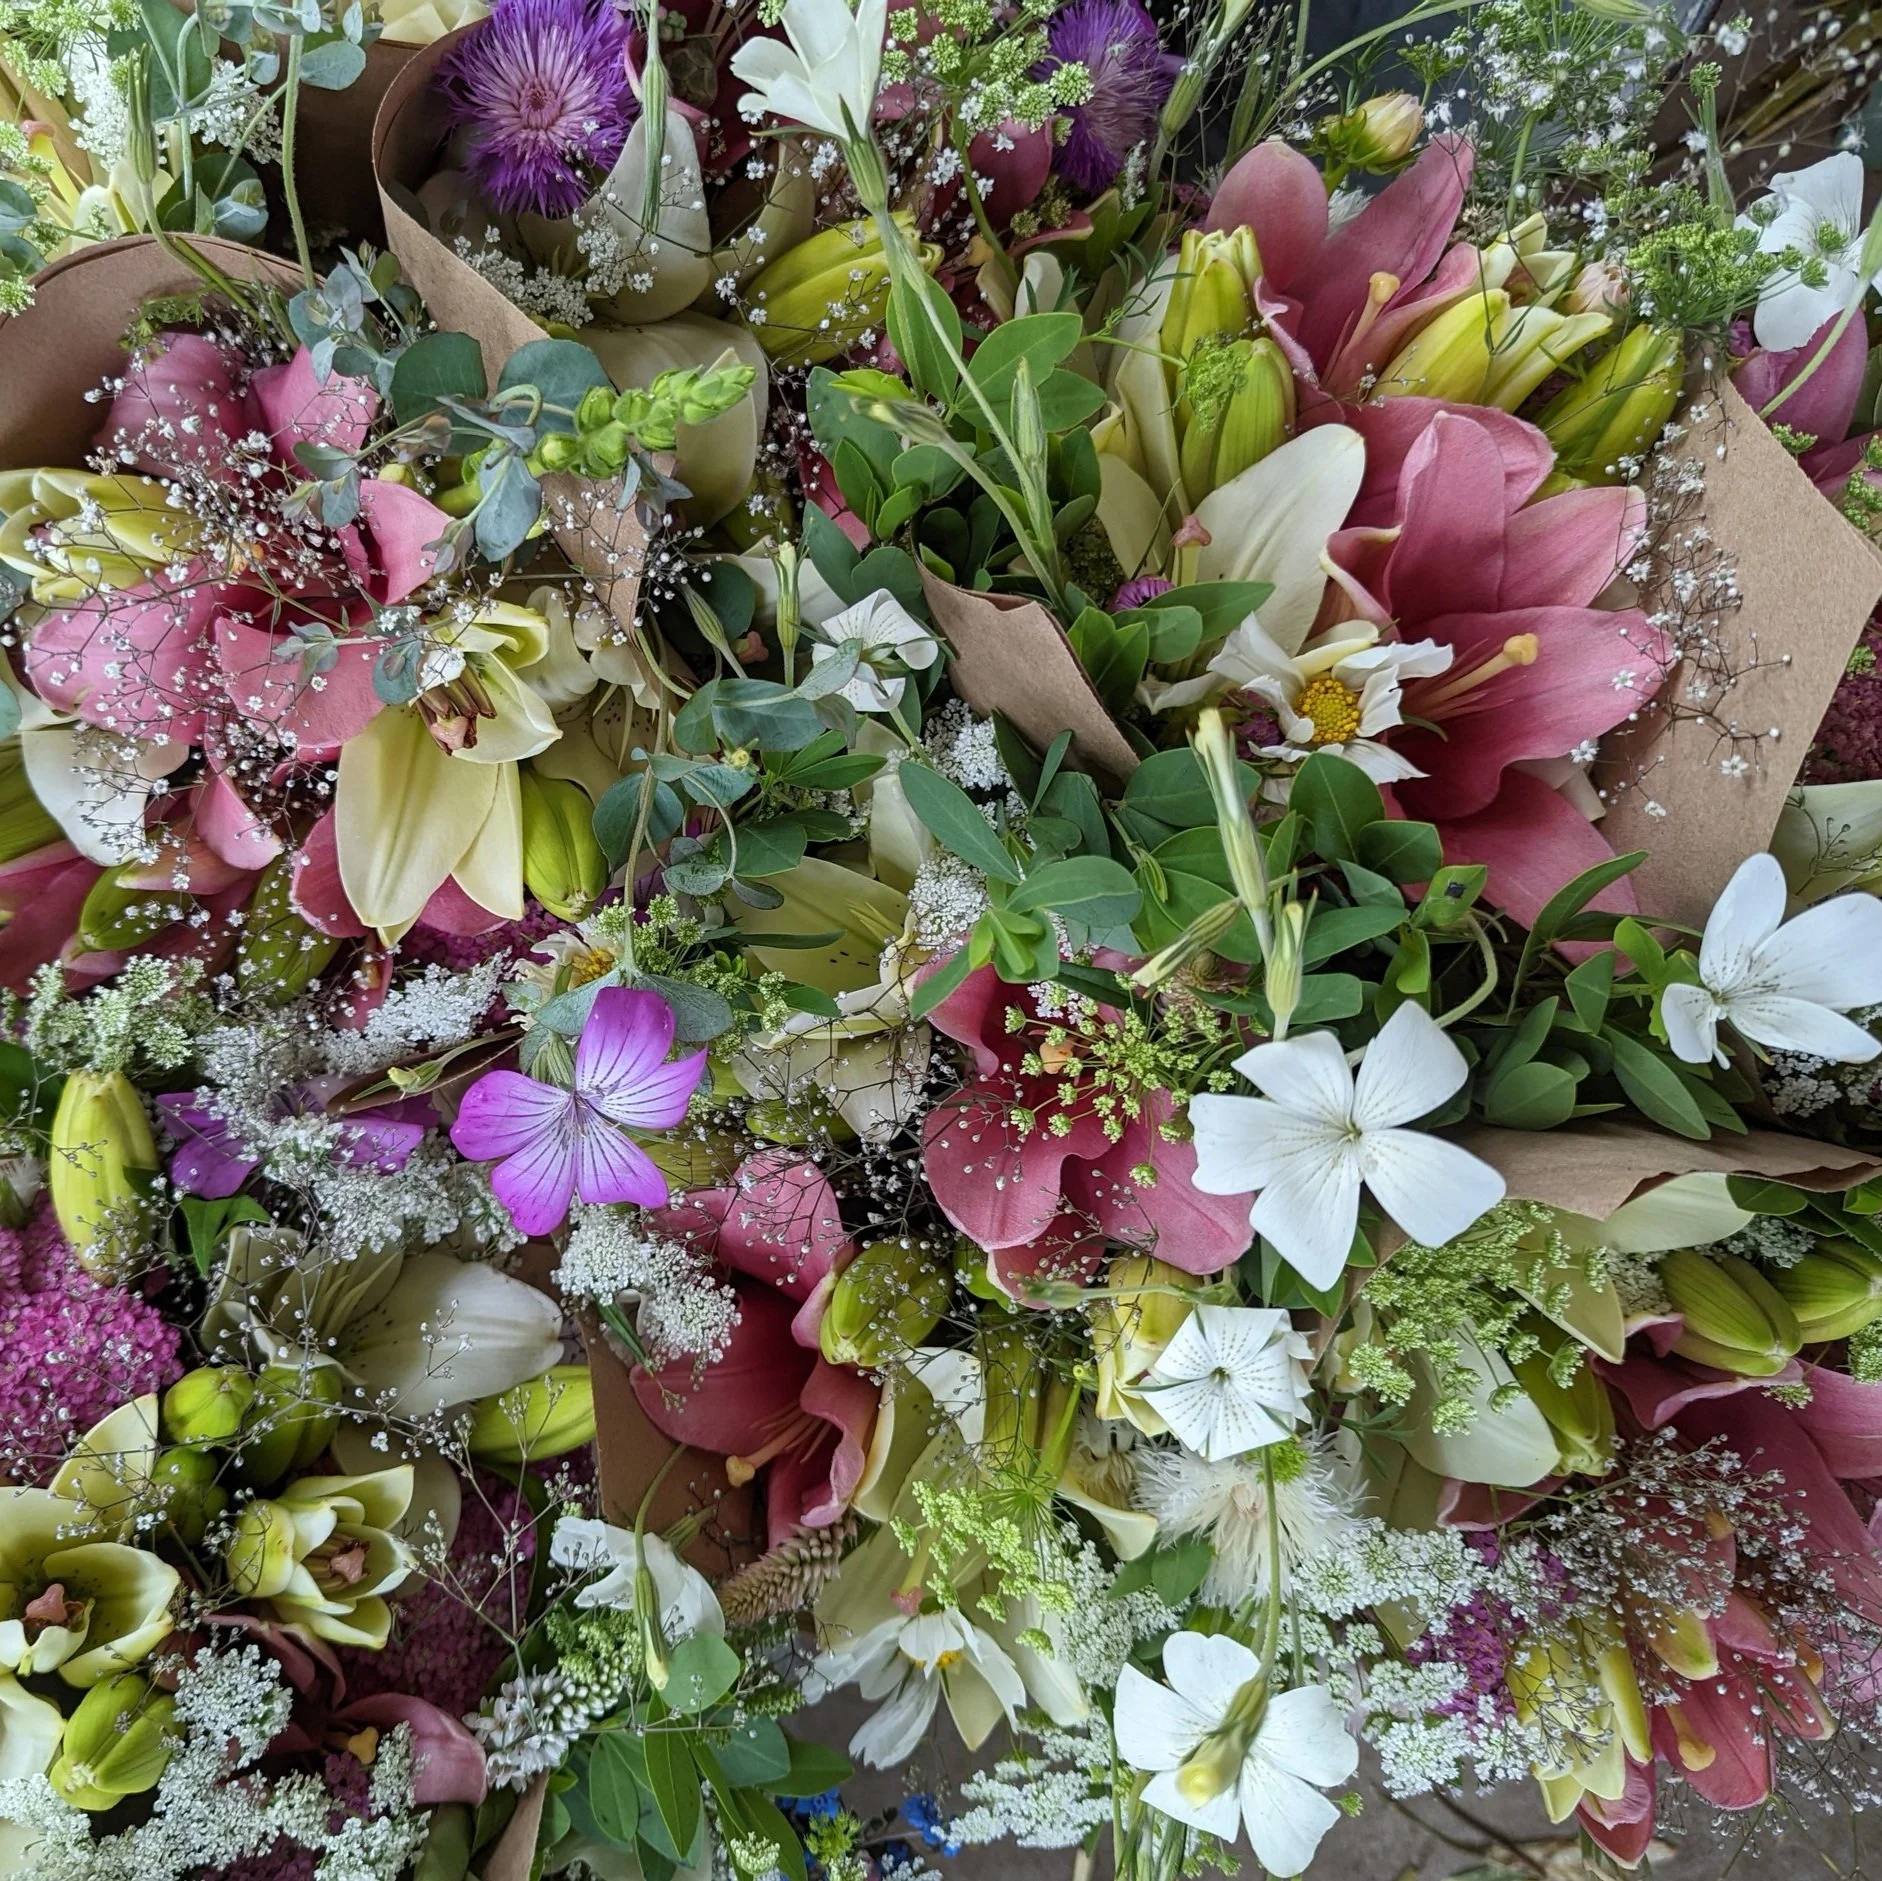
Choose a Color Scheme
Remember sitting in Art class learning about the Color Wheel and rolling your eyes thinking “This is so boring. Why do I need to know this? When will I ever use this?”
You’re gonna use it now, friend. ;)
The Color Wheel is a tool that helps you determine which colors look good together, depending on the “feel” or “look” you’re going for.
Sticking to a recognized Color Scheme, instead of mixing colors together willy nilly, will create a cohesive, pleasing design.
Of course, rules are meant to be broken, but if you’re looking for some guidelines to keep you on track, stick with a Color Scheme.
Color Theory can be complex, so here are a few Color Schemes that are simple and easy to use:
Complementary Colors: Colors directly across from each other on the color wheel. (Ex. Violet and Yellow)
Color Triads: Colors that form a perfect triangle on the color wheel. (Ex. Violet, Green and Orange)
Monochromatic: Multiple shades and tones of one color. (Ex. Varying shades and tones of pink)
Warm Colors: Reds, Oranges, Yellows
Cool Colors: Greens, Blues, Violets
As you can see in the sample photos below, I love to work with “Warm” and “Cool” Color Schemes.
When my daughter and I make our bouquets, we pull out all the “ingredients” (flowers/foliage) we have to work with, then divide them into “warm” or “cool”.
Then we lay out the “cool” color ingredients on the table assembly line style and make all the cool bouquets. After we’re done, we switch to the “warm” color ingredients and make all the warm bouquets.


2. FOCAL, FILLER, FOLIAGE
To simplify the bouquet making process, on our farm we assign every bouquet ingredient to one of these 3 categories:
Focal: The main flowers that capture the most attention.
Filler: The other flowers that compliment the Focal flowers (the vast majority of the bouquet is made of these ingredients).
Foliage: The greenery that creates the foundation for the Focal and Filler flowers
To learn even more about Focal, Filler and Foliage, read this Blog Post.
We like to divide a bouquet into roughly ⅓’s so that the overall mass of the bouquet is:
⅓ Focal Flowers
⅓ Filler Flowers
⅓ Foliage
We find this simple loose formula, along with a well defined Color Scheme leads to a well balanced, pleasing bouquet.

Focal: Dahlias
Filler: China Aster, Veronica, Celosia, Snapdragon, Strawflower, Lisianthus, Gypsophila, Statice
Foliage: Eucalyptus, Plectranthus
3. LIMIT THE “INGREDIENTS” in your “recipe”
It’s very easy to succumb to the temptation to add “a little bit of this, a little bit of that” to a bouquet… until you’re left with a cluttered, mish-mash bouquet that has no distinctive “flavor”.
The secret here is CONSTRAINT.
Instead of choosing 30 different flowers/foliage, CONSTRAIN YOURSELF and choose 5-10 flowers/foliage, and use them in multiples of 3-7 stems.
Why? The human eye loves pattern and repetition. Repeated shapes, colors, textures… all of these are pleasing to the eye and our brain can make sense of them. If a bouquet has no pattern or repetition, it looks chaotic and our brain doesn’t know how to process it.
Here’s a sample bouquet “Recipe”:
Focal - 1 Lily stem
Filler - 3 Snapdragon stems, 5 Yarrow, 3 Ammi (False Queen Anne’s Lace) stems, 5 Agrostemma stems
Foliage -3 Baptisa stems
There are countless more bouquet tips, but again I want to emphasize:
Simplify, simplify, SIMPLIFY.
Once you master these 3 simple tips, you’ll be crafting your own beautiful bouquets in no time!

How to Support Your Cut Flowers in the Garden to Prevent Ruined Blooms
Outsmart those damaging summer storms by proactively supporting your plants!
How to Support Your Cut Flowers in the Garden to Prevent Ruined Blooms
Maybe you’ve been there…
Your cut flowers are at their peak production and looking AMAZING!!! The stems are tall and straight and you’re days away from harvesting buckets and buckets of blooms!
And then… a summer storm whips through with 50+ mph winds. In just 30 seconds, your MONTHS of hard work is ruined as the plants topple over and smash into the mud.
*Sigh*
Can you tell this has happened to us more than a few times on the farm? ;)
Ok, here are a few things I know for sure:
There WILL be summer storms with damaging winds. This is not a surprise or a shocking event. In fact, it is to be EXPECTED.
Cut flowers plants that are not supported WILL crash during these storms… unless they are supported.
Thank goodness there are ways to prevent this from happening.
Today, I will discuss a few different methods you can use in your garden to support your cut flower plants.
If I’m being honest, I will tell you that I don’t like supporting my cut flower plants. No matter what type of support you use, it will slow you down when you’re harvesting… and quite frankly, some plants are a nightmare to harvest through supports and can become a tangled mess (I’m lookin’ at you, Scabiosa and Cosmos…). But it’s better than losing entire beds of plants to a storm.
Netting
Hortonova Trellis netting is a popular option for many growers. The netting can be used vertically for climbing plants or horizontally stretched over planting beds.
Pro Tip: Place the netting over the beds when you direct sow the seeds or plant the seedlings. I usually stretch the netting so it’s hovering about 18” over the ground. As the plants get bigger, they will grow up through the netting.
I recommend securing the netting with sturdy rebar stakes or t-posts. When we started the farm, we couldn’t afford t-posts and instead used plastic stakes… and they simply are not sturdy enough and the netted plants topple over.


Cattle Panel Support
While Hortonova netting has saved my butt many times, I’ve got no love for it. At the end of the season, it’s a tangled mess. We reuse it for as many years as possible, but eventually it will have to go in the trash.
One day, I saw a photo on Instagram posted by Cathy of “Miss Effie’s Flower Farm” in Iowa. Cathy’s husband, Cliff, created a brilliant solution for supporting her plants using metal cattle panel fencing from the farm store.
My husband thought Cliff was a genius and he started fashioning our own version of cattle panel plant supports.
The supports can be customized to fit your beds/growing area. Below is a video of how my husband bent the panels.
These supports are MUCH sturdier than Hortonova netting and I don’t find myself cursing as much when I’m harvesting Cosmos and Scabiosa. Ha!
But the real beauty of these supports is that they can “live” in the garden forever and don’t have to be “put away” at the end of the season. When I’m ready to clear out the beds, I just lift up the panel, remove the plants and put the panel back in place.
They are also very useful for early spring plantings. If you see that frost is coming, you can simply throw a sheet over the panel and protect your tender seedlings.
The only downside is the cost of the panels. We eventually want to phase out Hortonova netting completely and only use the cattle panel supports, but it will take us a few year to achieve that goal. In the meantime, we make more supports each year as our budget allows.


Corralling
For our Dahlias, we use a support method called “Corralling”.
There are lots of different ways to grow and support Dahlias, but this is what works for us.
We grow the plants in single rows that are about 12” wide. We then place t-posts at the corners of the long bed and then about every 12 feet down the length of the bed. We use polypropylene string stretched tightly around the t-posts to effectively “corral” the plants into the 12” wide bed. The string keeps the plants from toppling over into the aisle.
Most of the Dahlias we grow reach 3-4 feet tall, so we run a string line at about 12-18” and another at about 30-36”. Some Dahlias will reach over 6 feet tall, so those plants get a third string line to help them behave.
We plant over 1,000 Dahlias each season and find this to be the most efficient method for us. You can certainly use Hortonova netting for Dahlias, but I hated harvesting through the netting so much (it was very time consuming!) that we switched to corralling.


Tomato Cages
If you are growing a smaller number of plants and want to support them individually, tomato cages are an excellent option!
Here’s a photo of a Dahlia I’m growing in my vegetable garden. Eventually, the plants will hide the tomato cage, but the cage will keep doing it job.
Be sure to set up the tomato cage right away when you plant the tuber/seedling, so that you don’t damage roots/tubers installing it later in the season.

To support or not to support….
Many people ask me ”Do I HAVE to support all my plants? Is there anything I can skip netting?
Well, it really depends on where you live. If you’re growing in an open field, yes, you will likely need to net/support everything. Nearly all cut flower plants need support of some kind. Just do it. You’ll be so glad you did when those storm roll through.
However, if you are growing in a protected area that is sheltered from wind, you might be able to get away with only netting some of your plants.
On our farm, we net/support pretty much everything except:
Sunflowers
Statice
Zinnias
Most perennials


My Favorite Seed Sources for the Home Gardener
Confused about where to buy seeds? I've got you covered!
My Favorite Seed Sources for the Home Gardener
One of the #1 questions I field on a regular basis is:
"Where do you buy your seeds?"
The Short Answer? EVERYWHERE.
Seriously, it seems like every store I enter, I'm drawn like a moth to a flame to the seed section. Do you know how many stores carry seeds in the spring?!? It's crazy. My family sometimes has to physically drag me away from those enticing displays.
I can't help it!!! I buy seeds where ever I go - dollar store, grocery store, hardware store, Target... they are everywhere!
The Long Answer? EVERYWHERE. ;)
Ok, fine, so I'll try to narrow it down... a bit.
![20180105_143903[1].jpg](https://images.squarespace-cdn.com/content/v1/582b872529687fd6acb7423d/1515181587806-6HFZOJLH8YE8MXDA9I8Q/20180105_143903%5B1%5D.jpg)
Here are few suggestions I usually make before I give Seed Source advice:
1. Seek out seed companies that are located in a similar growing environment to yours. This not completely necessary, but it makes sense that if a plant variety does well in their trial gardens, it will probably thrive in YOUR garden.
So if you live in the Pacific NorthWest, choose companies in the PNW. If you live in the NorthEast Coast, go for seed companies in the NEC. If you live in the deep South, go with companies in the deep south. You get it.
2. Are you interested in saving your own seeds to use next year? Then you will want to seek out companies that specialize in "Heirloom" or "Open Pollinated (OP)" varieties. These seeds will save "true to type".
You should NOT try saving seeds from Hybrid varieties. You will know it's a Hybrid if you see the term "F1" on the seed description. Hybrid is not a "bad" trait - it simply means it's a specifically pollinated cross of 2 different plant varieties and the seeds saved from the resulting fruit/veggie/flower will NOT be "true to type".
3. Are you going to grow your garden with only Organic methods? If so, you may want to lean toward purchasing certified Organic seed. Most Organic plant varieties are bred specifically to thrive without the use of synthetic fertilizers, pesticides and fungicides. But don't feel like you have to limit yourself to only certified Organic seeds.
Given the choice, I will purchase Organic, but I'm not a stickler for ONLY Organic.
My Favorite Seed and Gardening Sources
Your Local Garden Center
In our neck of the woods (near Grand Rapids, MI), my favorite place to shop for seeds is Fruitbasket Flowerland (I hit up the location on 28th St., near US 131). They have a HUGE selection of flower and vegetable seeds, seed potatoes, onion sets, tubers, bulbs, etc. As a bonus, they have a highly knowledgeable and helpful staff. I look forward to my annual spring shopping trip.
High Mowing Organic Seeds
Located in Vermont, this seed company has been my trusted go-to source for vegetable seeds.
Great selection, appropriate for home gardens, homesteads and farms.
They offer a good mix of Open Pollinated and Hybrid seed varieties.
Ordering online is super easy.
100% Certified Organic
Non-GMO Project Verified
Johnny's Selected Seeds
This Maine based company has a stellar selection. Johnny's not only offers great seeds, but also their website is chock full of valuable growing information. This is where I order the majority of my flower seeds, since they offer flowers varieties that are suitable as cut flowers (only some flowers are good for cutting/bouquets!).
Wide vegetable selection makes them the trusted source for many small farms, but also appropriate for the home gardener.
Offer Hybrid, Open Pollinated and Organic choices.
Fantastic selection of Herbs and Cut Flowers.
Well known for their high quality growing supplies, such as seed trays, heat mats, plastic mulch, etc.
Territorial Seed Company
Located in Oregon, this company offers a selection similar to Johnny's Select Seeds. I often find a few unique varieties that are not available anywhere else, like their "Yum Yum Gold" mini sweet bell peppers, which are AH-MAZING and some super fun tomato varieties.
Excellent selection of Hybrid, Open Pollinated and Organic seeds.
Lots of unique cut flowers, peppers and tomatoes.
100% Non-GMO
Easy on-line ordering
Baker Creek Heirloom Seeds
Ah, Baker Creek... their seed catalog is the stuff of dreams. *Swoon!* If you are looking for fun, unique or rare varieties, look no further. Jere and Emilee Gettle, the founders of the company, and their employees quite literally scour the globe as seed explorers, searching for new (or perhaps we should say ancient!), endangered and rare seed varieties. You must check them out! They are located in Missouri, but also have stores in Connecticut and California.
You get a free pack of seeds with every order. It's a fun surprise!
GMO free seeds
Supporter of heritage and heirloom seeds
All seeds are Open Pollinated (so you can become a seed saver, or course!)
Rare, exotic seeds that you won't find anywhere else, along with some familiar faces
Seed Savers Exchange
If you are really geeked out about seed saving, consider a membership to the Seed Savers Exchange, one of the nations largest "seed banks". Their mission is to preserve our diverse agricultural heritage. They are located in Iowa.
All seeds are Open Pollinated (obviously!)
Non- GMO
Many certified Organic options
Offer "Certified Heirloom Varieties", which means they have been saved and shared by home gardeners for generations.
Great selection of Heirloom tomatoes and peppers!
Grow Organic/Peaceful Valley Farm and Garden Supply
Located in California, Peaceful Valley Farm and Garden Supply is a homesteader's dream come true. They offer everything from seeds to gardening tools/equipment to cheese-making supplies to composters to dehydrators to beekeeping supplies! I could go on and on. Be sure to sign up for the email subscription service, as they regularly offer flash sales and discounts to their subscribers.
100% GMO free seeds
Certified Organic seeds
HUGE selection of farming, gardening and homesteading supplies. Watch out! You're going to put EVERYTHING on your wish list!!! Ha!
Good source for Organic garden fertilizer and compost
Prairie Road Organic Seed
In full disclosure, I have not YET purchased seeds from this company… but I got to know the owners over the winter and I love what they doing! They can expect as seed order from me soon ;)
My farming friend down the road purchased from them and was very pleased with the quality of the seed.
Theresa does a great job maintaining their helpful, easy to navigate website. It’s full of tasty recipes and tips to help you on your growing journey.
Certified Organic seeds.
Excellent customer service. You get to talk to the people who actually grow the seed!
Botanical Interests
Ok, I must confess one of the reasons I love this company is because of their great artwork/illustrations. Everything about their seed pack and products are beautiful and sure to make you feel joyful and inspired! If you live in the Grand Rapids area, be sure to visit Fruitbasket Flowerland, since they carry this brand in the store. Otherwise, their online ordering is simple.
Non- GMO seed
Great selection of Heirloom and Organic vegetable choices (and the occasional hybrid, but most are OP).
Varieties are selected for home garden use.
Large selection of flowers, many that make good cut flowers
Nature and Nurture Seeds
This Michigan based seed company offers a delightful selection of veggies, herbs and flowers. Some of my favorite tomato varieties, such as “Growing in Place” cherry tomato and “Early Detroit” slicer are sold here.
Non-GMO
Organic and Heirloom seeds
Great for Midwest growers
Select Seeds
This seed company is 100% pure delight. Select Seeds specializes in flower seeds, with many unique and hard to find species. Their catalog is one of my favorites to explore!
They sometimes offer free shipping on orders over $50 for early bird buyers.
Shop by types, such as “Fragrant”, “Heirloom”, “Cottage Garden”, etc
Old House Gardens
This small company is located in my home state of Michigan (Ann Arbor). They specialize in rare, endangered and Heirloom Bulbs/Tubers. Their customer service is top-notch and their catalog/website is so fun to explore. A great source for hard to find:
Daffodills
Peonies
Lillies
Tulips
Daylillies
Irises
Dahlias and more...

Your Turn!
What are your favorite sources for seeds and supplies? I would LOVE to hear about them.
Have fun searching for seeds and dreaming about spring!
-Lori

All your burning questions about growing answered in one place
Learn about a unique and special way for us to grow together!
All your burning questions about growing answered in one place
When I started growing cut flowers in 2016, I had no idea what I was doing (just being honest!). After fumbling around on the internet for months, killing countless seedlings, growing a handful of sad looking blooms… I needed help.
Figuring out how to grow cut flowers was a LOT harder than I expected! So many variables! So many options!
Unfortunately, I made the mistake of visiting online groups/forums for advice. I quickly realized there were many people who were determined to prove that their way was the “best/only” way to grow.
There was too much “You have to do it THIS WAY or else ______” and the not-so-subtle tone of “I’m the expert. You’re not. Listen to me”.
It left a bad taste in my mouth.
I longed for a mentor who would listen to me.
Someone who didn’t try to give me a one-size-fits-all answer.
Someone who actually cared and wanted to see me succeed.
Someone who would challenge and empower me to become a better grower, instead of just giving me answers (because that’s not how we grow!).
Do you feel that longing too?
My longing for a mentor inspired me to become that person for YOU.
Today, it’s my joy and delight to mentor hundreds of cut flower gardeners in my online course, “Backyard Cutting Garden 101”.
When you join the online course, you’ll learn:
How to grow in your own unique climate and location.
How to grow your skill level and confidence.
How to grow beautiful flowers… and a beautiful life.

Watch the video below to learn more about the course.
If you’ve dreamed about growing cut flowers but you’re stuck thinking:
“I’m overwhelmed and I don’t know where to start…”
Or…
“I don’t have time to figure this all out on my own…”
Join me. You don’t have to do this on your own.
Are you going to make mistakes? Absolutely.
Are you going to kill some plants? Count on it.
Are you going to burst with pride when you see what you’re capable of? 100%
You’ll be guided, challenged and encouraged to approach every circumstance with a “growth mindset” : a belief that challenge is invigorating and failure means you’re making progress in the right direction.
We’re going to grow together, in every sense of the word.
Do you know how many people avoid doing what they desire because of Fear of Failure?
But not you. You’re brave. You’re determined. You’re willing to learn and step outside your comfort zone.
Join me. We’ll do this together and you’ll grow in clarity and confidence.
Take THAT, Fear of Failure.

In this course, you'll learn:
MODULE 1: How to Choose the Best Cut Flowers
MODULE 2: Planning Your Garden
MODULE 3: Seed Starting 101
MODULE 4: Digging In: Preparing Your Garden
MODULE 5: Growing: Best Practices for Beautiful Blooms
MODULE 6: Harvesting and Arranging
BONUS MODULE: How to Grow Dahlias
BONUS MODULE: Favorite Cut Flowers Deep Dive
BONUS MODULE: Checklists and Guides, including a copy of my actual seed sowing chart.
In addition to this, you also get:
A 90+ page downloadable, printable workbook, packed full of growing information, reference lists and more.
Direct access to me through the Questions and Comments section at the end of each Module. I personally read and address every question.
Watch the video for a “Behind the Scenes” view of “Backyard Cutting Garden 101”
NOTE: The “Questions and Comments” section of the course is my favorite part of “Backyard Cutting Garden 101”.
This is where I get to interact with YOU and answers all your questions. We get to go deep and specific together.
As much as I wish I could answer all the growing questions I receive via email and social media, there’s simply not enough hours in the day. Instead, I devote my energy to mentoring my “Backyard Cutting Garden 101” students and operating Three Acre Farm.
Have you ever wished you could (virtually) sit down with me and “pick my brain”? This course offers you the opportunity!
You have your very own flower growing mentor, right at your fingertips.
(Hmmmm… ok, I lied. My FAVORITE part of “Backyard Cutting Garden 101” is when my students send me all the STUNNING photos of the beautiful blooms they grew in their own backyard. I wish they could see my huge smile and hear me cheering out loud!)

Are you ready to grow? This is the invitation you’ve been waiting for.
Join “Backyard Cutting Garden 101” and let’s get started together!