

Potato, Corn and Cheese Chowder: The Perfect Fall Potato Soup Recipe
The perfect potato soup for a cold day!
Potato, Corn and Cheese Chowder
Oh friends, fall is here.
In my head, fall is always bright and sunny and beautiful, filled with sights and smells of apples, cinnamon, spice, pumpkins, falling leaves, and cornstalks. In my mind, fall is a wonderland.
But yesterday, reality hit hard. Cold, driving rain that lasted 2 days. Depressing darkness. Mud, muck and wet leaves. And us with no heat in the house (don't ask- it will be fixed soon!).
What to do? Make soup, of course. There is nothing better to warm the body and soul, am I right? I know I'm not the only soup fan out there! When I shared this photo on social media yesterday, I had multiple requests for the recipe... so here you go.
I found this recipe years ago in a magazine and I've adapted it to suit our tastes over the years. It's a favorite around our house because we can make it with almost entirely locally sourced ingredients. The potatoes, onions, corn and herbs come right from our own garden. The milk, cream and bacon come from our neighboring farm down the road.
This soup tastes like fall in Michigan. There is something so grounding and comforting about locally grown food.
I hope you enjoy the recipe... and feel free to change it up to meet the needs of your family! That is the lovely thing about soup - recipes are forgiving, flexible and easily customized.
![IMG_20171024_165539_636[1].jpg](https://images.squarespace-cdn.com/content/v1/582b872529687fd6acb7423d/1508947946895-M5600TZ0PKX5A9G6GLMS/IMG_20171024_165539_636%5B1%5D.jpg)
Potato, Corn and Cheese Chowder
Serves about 4 people
Active Prep Time: 15 minutes
Cooking Time: 1 hour
3 large potatoes, diced into 1/2" pieces
3 cups water
1 bay leaf
1 tsp salt
1 medium onion, finely diced
1 tbsp butter, olive oil, beef tallow, lard or bacon fat (the best!!!)
3 tbsp all-purpose flour
1 1/2 cups whole milk or cream or half & half... or a blend of these
1 1/2 cups frozen, fresh or canned corn
2-4 tbsp chopped fresh chives
2-4 tbsp chopped fresh parsley
1/2 tsp cumin
salt and pepper to taste
pre-cooked bacon crumbles (optional, but seriously, why wouldn't you?)
4 oz of grated cheese
A FEW NOTES:
I usually double this recipe so we can have leftovers. I haven't tried freezing it, but that has never been an issue because it gets gobbled up so quickly.
If you are adding bacon, you can cook the bacon first, then use the bacon fat to saute the onion and make the roux. I usually have small containers of pre-cooked, chopped bacon crumbles in my freezer, so I use that. Cooking bacon adds another step and more time.
You can use any type of potato (Russet, Yukon Gold, red skin...). I always keep the skins on because I am much too lazy to peel potatoes.
1. Bring water, potatoes, bay leaf and salt to a boil in a large soup pot. Cook potatoes until they are softened and easily pierced with a fork.
2. While waiting for potatoes to cook, saute the onion in a separate pot (2 qt pot works well) in the butter/oil/fat until soft and translucent. *See note above about cooking bacon.
3. Add flour to the sauteed onions and mix well to coat the onions with flour. Very slowly, pour milk/cream into the pot, stirring constantly with a fork or whisk to make a roux (a thickener made by mixing flour and fat).
4. Once the roux has thickened, pour it into the soup pot with the cooked potatoes.
5. Stir in the corn, herbs and spices (be sure to taste test when adding salt and pepper). Simmer gently for at least 15 minutes, but preferably longer to allow flavors to meld. Do not allow soup to boil.
6. Add cheese just before serving or allow people to sprinkle the cheese on their own bowl.
Enjoy!
*Do you have any favorite fall soup recipes to share? I'd love to hear them!*
-Lori

Drowning in Tomatoes? Try this easy (and delicious!) preserving method.
A simple method for preserving LOTS of tomatoes EASILY!
Drowning in Tomatoes?
It happens every year.
The first of the tomatoes ripen and I'm in my glory.
Fresh salsa!
BLTs!
Caprese Salad!
We have tomatoes with nearly every meal. My daughter eats them for snacks. I delight in their beauty and delicious taste. We grow Heirloom varieties and their flavors are incredible.
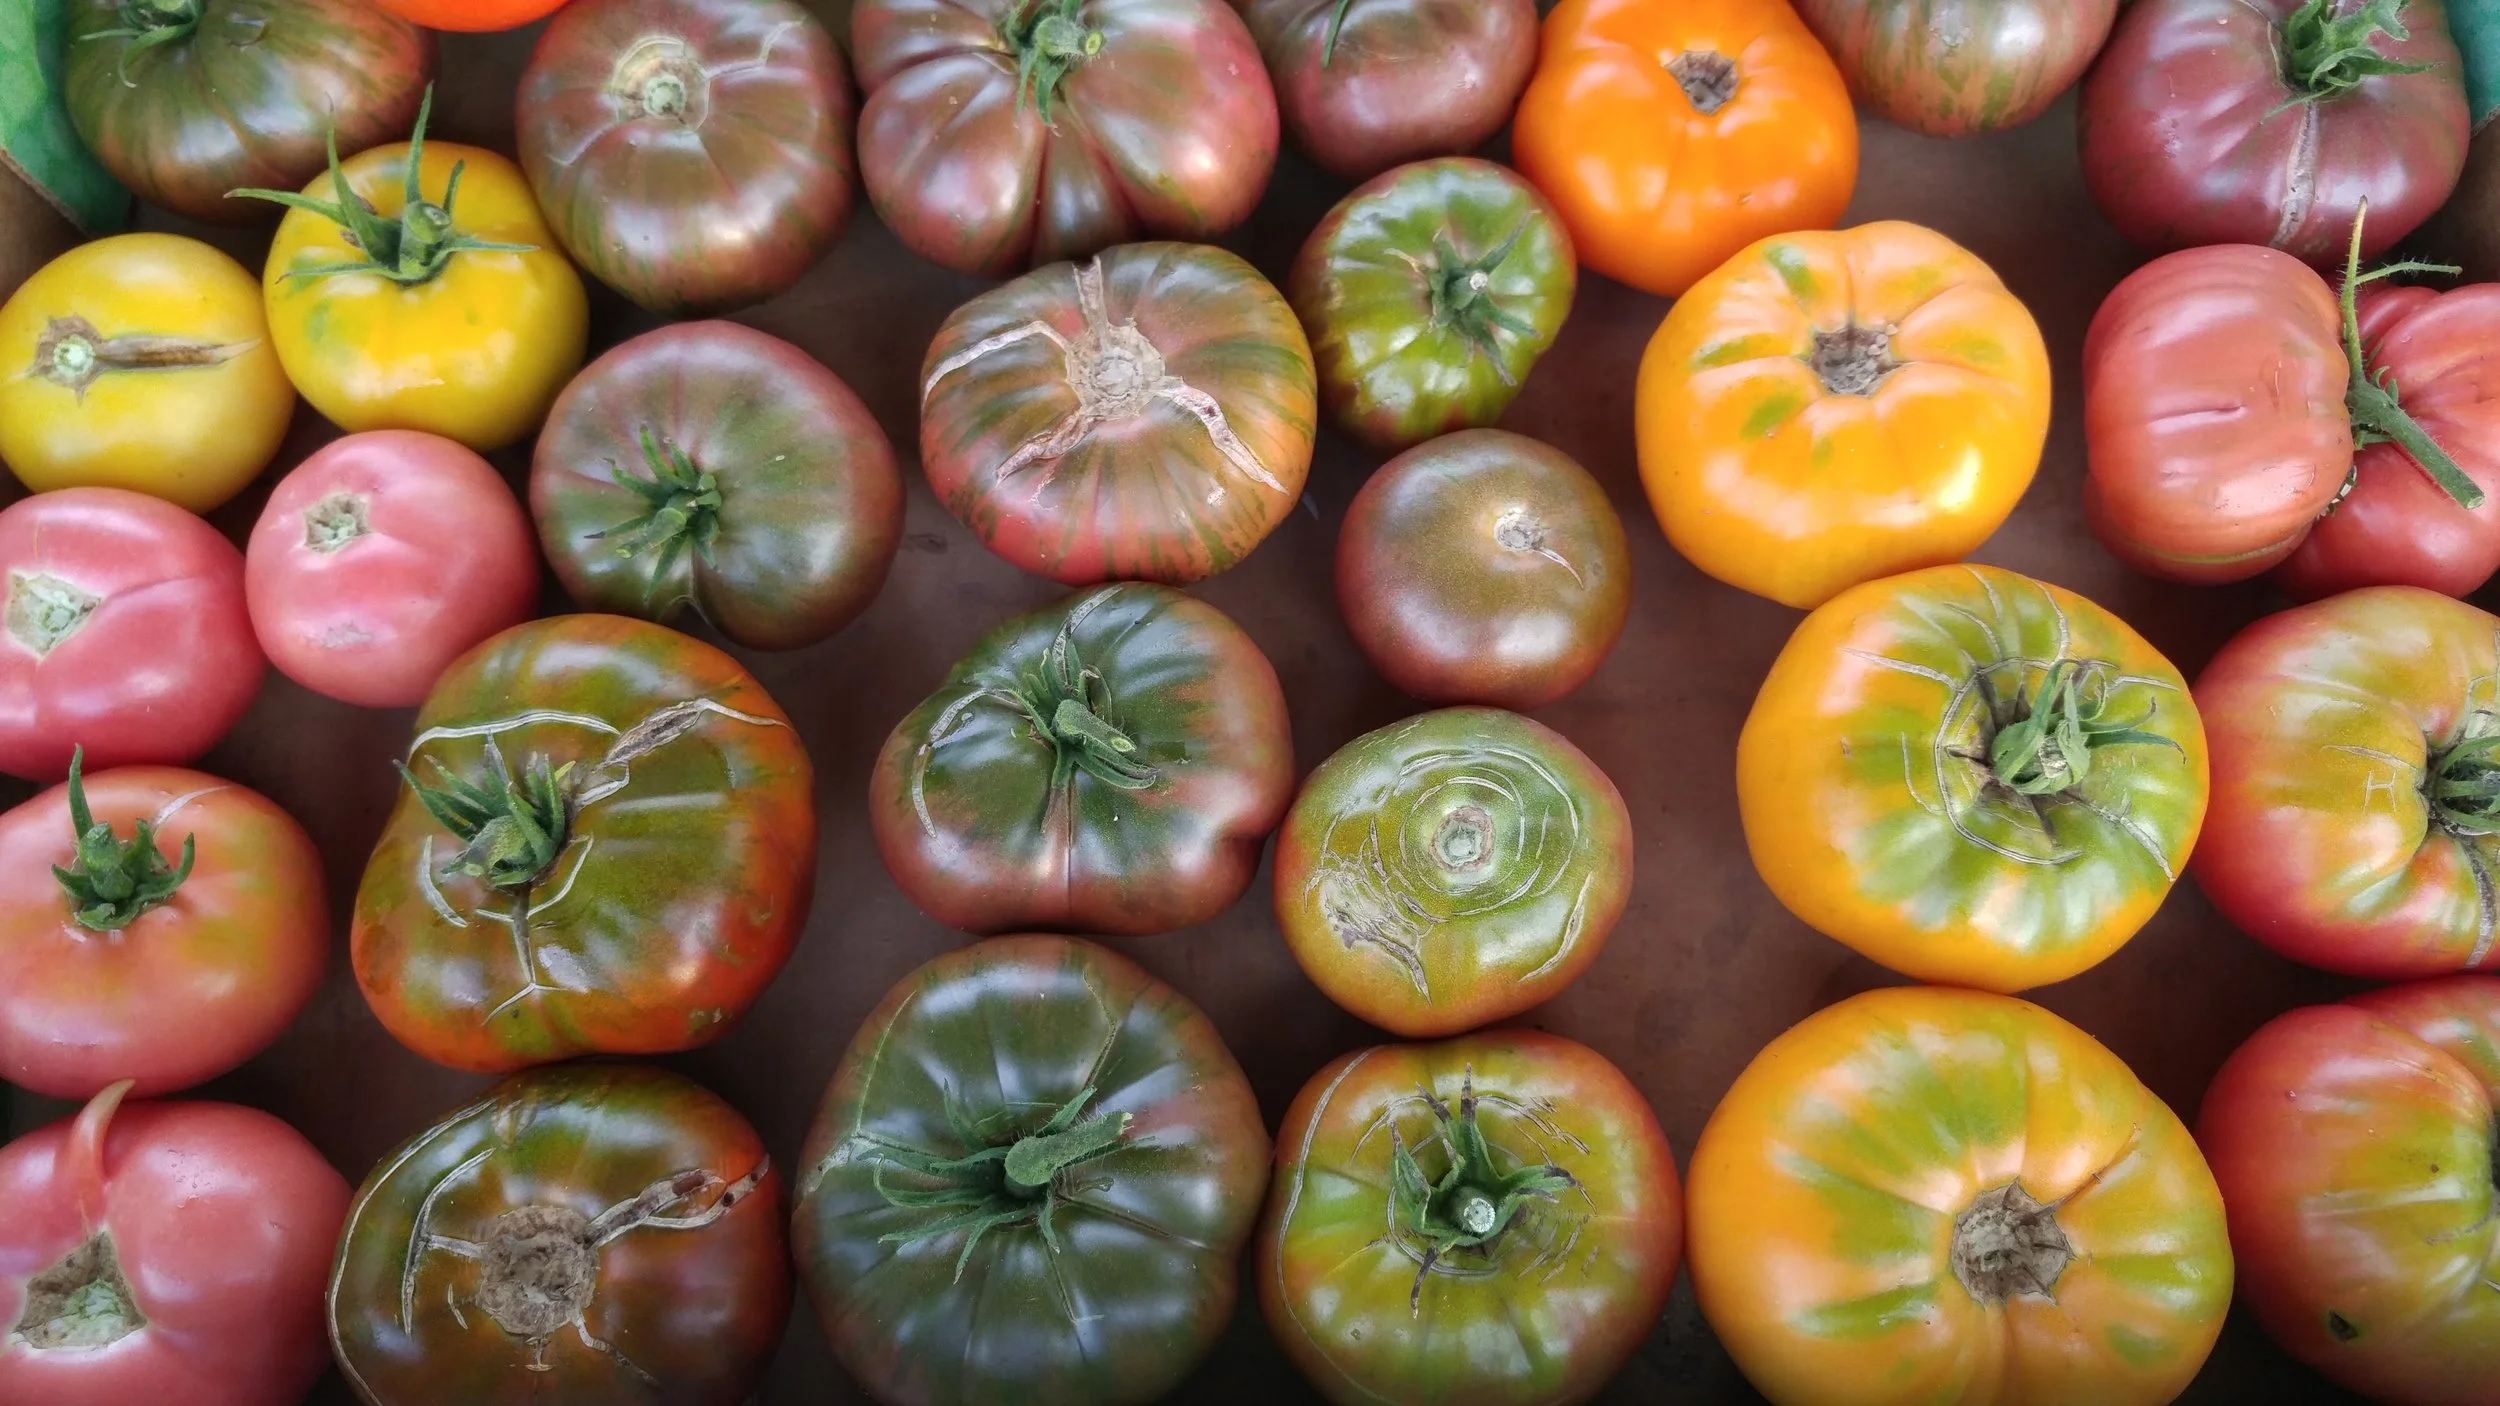
But then... THEY JUST KEEP COMING. Before I know it, every surface in the kitchen is covered in tomatoes. We're drowning in tomatoes!
I need to turn that huge pile of tomatoes into something FAST, before they go bad.
This season, I've been so busy that I just can't seem to find the time for canning tomatoes. So instead, I decided I would make frozen tomato paste this year.
Last summer, I made a few batches of tomato paste and quickly used them all up over the winter. I found myself using the paste for all sorts of meals, such as:
Homemade pizza
Pasta
Curry
Soup
Stew
Frittata (baked egg dish)
Casserole
Anything that needs a little more flavor!
I love this method because it's easy and it uses up massive amounts of tomatoes. It's also a good way to use up blemished tomatoes that might not make the cut for canning or slicing.
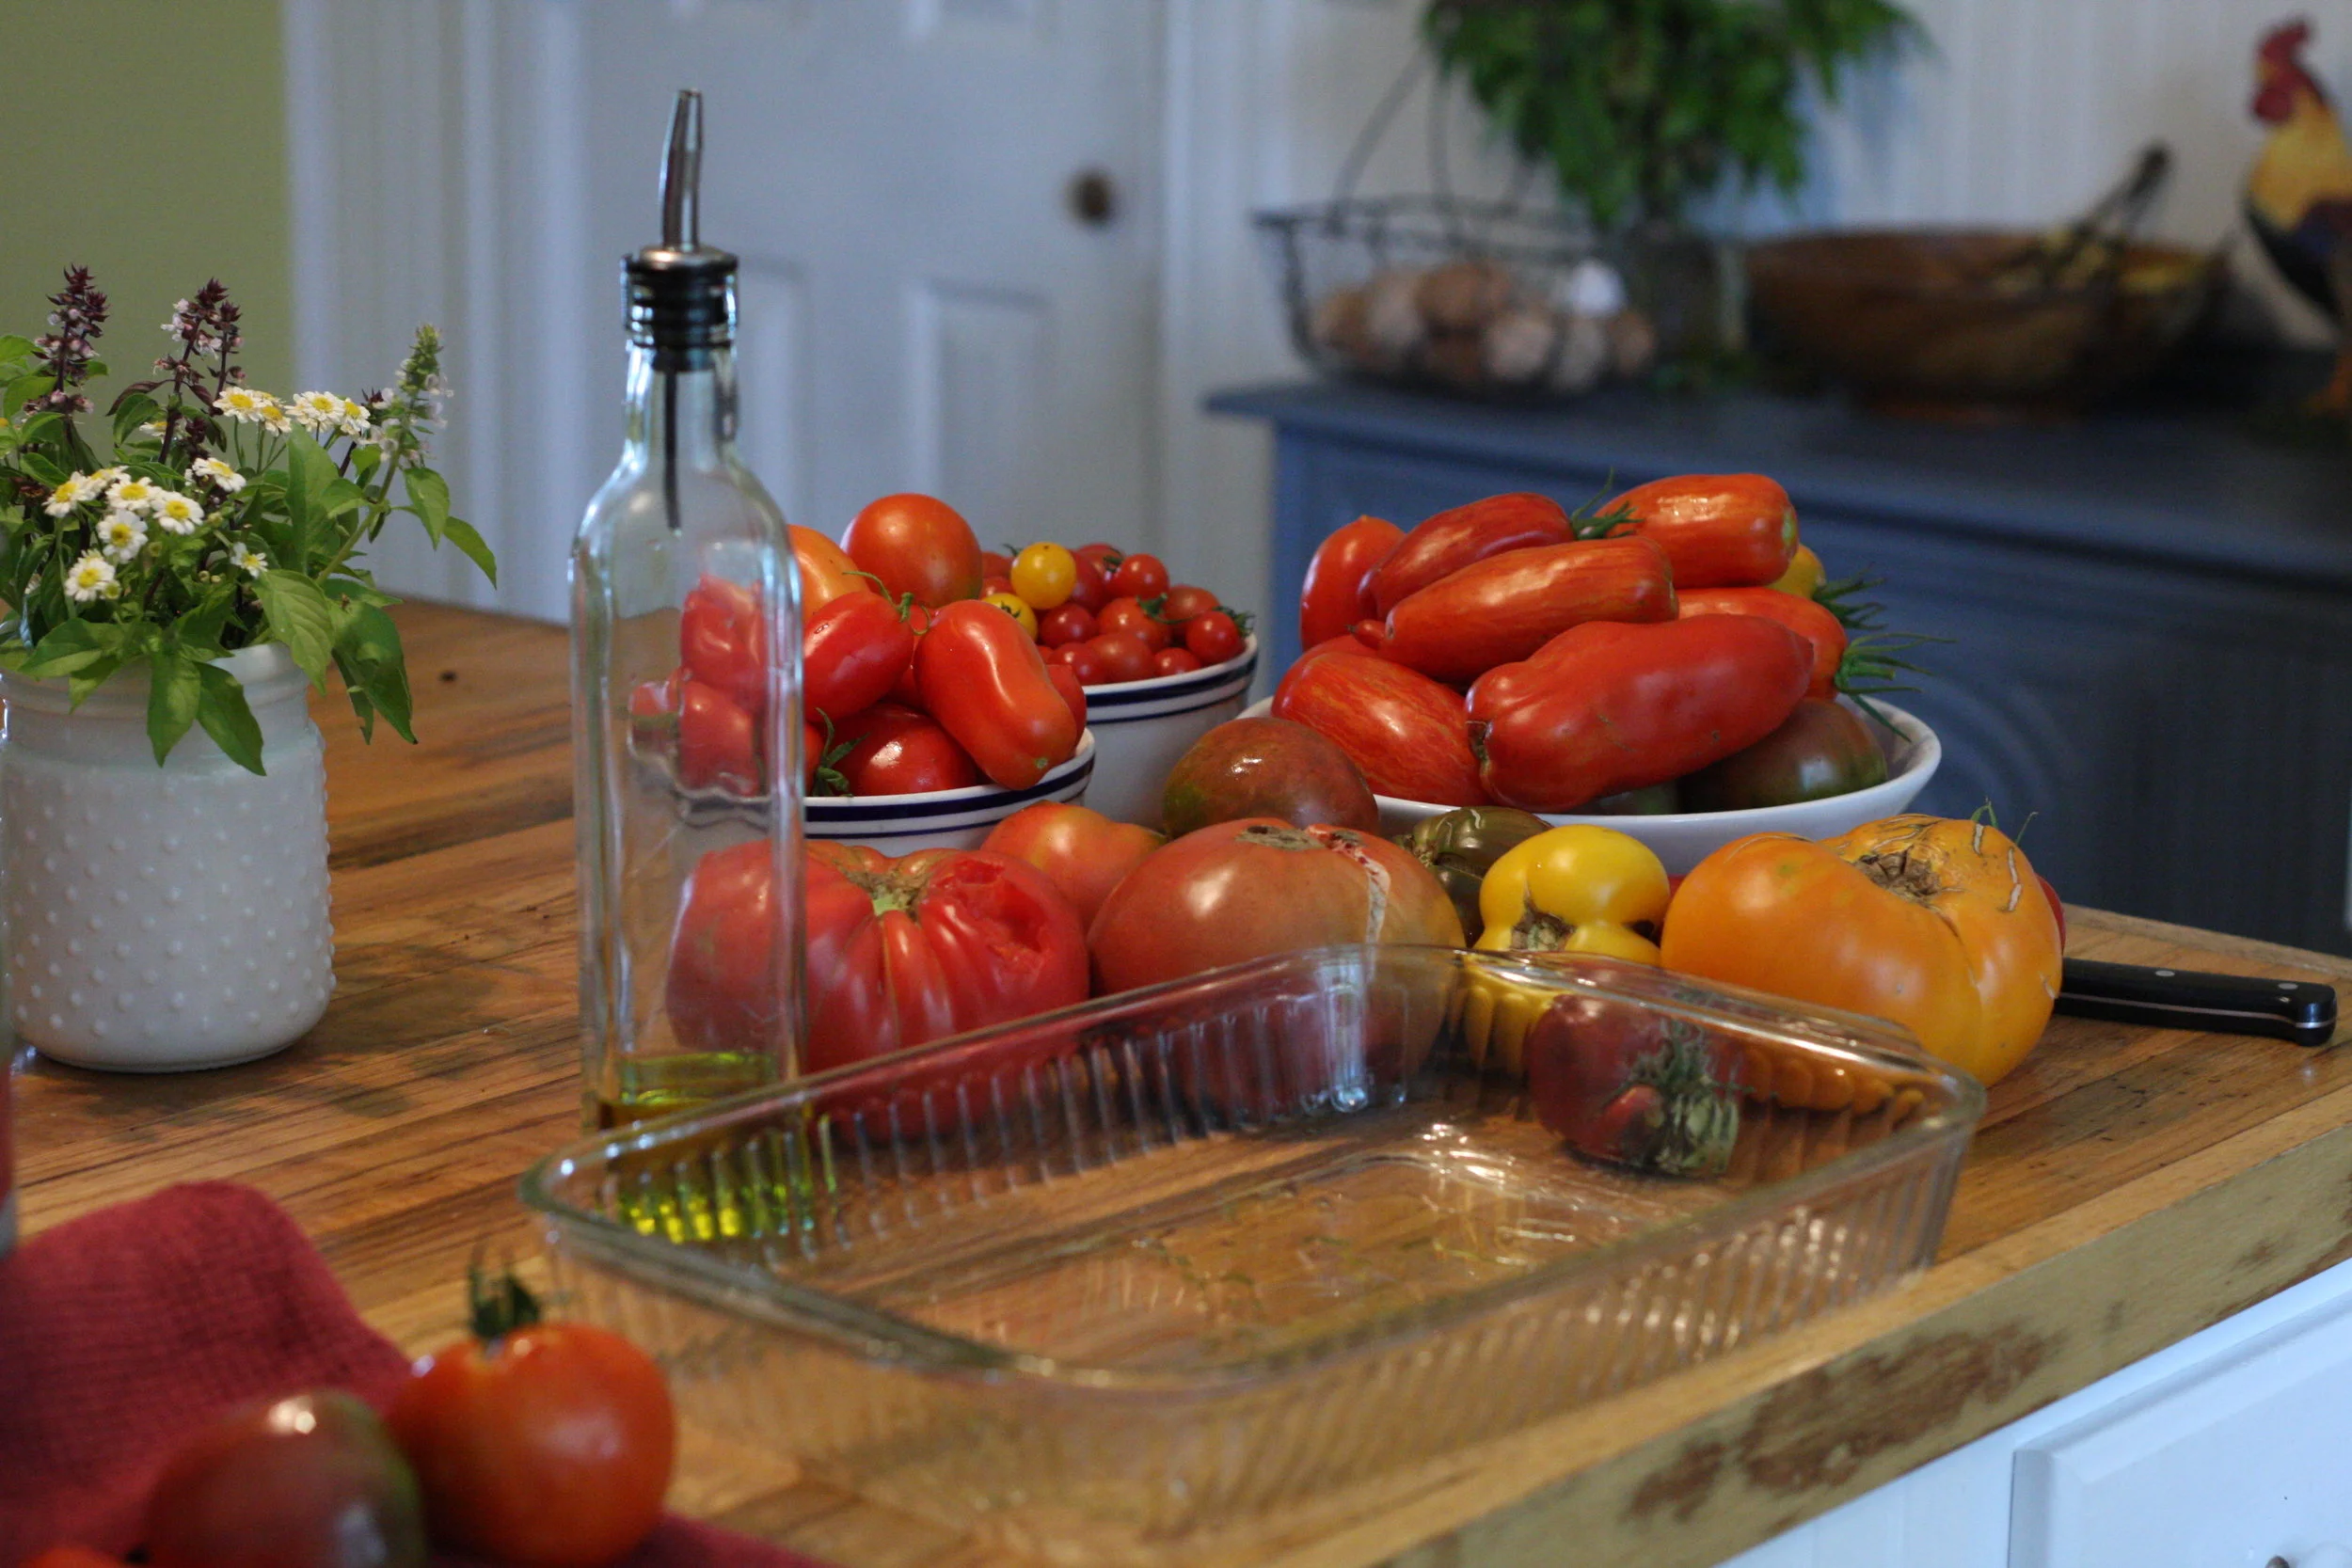
Supplies
Tomatoes (of course!), any kind (including cherry tomatoes)
Salt
Olive Oil
Herbs and spices (optional - I used Italian seasoning, but you can add whatever you like, fresh or dry)
Garlic cloves (optional)
Pan or dish for roasting
A Food Mill- I use an old fashioned hand cranked Foley food mill I found at a garage sale. Ask around - a friend might have one you can borrow. The food mill removes the seeds and skin for you.
Ice Cube Trays
Method
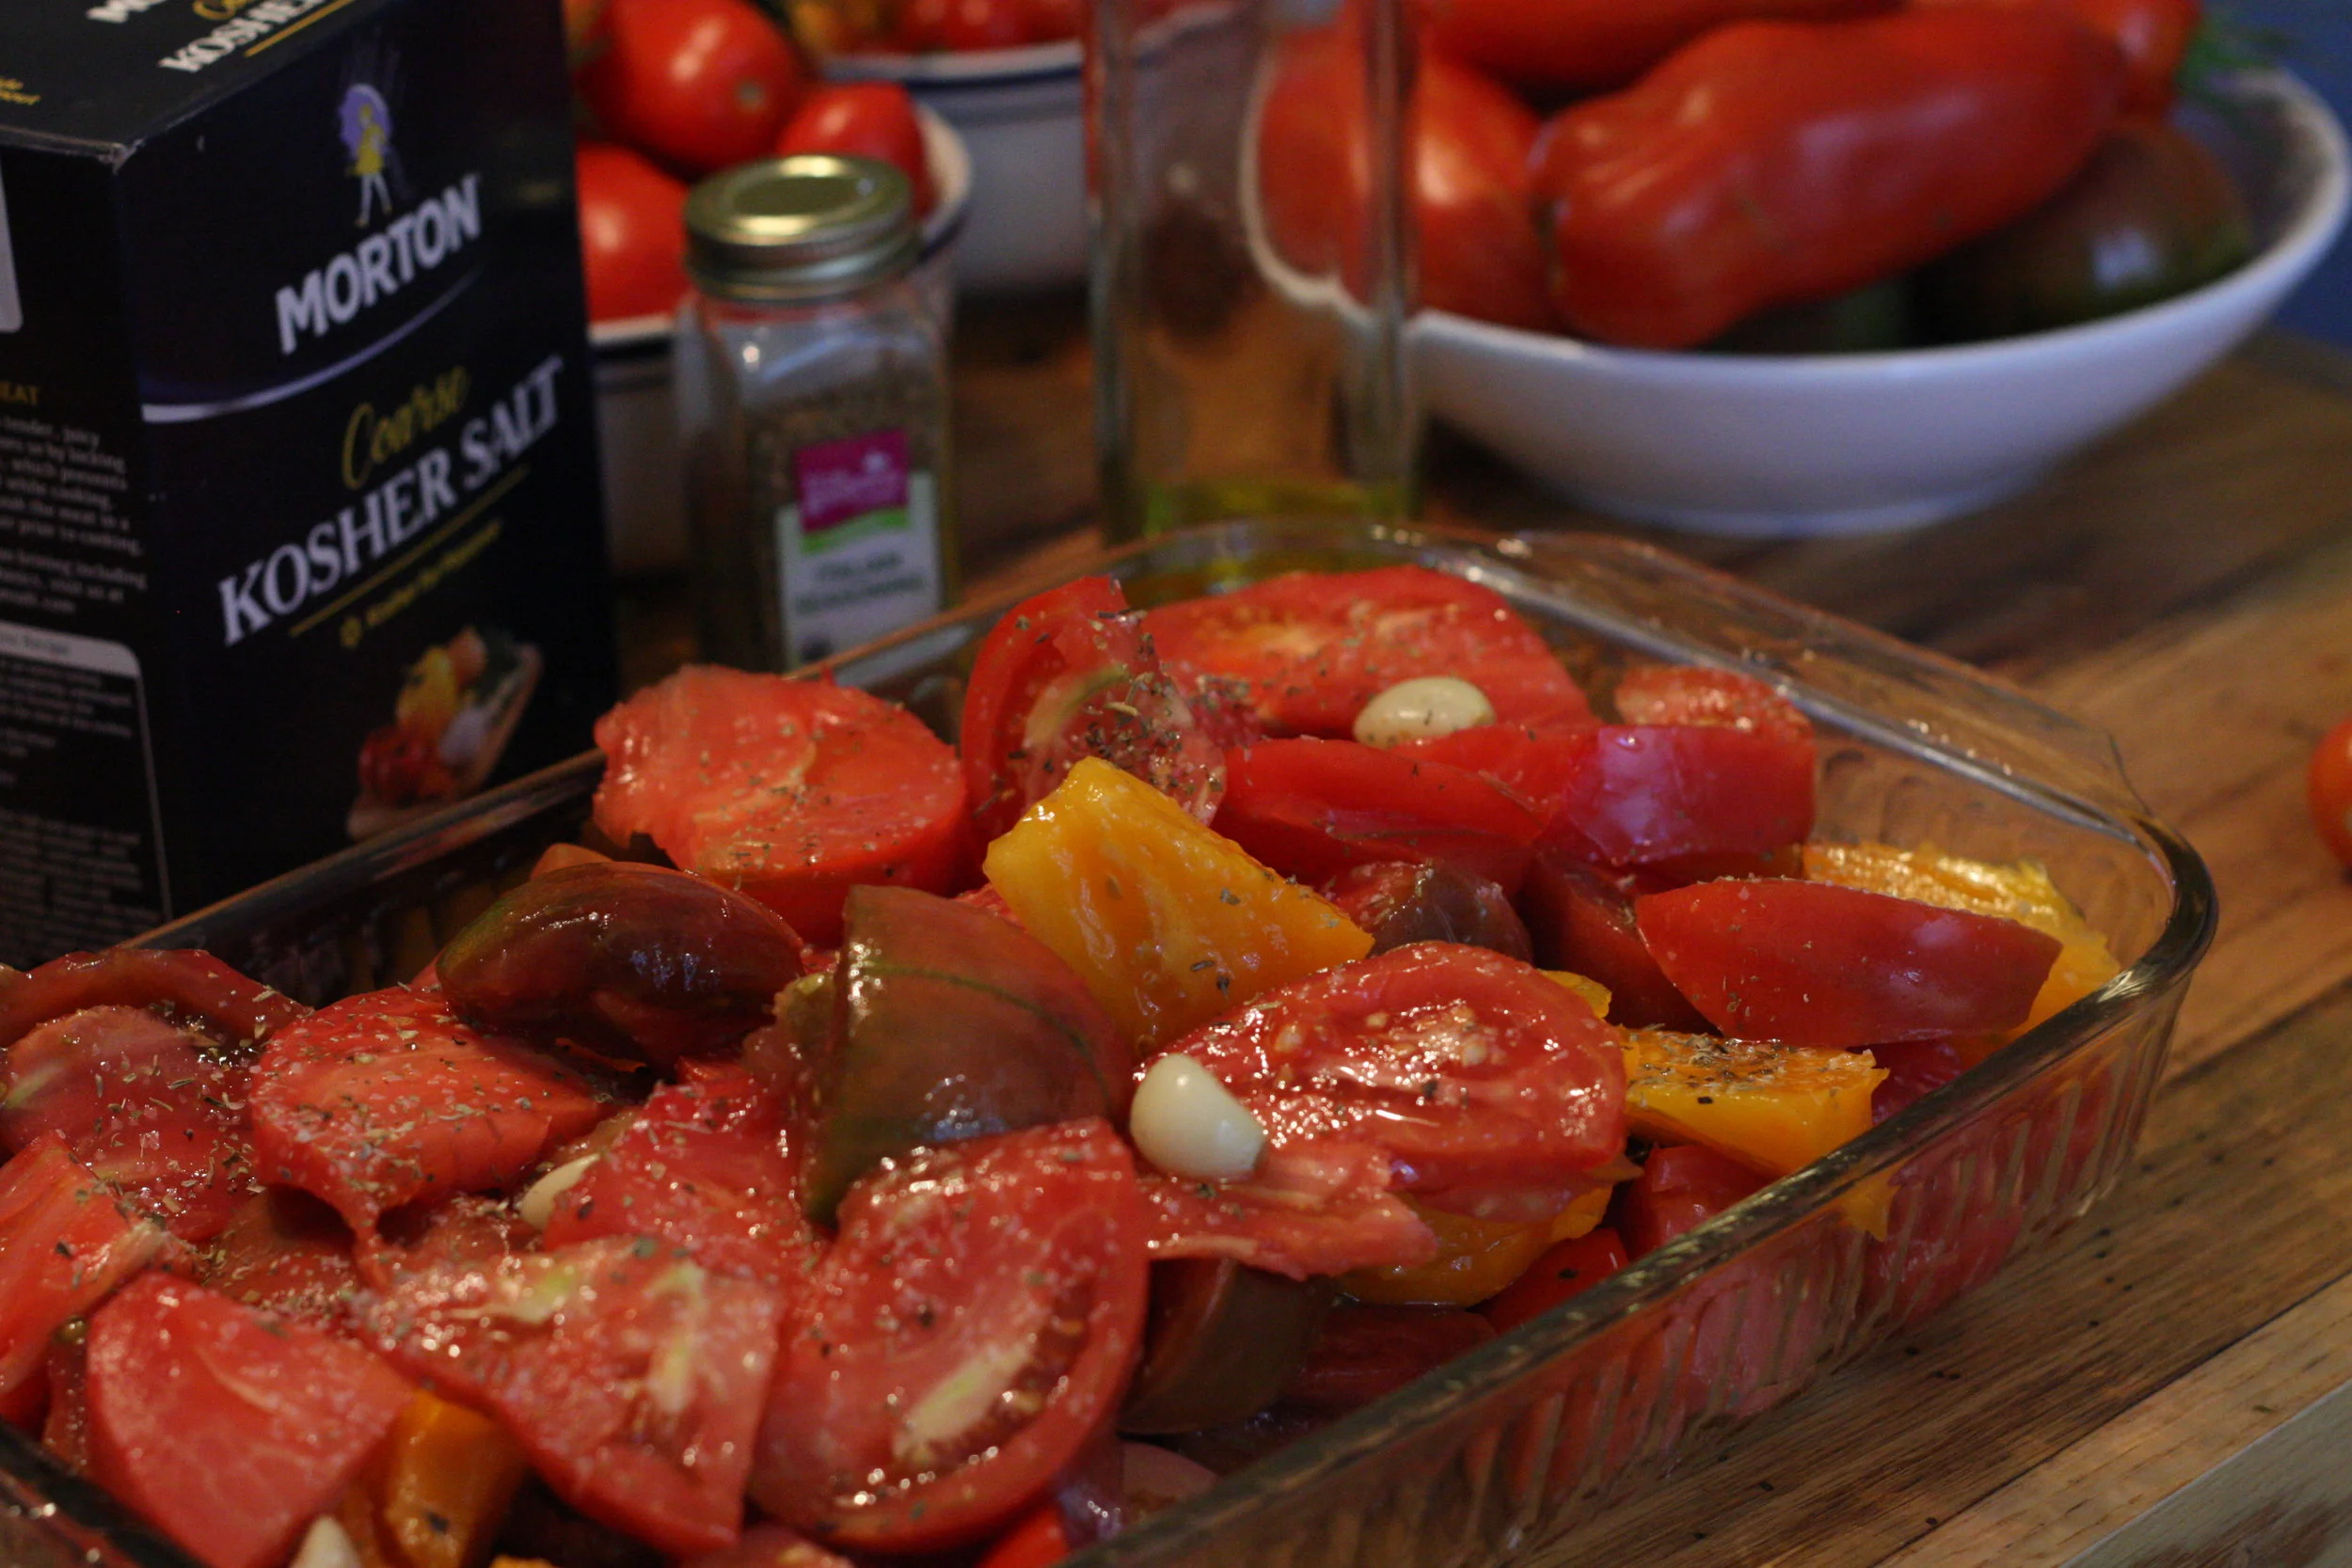
1. Preheat your oven to 400 degrees. Drizzle olive oil into the dish/pan. Roughly cut up your tomatoes right into the dish/pan.
2. Drizzle the tomatoes with a bit more olive oil. Sprinkle with herbs/spices and throw in a few garlic cloves. Top with some salt. Don't be shy.
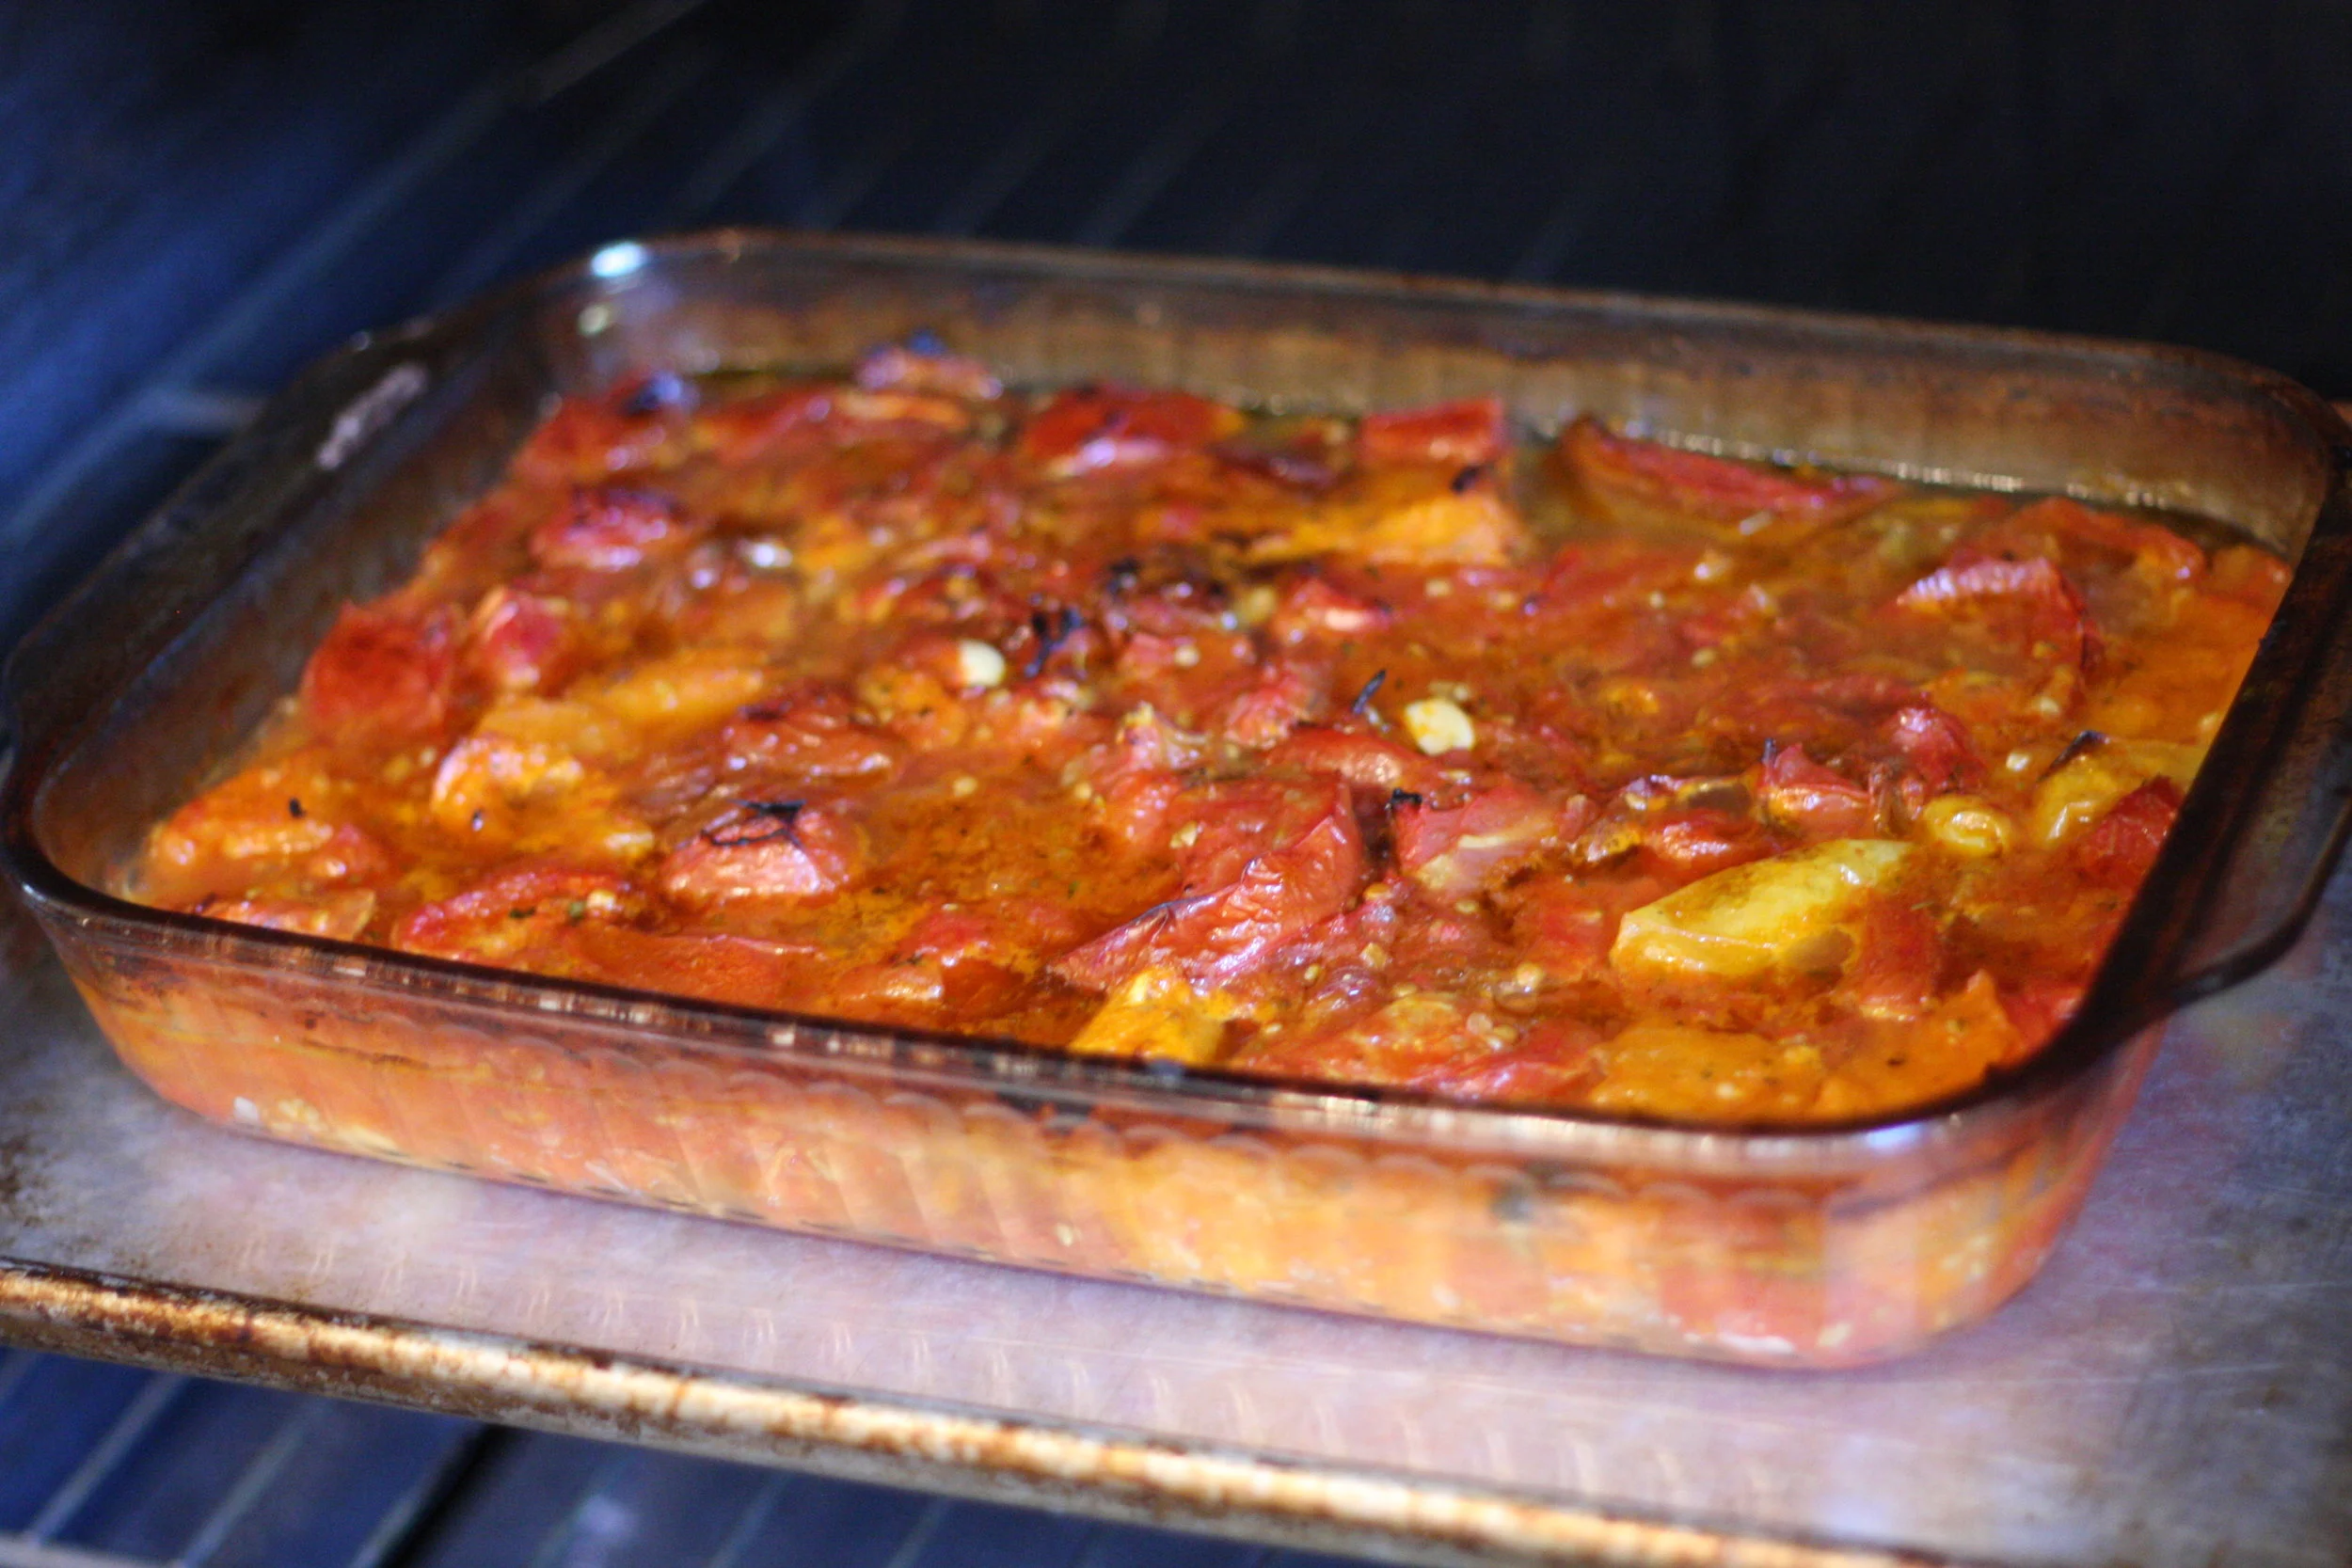
3. Roast tomatoes until they start to darken on the top. You can stir them occasionally. Try not to drool as the smell of roasted tomatoes and garlic fills your whole house. I could even smell it from 100 yards outside the house!
4. Remove roasted tomatoes from oven and allow to cool a bit. Prepare your food mill. Mine sets right over top another pot.
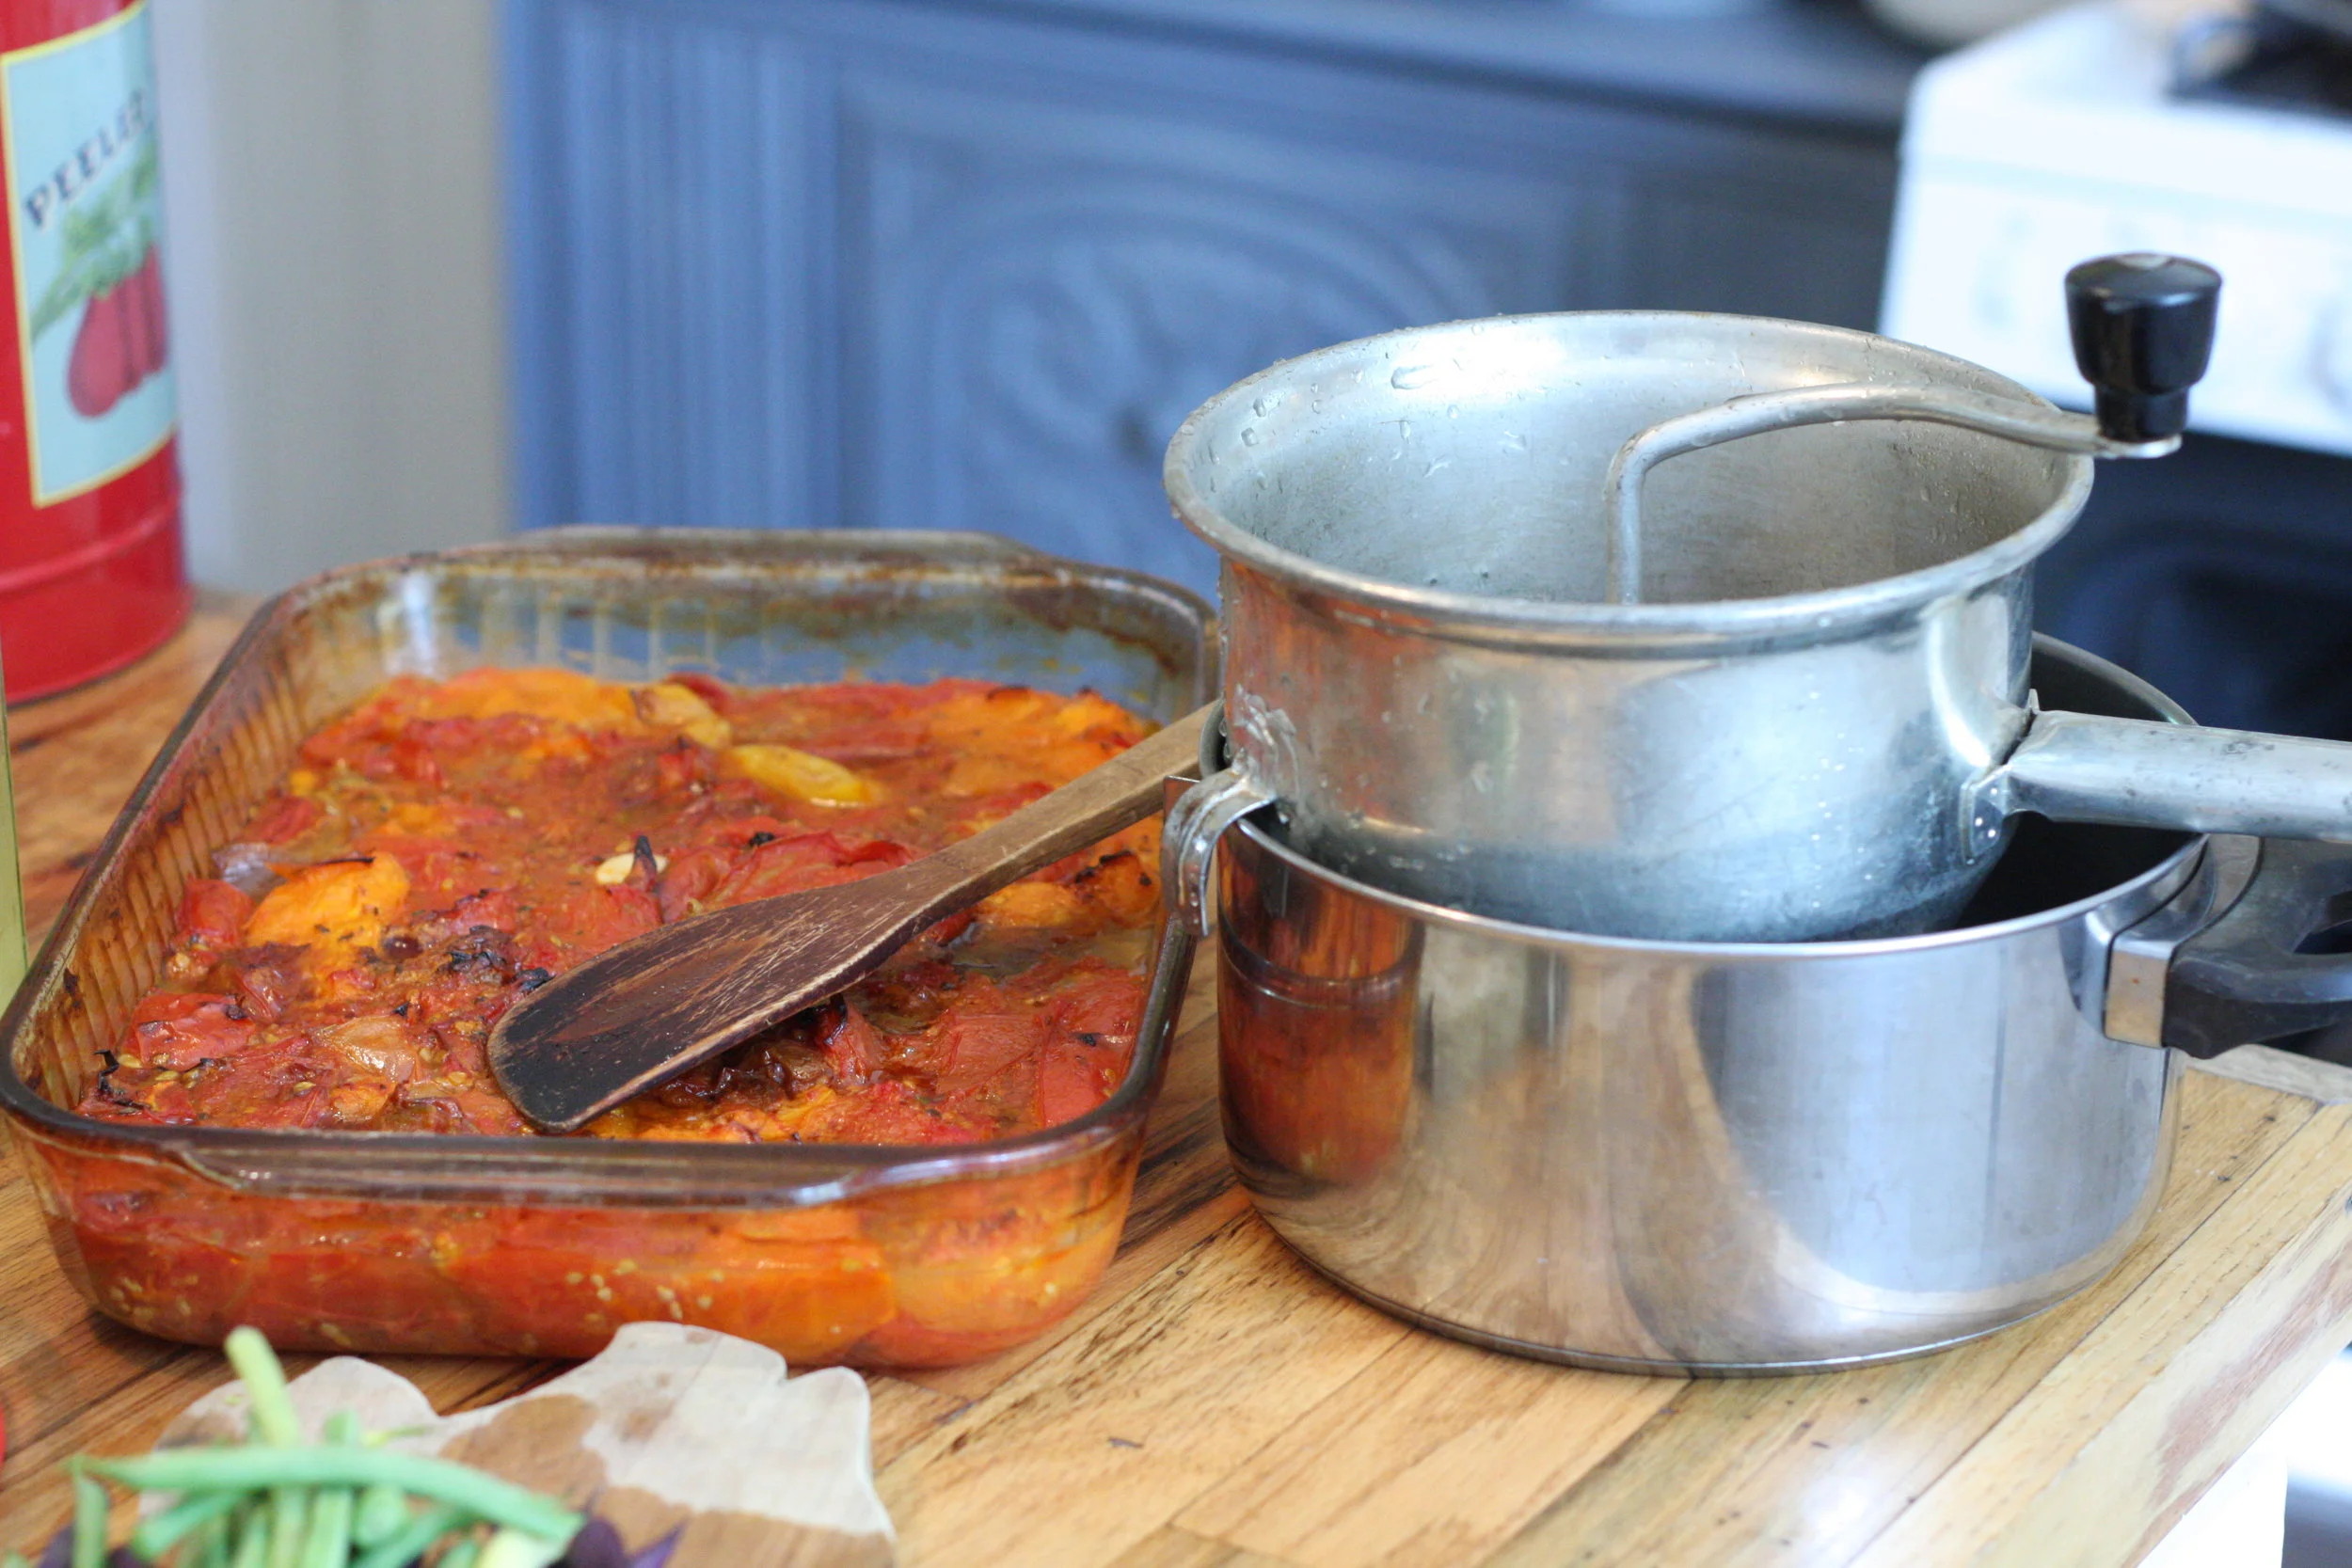
5. Carefully pour the tomatoes into the food mill. Turn the crank until you are only left with the skins, seeds and garlic cloves.
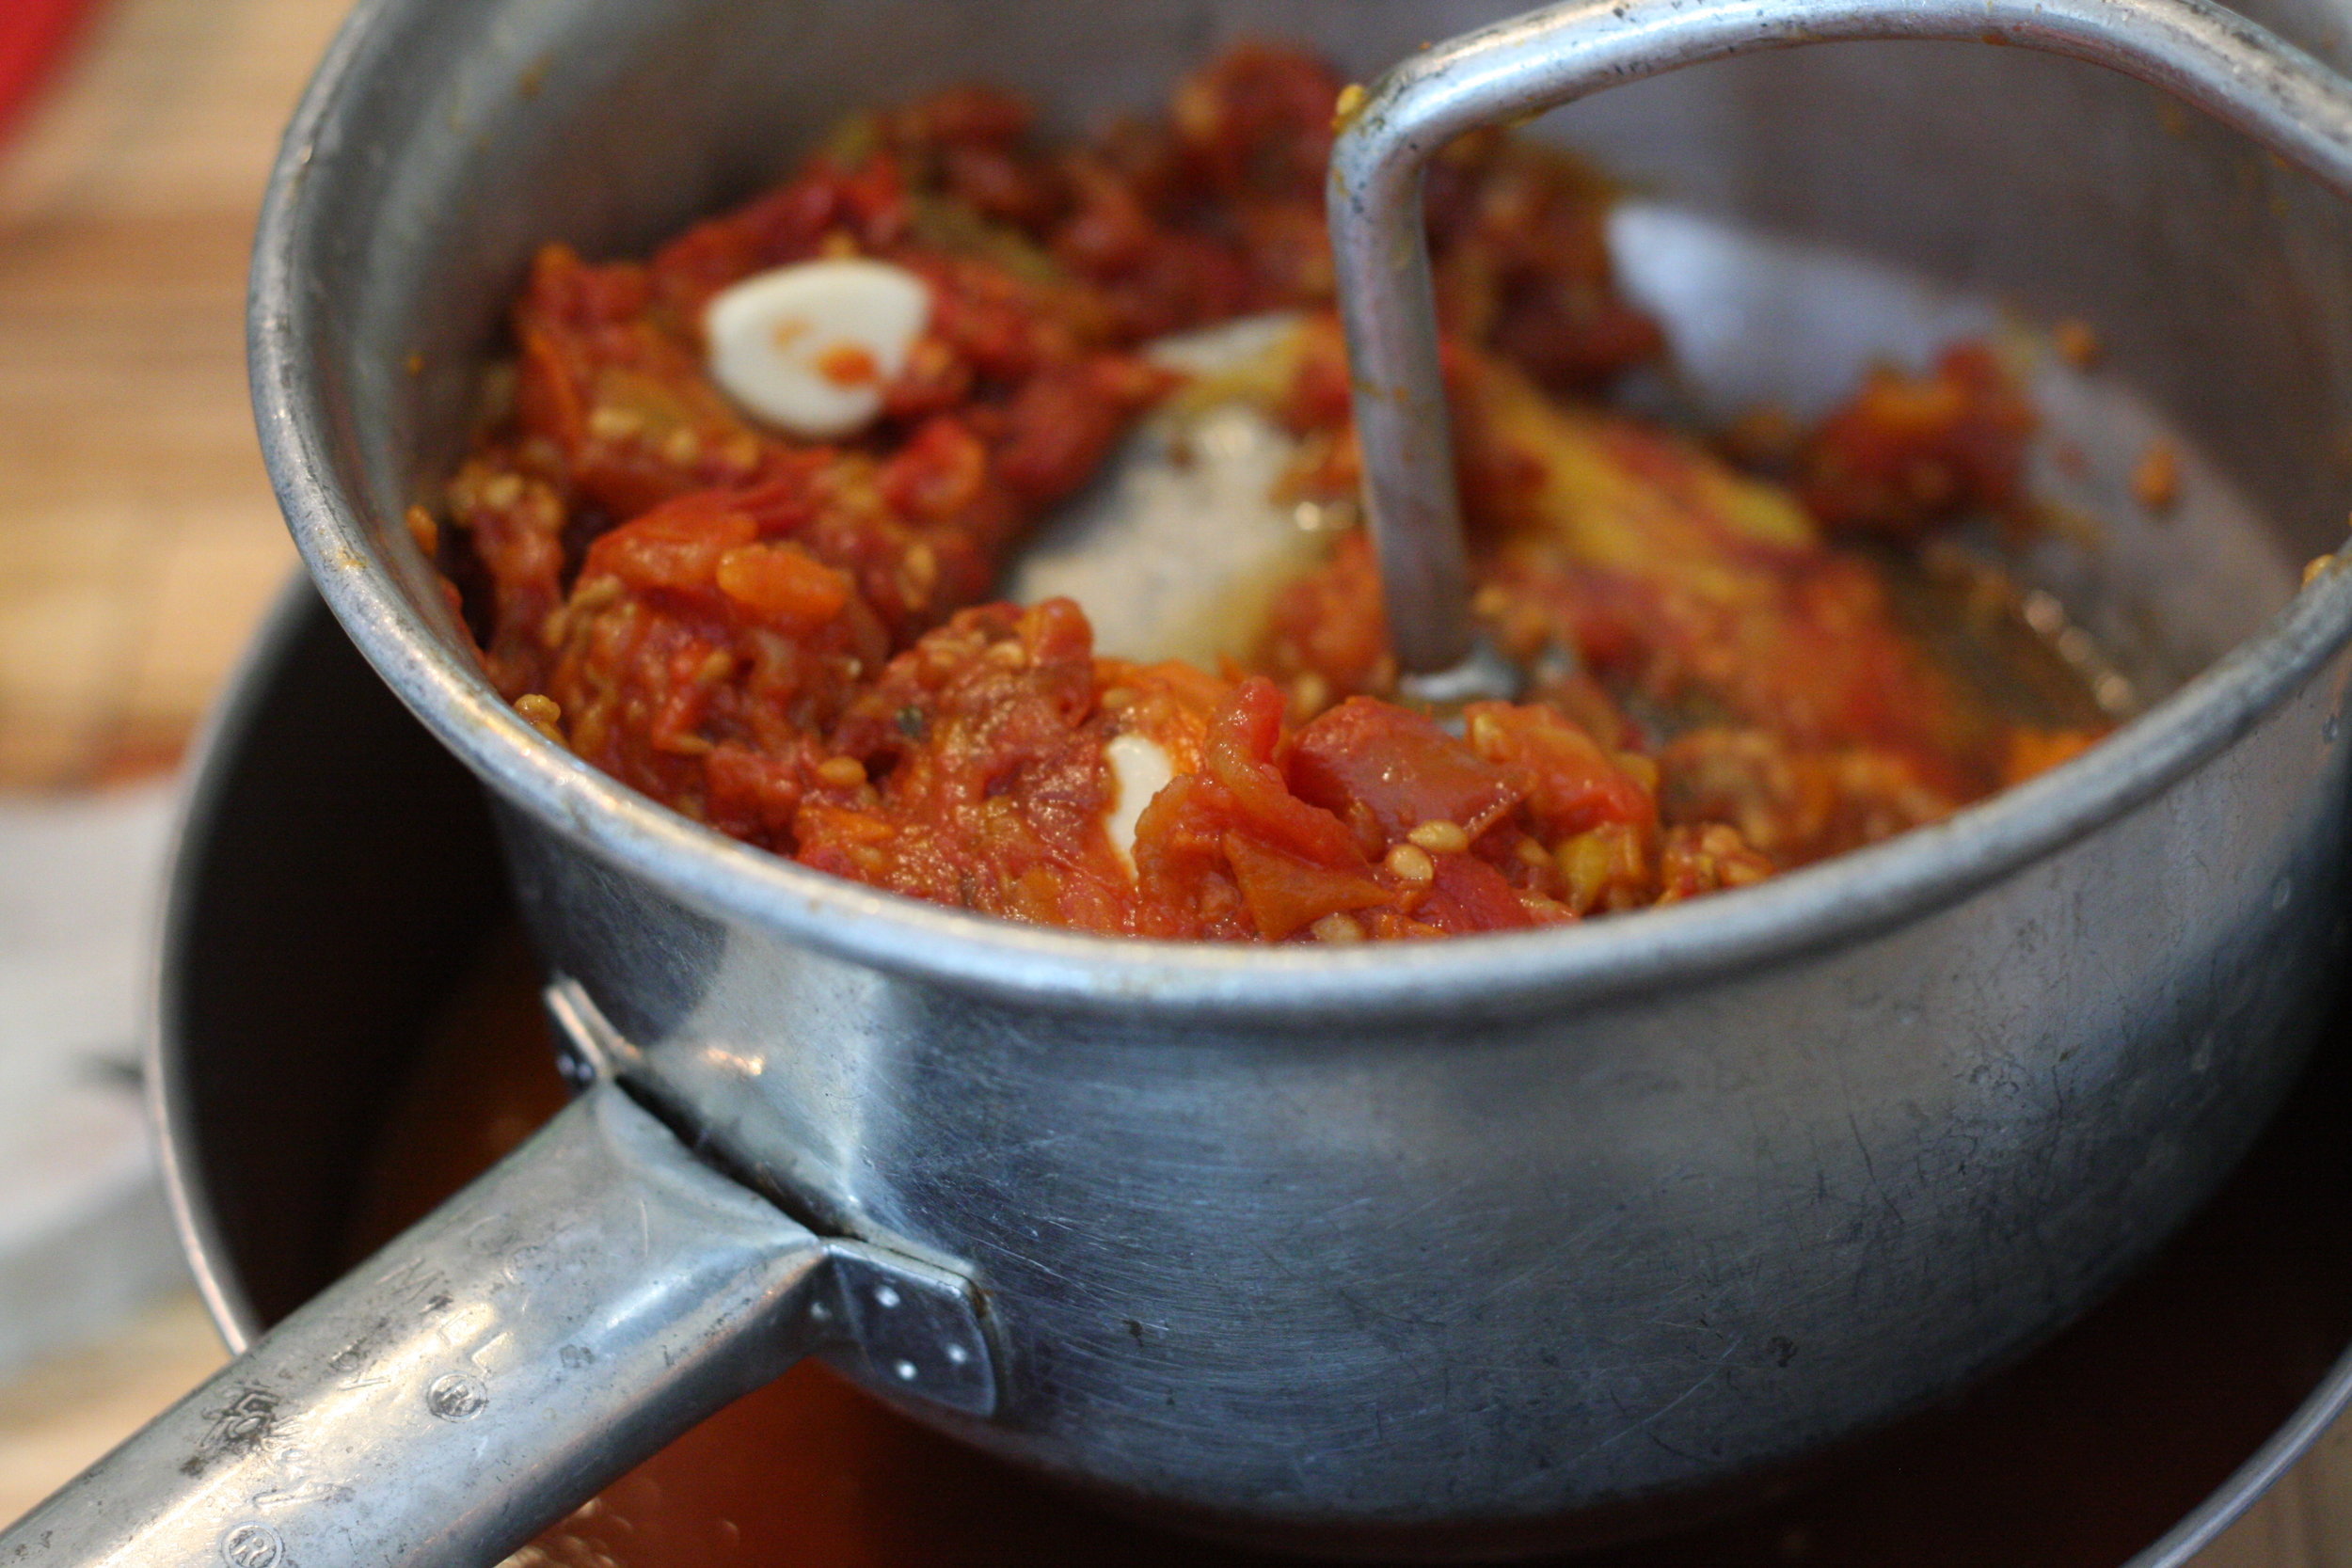
6. Now you have tomato sauce! If you want, you could stop right here and freeze the sauce, and use it for soup, stew or pasta sauce later this winter.
However, I prefer the convenience of tomato paste cubes, so I cook down the sauce until it's thick and concentrated. The thicker it gets, the more often you will need to stir the pot, so be sure to keep a close eye on it.
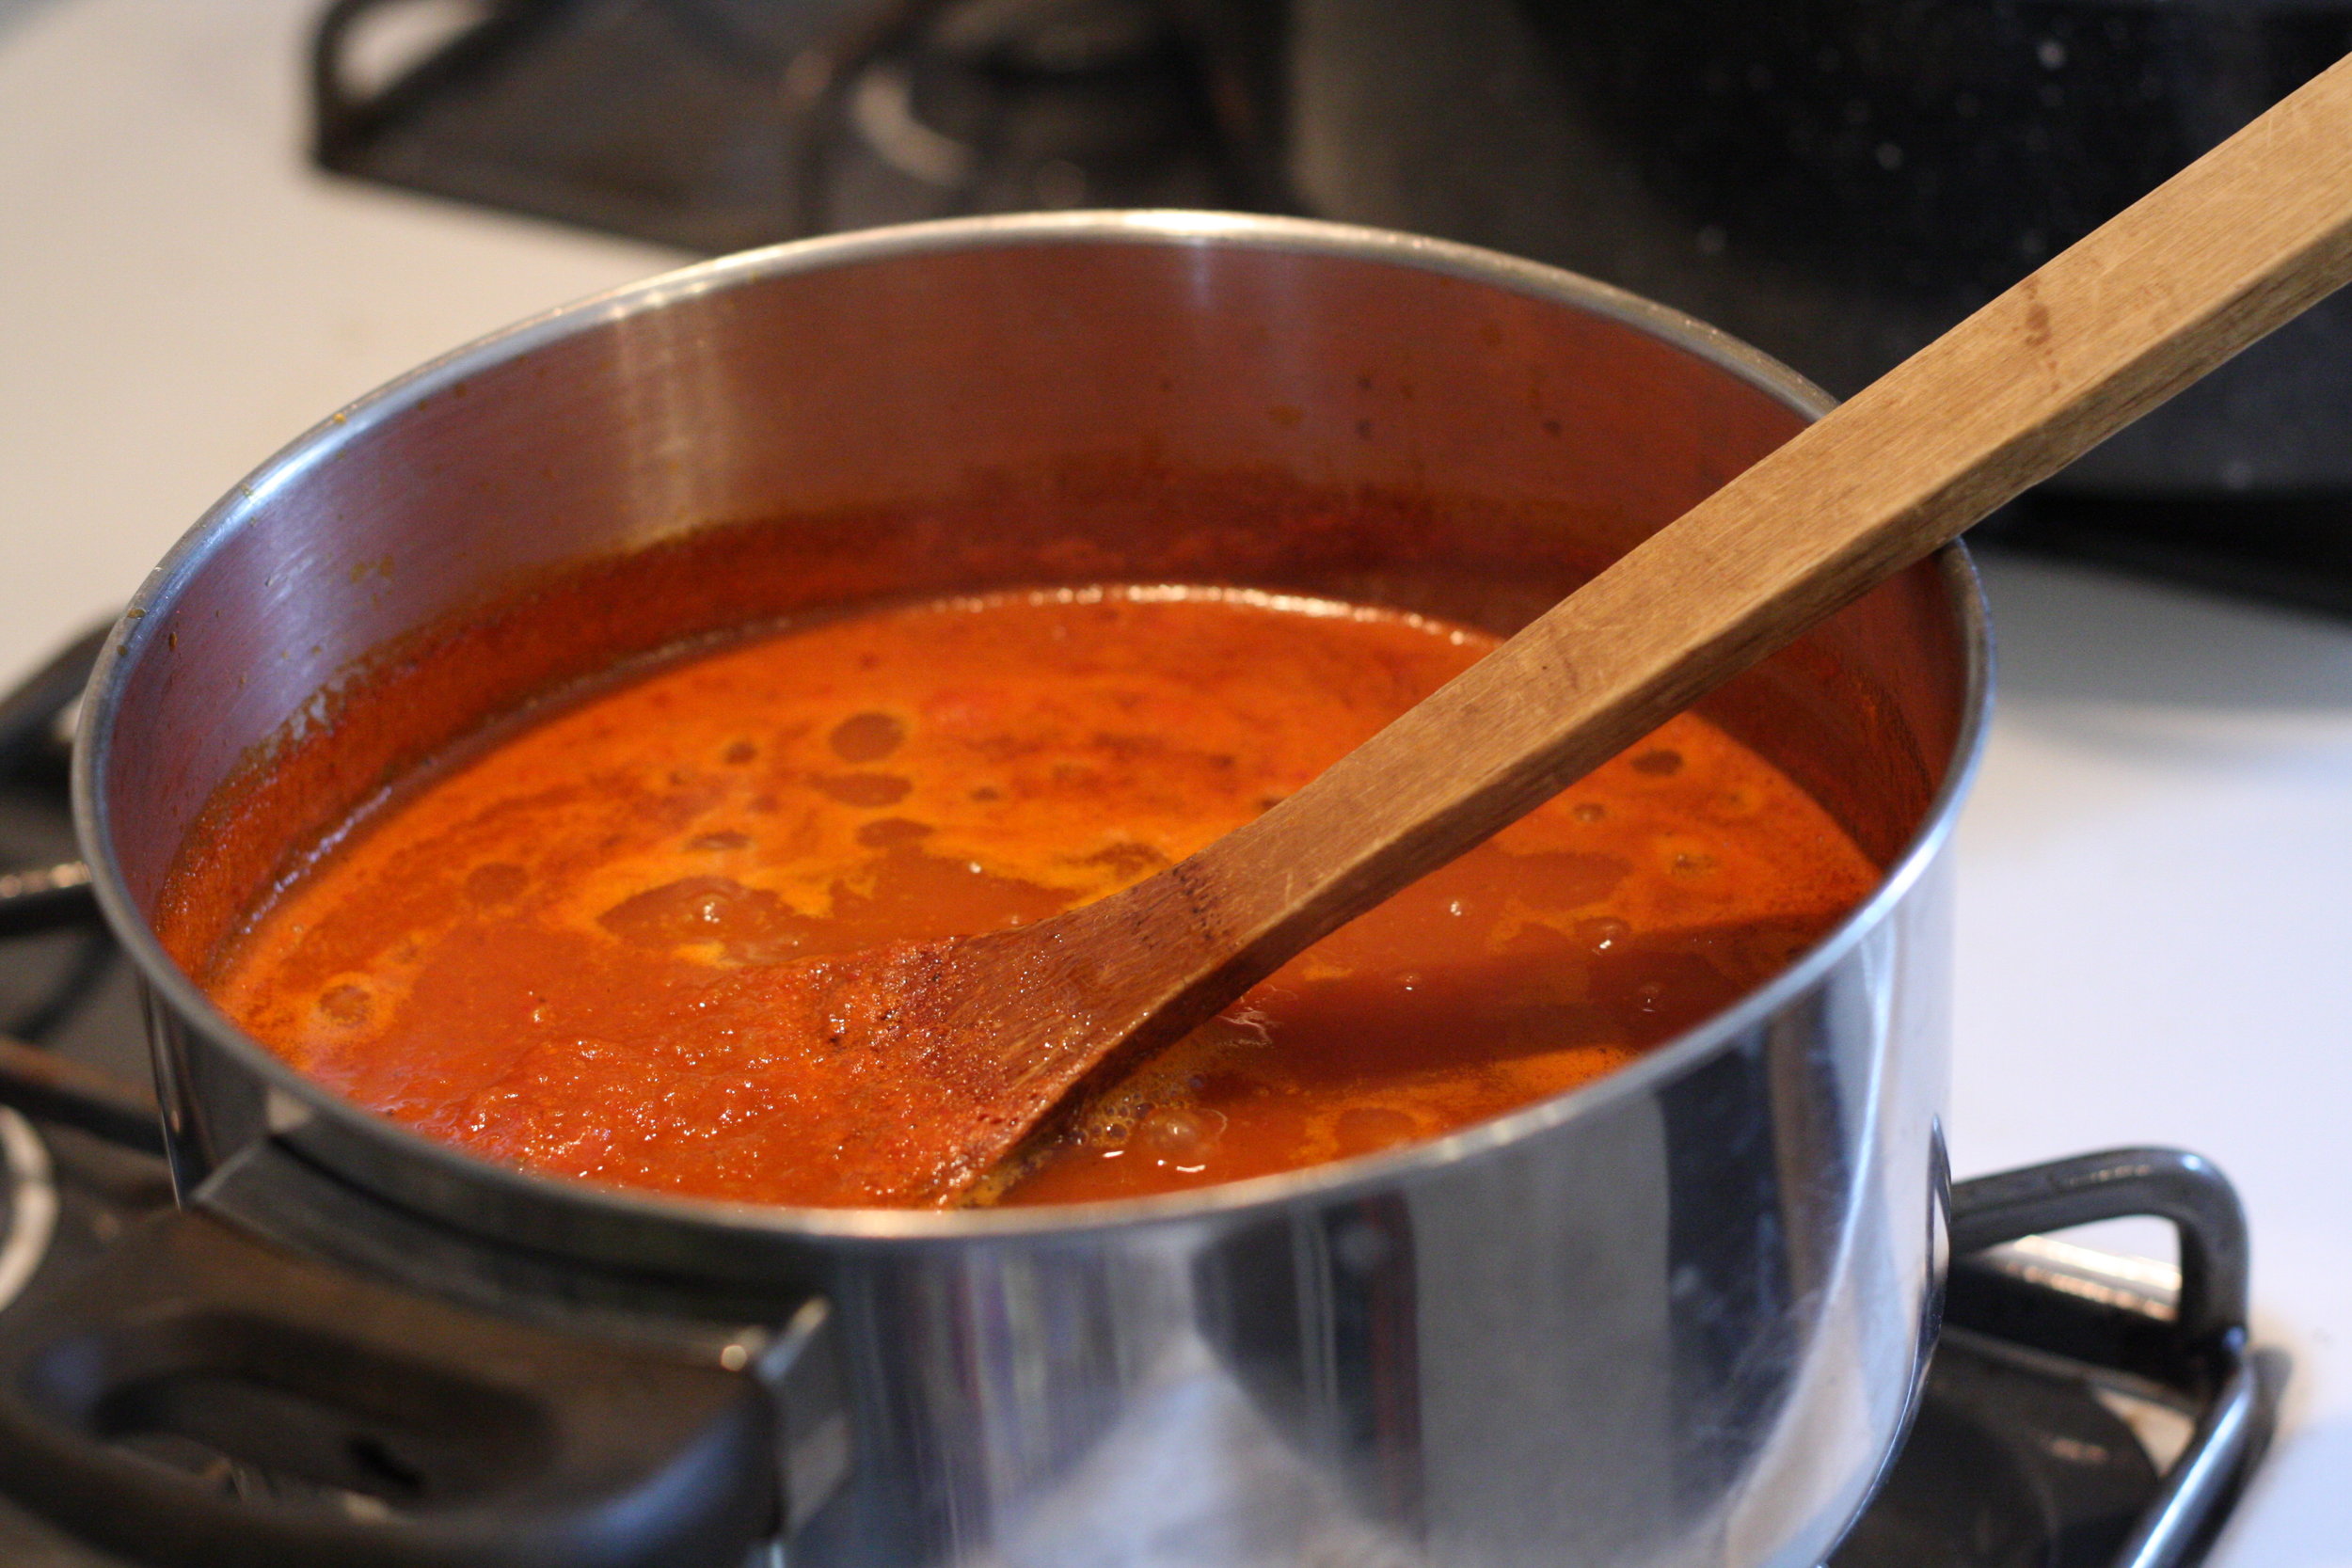
7. When the sauce/paste reaches a consistency that you like (mine is not nearly as thick as store bought tomato paste), it's time to transfer it to ice cube trays. You can measure it out if you like (Ex. each cube is 1 tbsp) or just glop it in like I do.
Pop the tray in the freezer and when the cubes are frozen, you can transfer them to a freezer container/bag of your choice.
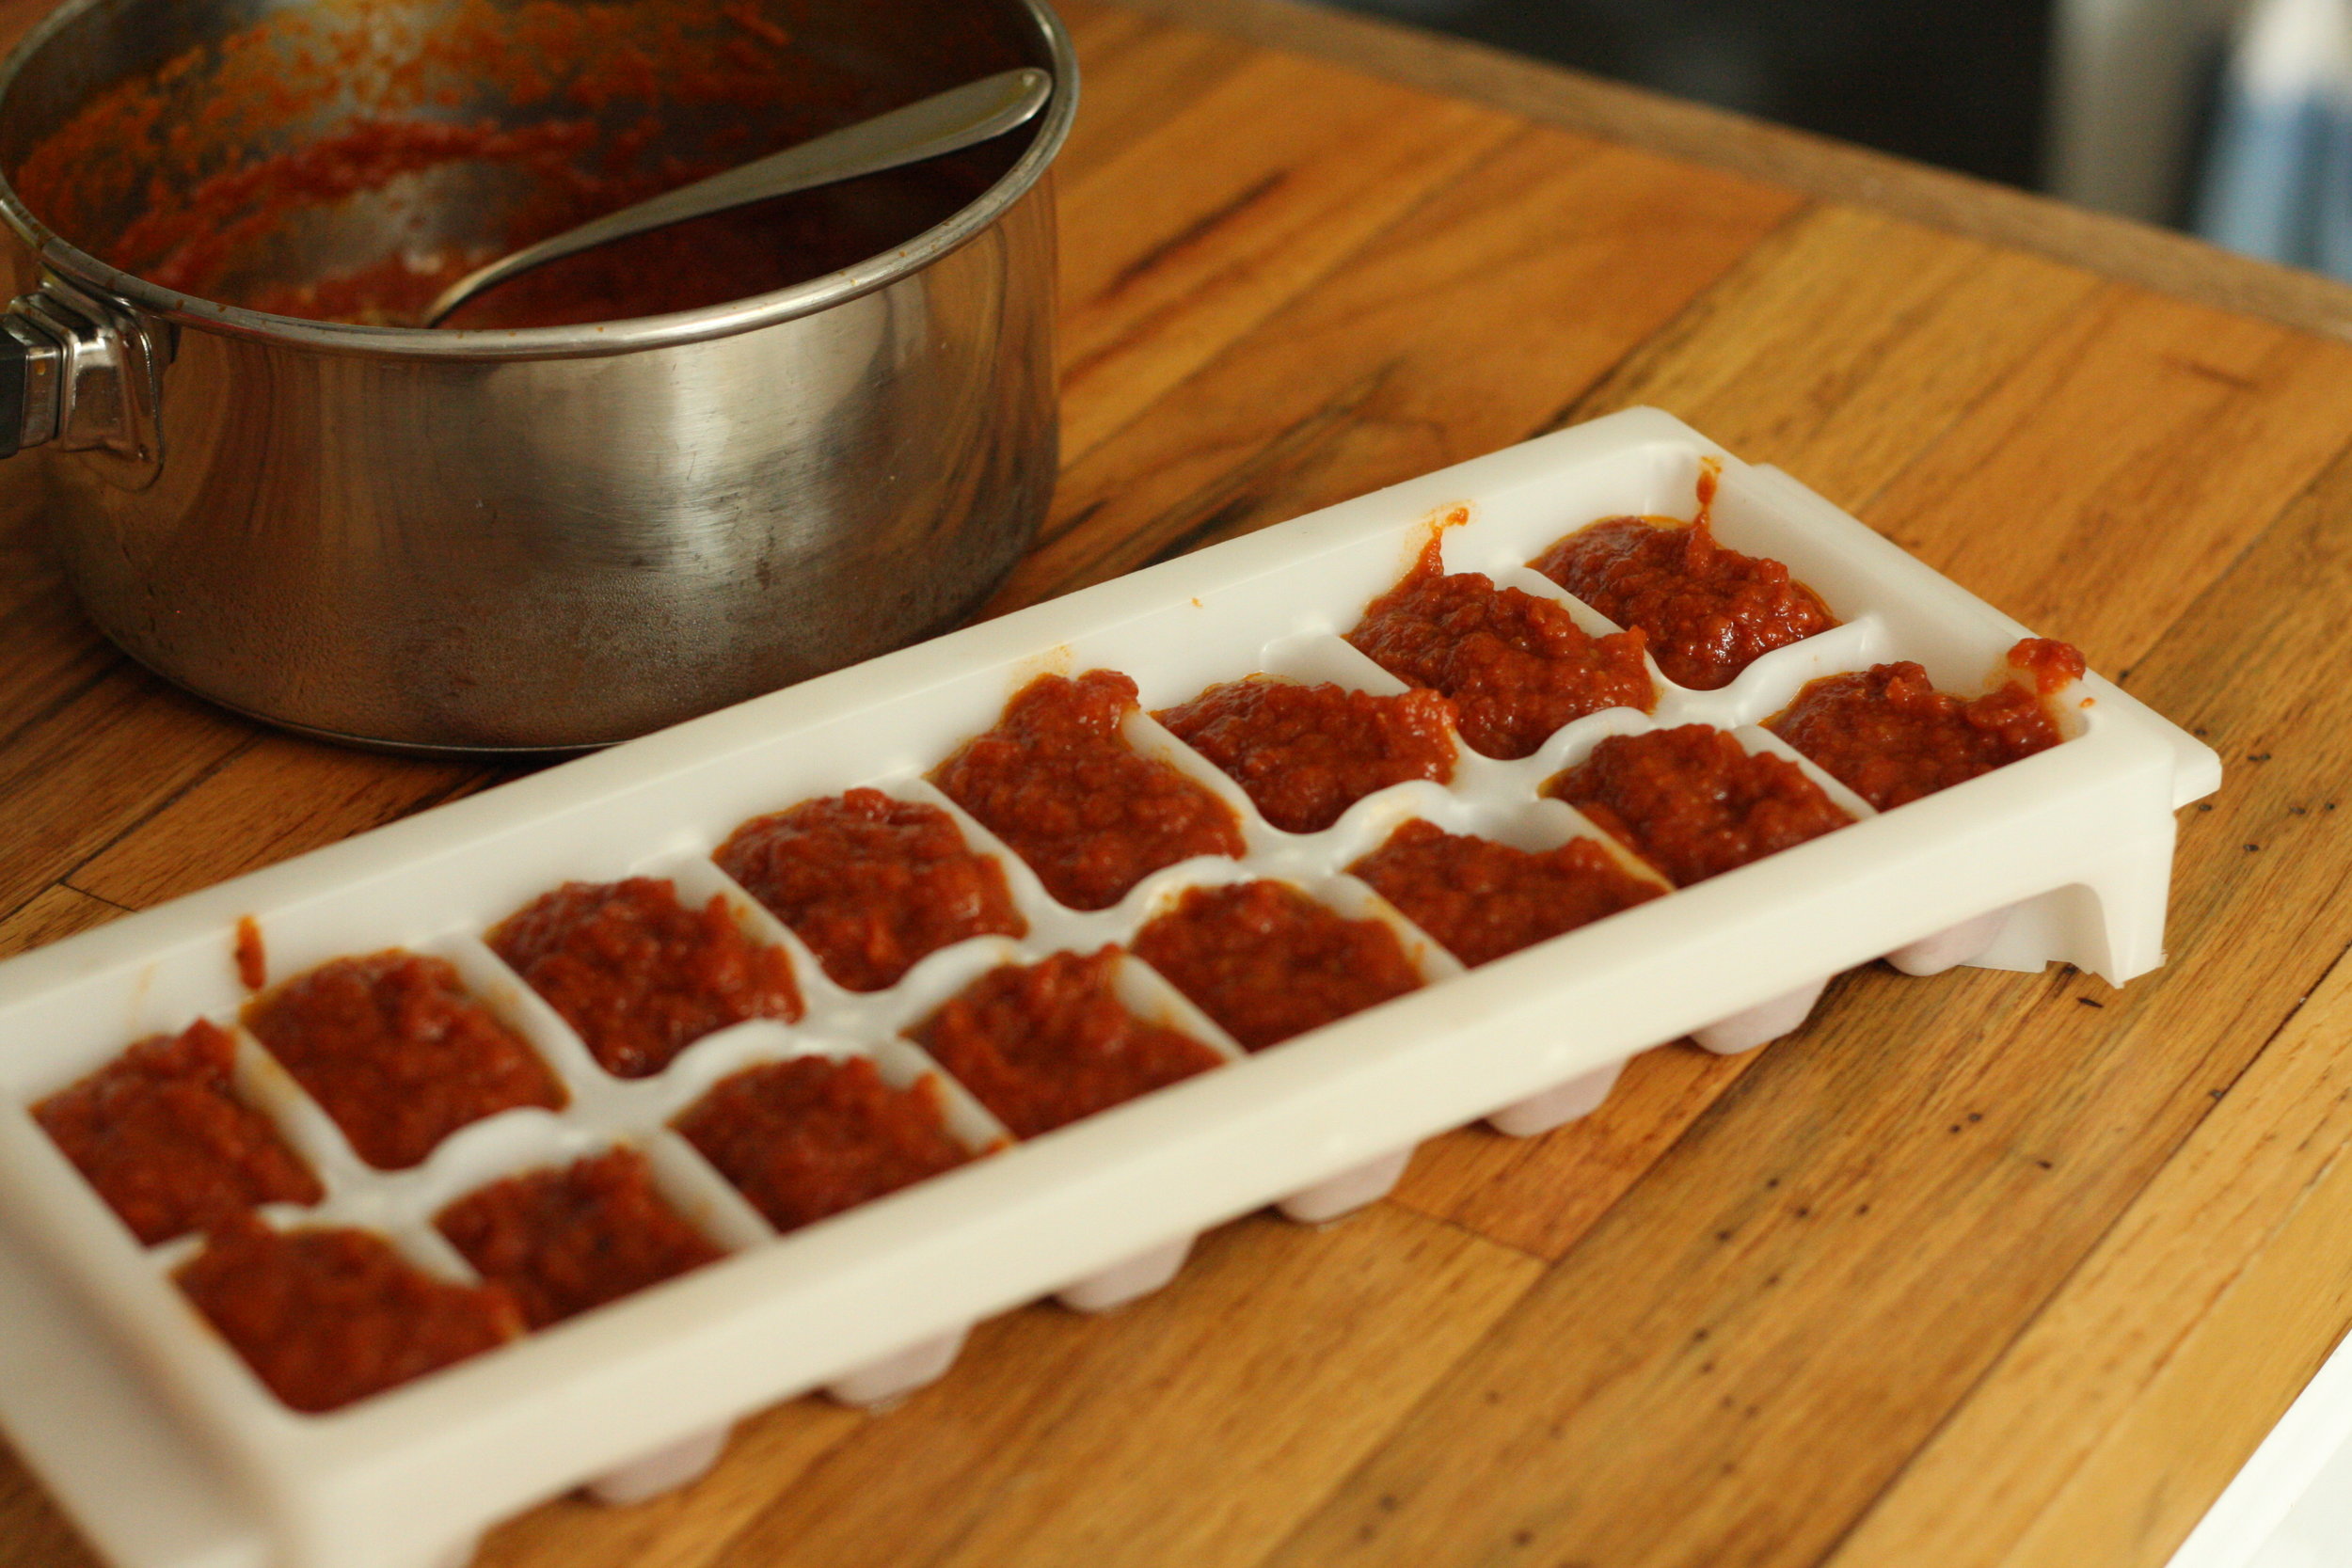
There you have it! You have successfully turned a huge pile of tomatoes into a small container that will fit in your freezer.
Enjoy the taste of summer each time you add one of these flavor-packed cubes to your meals this winter. Happy gardening!

Perfect Pickle Recipe
Our favorite pickle recipe!
Perfect Pickle Recipe
Don't you just love this time of year? What a thrill to walk out into the garden each day and find new treats to enjoy with our meals!
Our family always looks forward to the first harvest of fresh cucumbers. We grow some for slicing and some for pickling.
When the cucumbers and dill ripen at the same time, it's time to make pickles!
Every summer, I can a year's worth of pickles to eat on our weekly "Grilled Cheese, Pickles and Tomato Soup" night. While we prefer the crisp texture of fresh "refrigerator pickles", we simply don't have room in our fridge for 15 quarts of pickles, so I need to can them.
Over the years, I've tried many Water Bath Canning cucumber pickle recipes... and we've finally found our keeper!

This recipe uses the Water Bath Canning method. If you have never canned before, then ask around and see if you can learn alongside an experienced canner. While you can certainly learn how to can from a book, tutorial or video, there is NOTHING like first hand experience.
*To keep this post short and sweet, I'm going to assume you already know how to prep and sterilize all your equipment, and are thoroughly familiar with the canning process.
I found this recipe in the "Ball Blue Book Guide to Preserving" (2009 edition). It is their classic "Dill Pickles" recipe, with the "Kosher-Style" variation. I've taken notes over the years, and my yields are a bit different than the original recipe in the book.
I highly recommend you add Ball Pickle Crisp to the recipe. We noticed a huge difference in texture when we compared batches made with and without the Pickle Crisp. You should be able to find it at your local grocery/hardware/farm store.
Fresh dill can be tricky to find, but never fear! We always grow plenty of dill on Three Acre Farm, so be sure to look for it on the Farm Stand - it's great for culinary use AND it looks great in floral bouquets. I love multipurpose plants!

Kosher- Style Dill Pickles
Yield: about 5 quarts
8 pounds small (4-6 inches) pickling cucumbers, cut into spears
3/4 cup sugar
1/2 cup canning salt
1 quart vinegar
1 quart water
3 tbsp mixed pickling spices
Green or dry dill (1 head per jar)
Bay leaf (1 leaf per jar)
Garlic (1 clove per jar)
Hot red pepper, fresh or dried (1 small piece per jar... or a pinch of red pepper flakes)
Mustard seed (1/2 tsp per jar)
Pickle Crisp (1/4 tsp per jar)
Wash and drain cucumbers. Be sure to cut off the stem end, then cut into spears.
Combine sugar, salt, vinegar and water in a large pot to make the brine. Tie pickling spices in a spice bag, cheesecloth or muslin. Add to brine mixture and simmer for 15 minutes.
In each hot sterilized jar, drop dill, bay leaf, garlic clove, hot red pepper, mustard seed and Pickle Crisp into each jar. Then pack the jar with pickle spears, leaving at least 1/4-inch headspace.
Ladle hot brine over the pickles, leaving 1/4-inch headspace. Remove air bubbles.
Place lids and rings on jars. Process for 15 minutes in water bath canner.
Once time is up, turn off the heat and remove the canner lid. Set the timer for 5 minutes, then remove jars once the time is up.
*If you happen to have leftover pickles and brine, but not enough for a whole jar, you can put the leftovers in a jar in the fridge and eat them over the next few weeks.
Enjoy! Nothing better than homemade pickles with grilled cheese sandwiches...
I would love to hear about your favorite summertime recipes!

Spring at Three Acre Farm: As Told By Lindsay Ritchie Photography
My dear friend (and old neighbor) came to visit the farm and tell the story of Spring at Three Acre Farm.
Spring at Three Acre Farm
A few weeks ago, a dear friend offered to visit our farm and tell it's story through her photography. I was absolutely thrilled to have her come and thankful for a new perspective of our farm.
You see friends, most of the time when I look around our farm, I'm flooded with feelings of being overwhelmed. There is SO MUCH TO DO, ALL THE TIME. Especially at spring time, I feel crushed.
I see the fences I need to paint, the garden beds that need to be weeded, the chicken coop that needs to be cleaned out, the lawn that needs to be mowed, the piles of wood that need to be stacked, the goat hooves that need to be trimmed, the barn that needs to be purged and organized, plants that need to be watered, seedlings that must be planted, the landscaping that needs to tending... I look around and see work that needs to be done, the ugliness and shame of unfinished jobs.
But my friend Lindsay... she saw beauty instead. She saw wonder and loveliness and delight. When she showed me these images, I gasped out loud. I loved seeing the farm from her eyes.

Lindsay was the perfect person to tell our story because she has witnessed it and been part of it since the beginning.
Years ago, we were close neighbors. We lived across the street from each other. We babysat each other's kids. We ate meals together. We shared life together.
When God instructed us to leave our life in the city and start a farm, she was there. When we planted our first garden, she was there. When I struggled with discerning God's calling for our lives, she was there. She has been part of our joys, our struggles, our transformation. She was there as we stepped into the unknown and followed a dream God placed in our hearts.
She has also gone through some huge transforming life changes too in the last few years. It's been such an honor to watch her as SHE steps into the unknown and follows the desires that God placed in her heart, the desire to help others tell their story through images.
Lindsay has taught me so much about the value of beauty and how to live with intention. I love watching her embrace her skills and talents as a photographer, as she helps other find the beauty in the present, in everyday life.
If you are looking for someone to your story, you've just got to meet to Lindsay. Check out her work at: Lindsay Ritchie Photography. You won't be disappointed.
Without further ado, here is the story of "Spring at Three Acre Farm". Enjoy!
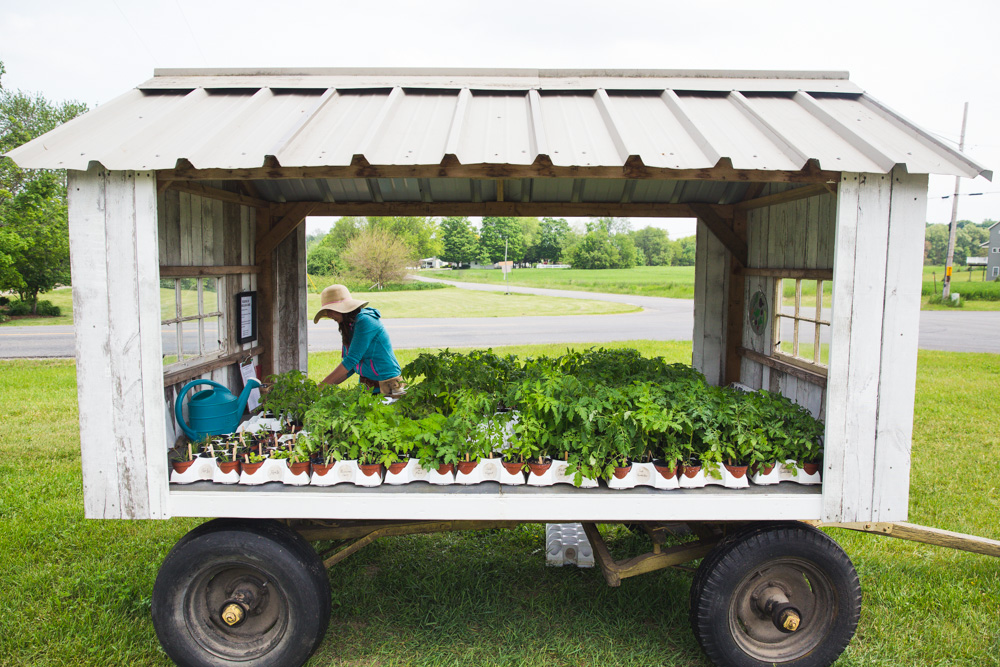
Our humble Farm Stand. My husband bought an old horse cart, took off the sides and built the base, walls and roof. It's perfect!

Everything for sale on the Farm Stand is truly "Home Grown". I start all the plants (flowers and veggies) in our 1880's farmhouse basement. Many of the plants are started from seed that I've saved from the previous year. Seed saving is an important skill to preserve.

In the spring, I sell tomato, pepper and herb plants on the Farm Stand. I started selling plants year ago, when I got the "seed starting bug" and found myself with excess plants at planting time. Friends and family kept asking if they could buy my extra plants... so I decided to start growing some each spring to sell.
I specialize in growing hard to find, unique Heirloom type tomatoes. Almost all the varieties are Open Pollinated (not hybrids), which means the seeds can be saved and used for next spring's planting.

Dahlias, dahlias and more dahlias. We put in over 750 dahlia tubers. I can't wait to see them bloom in August!

Meet Silas, my side kick. When our 15 year old dog had to be put down this winter, we were heartbroken... and our other 14 year old dog, Gibson, was lonely.
We searched for the perfect dog for months. I was ready to give up the search until fall, when this guy's profile came up on Petfinder the EXACT same day I told my husband we should stop looking. Of course, we went to the shelter to "just look" and 30 minutes later, we were driving home with our new addition.
Welcome to your forever home, Silas.
John is the dahlia expert. In fact, planting dahlias (and really this whole flower farm) was HIS crazy idea. He decided "we need more beauty in our life". He was right.
John is a member of the West Michigan Dahlia Society... where gets to hang with some wiser (older) folks that teach him all the tricks of growing these spectacular flowers. Dahlias can be pretty fussy and labor intensive, but those blooms... swoon! We'll work like dogs for that reward!

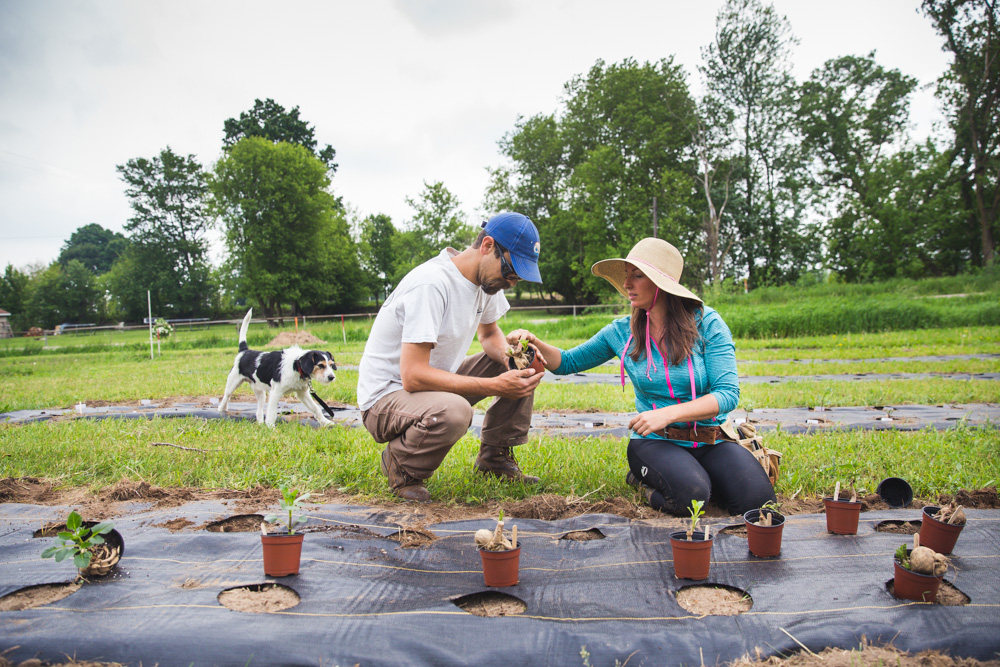
This year, we tried "pre-sprouting" some of the dahlia tubers to get a jump on the growing season. I'm so glad to finally be planting them. Every flat surface (including the bed) in our guest room was covered with flats of sprouting dahlia tubers!
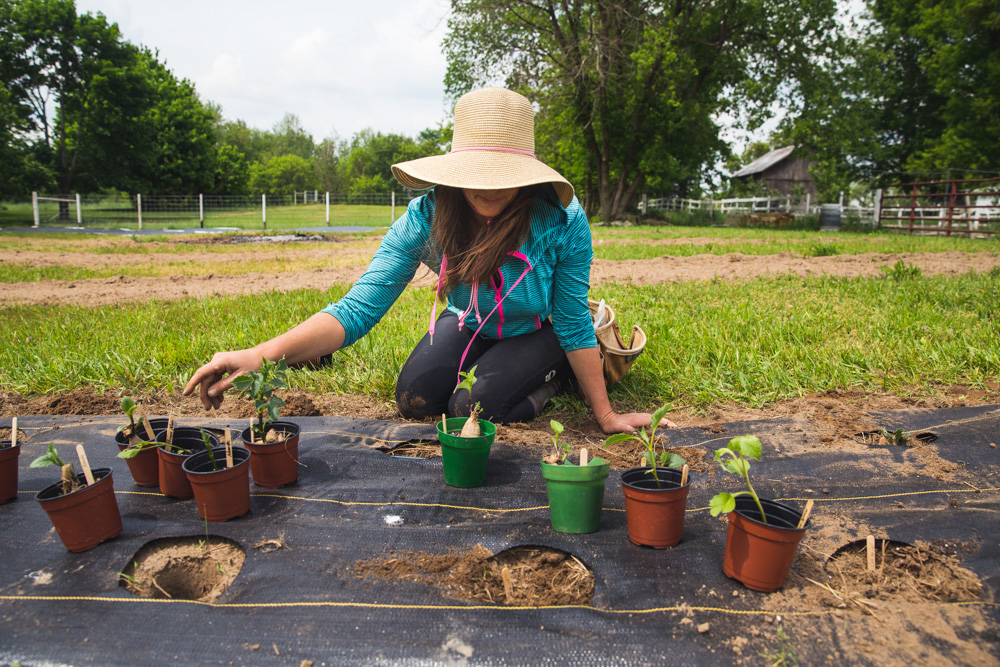
So many dahlias to plant... it took us about 3 days to get them all in.

Flowers in the greenhouse waiting to be planted. All these babies were started under lights in the basement. They eventually graduate to the greenhouse, then the field.
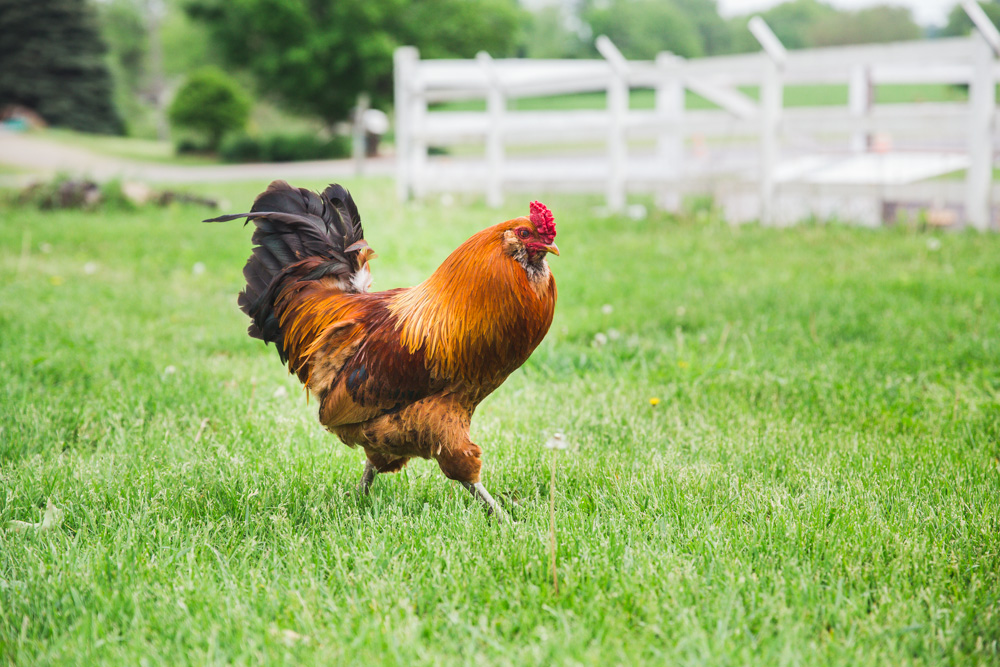
Sexy Rexy, our resident rooster. He is an Americauna( or Easter Egger) breed. Obviously, he doesn't lay eggs, but our hens of the same breed lay the prettiest blue eggs... hence the name "Easter Egger".

I know that buildings don't have feelings, but I swear this old barn lets out a deep sigh of contentment the day we filled it with goats and chickens. It hadn't housed animals in almost 40 years and I think it was lonely and feeling neglected.

Back door to the barn. The knob makes me smile every morning. So fancy!

I was created to do this.

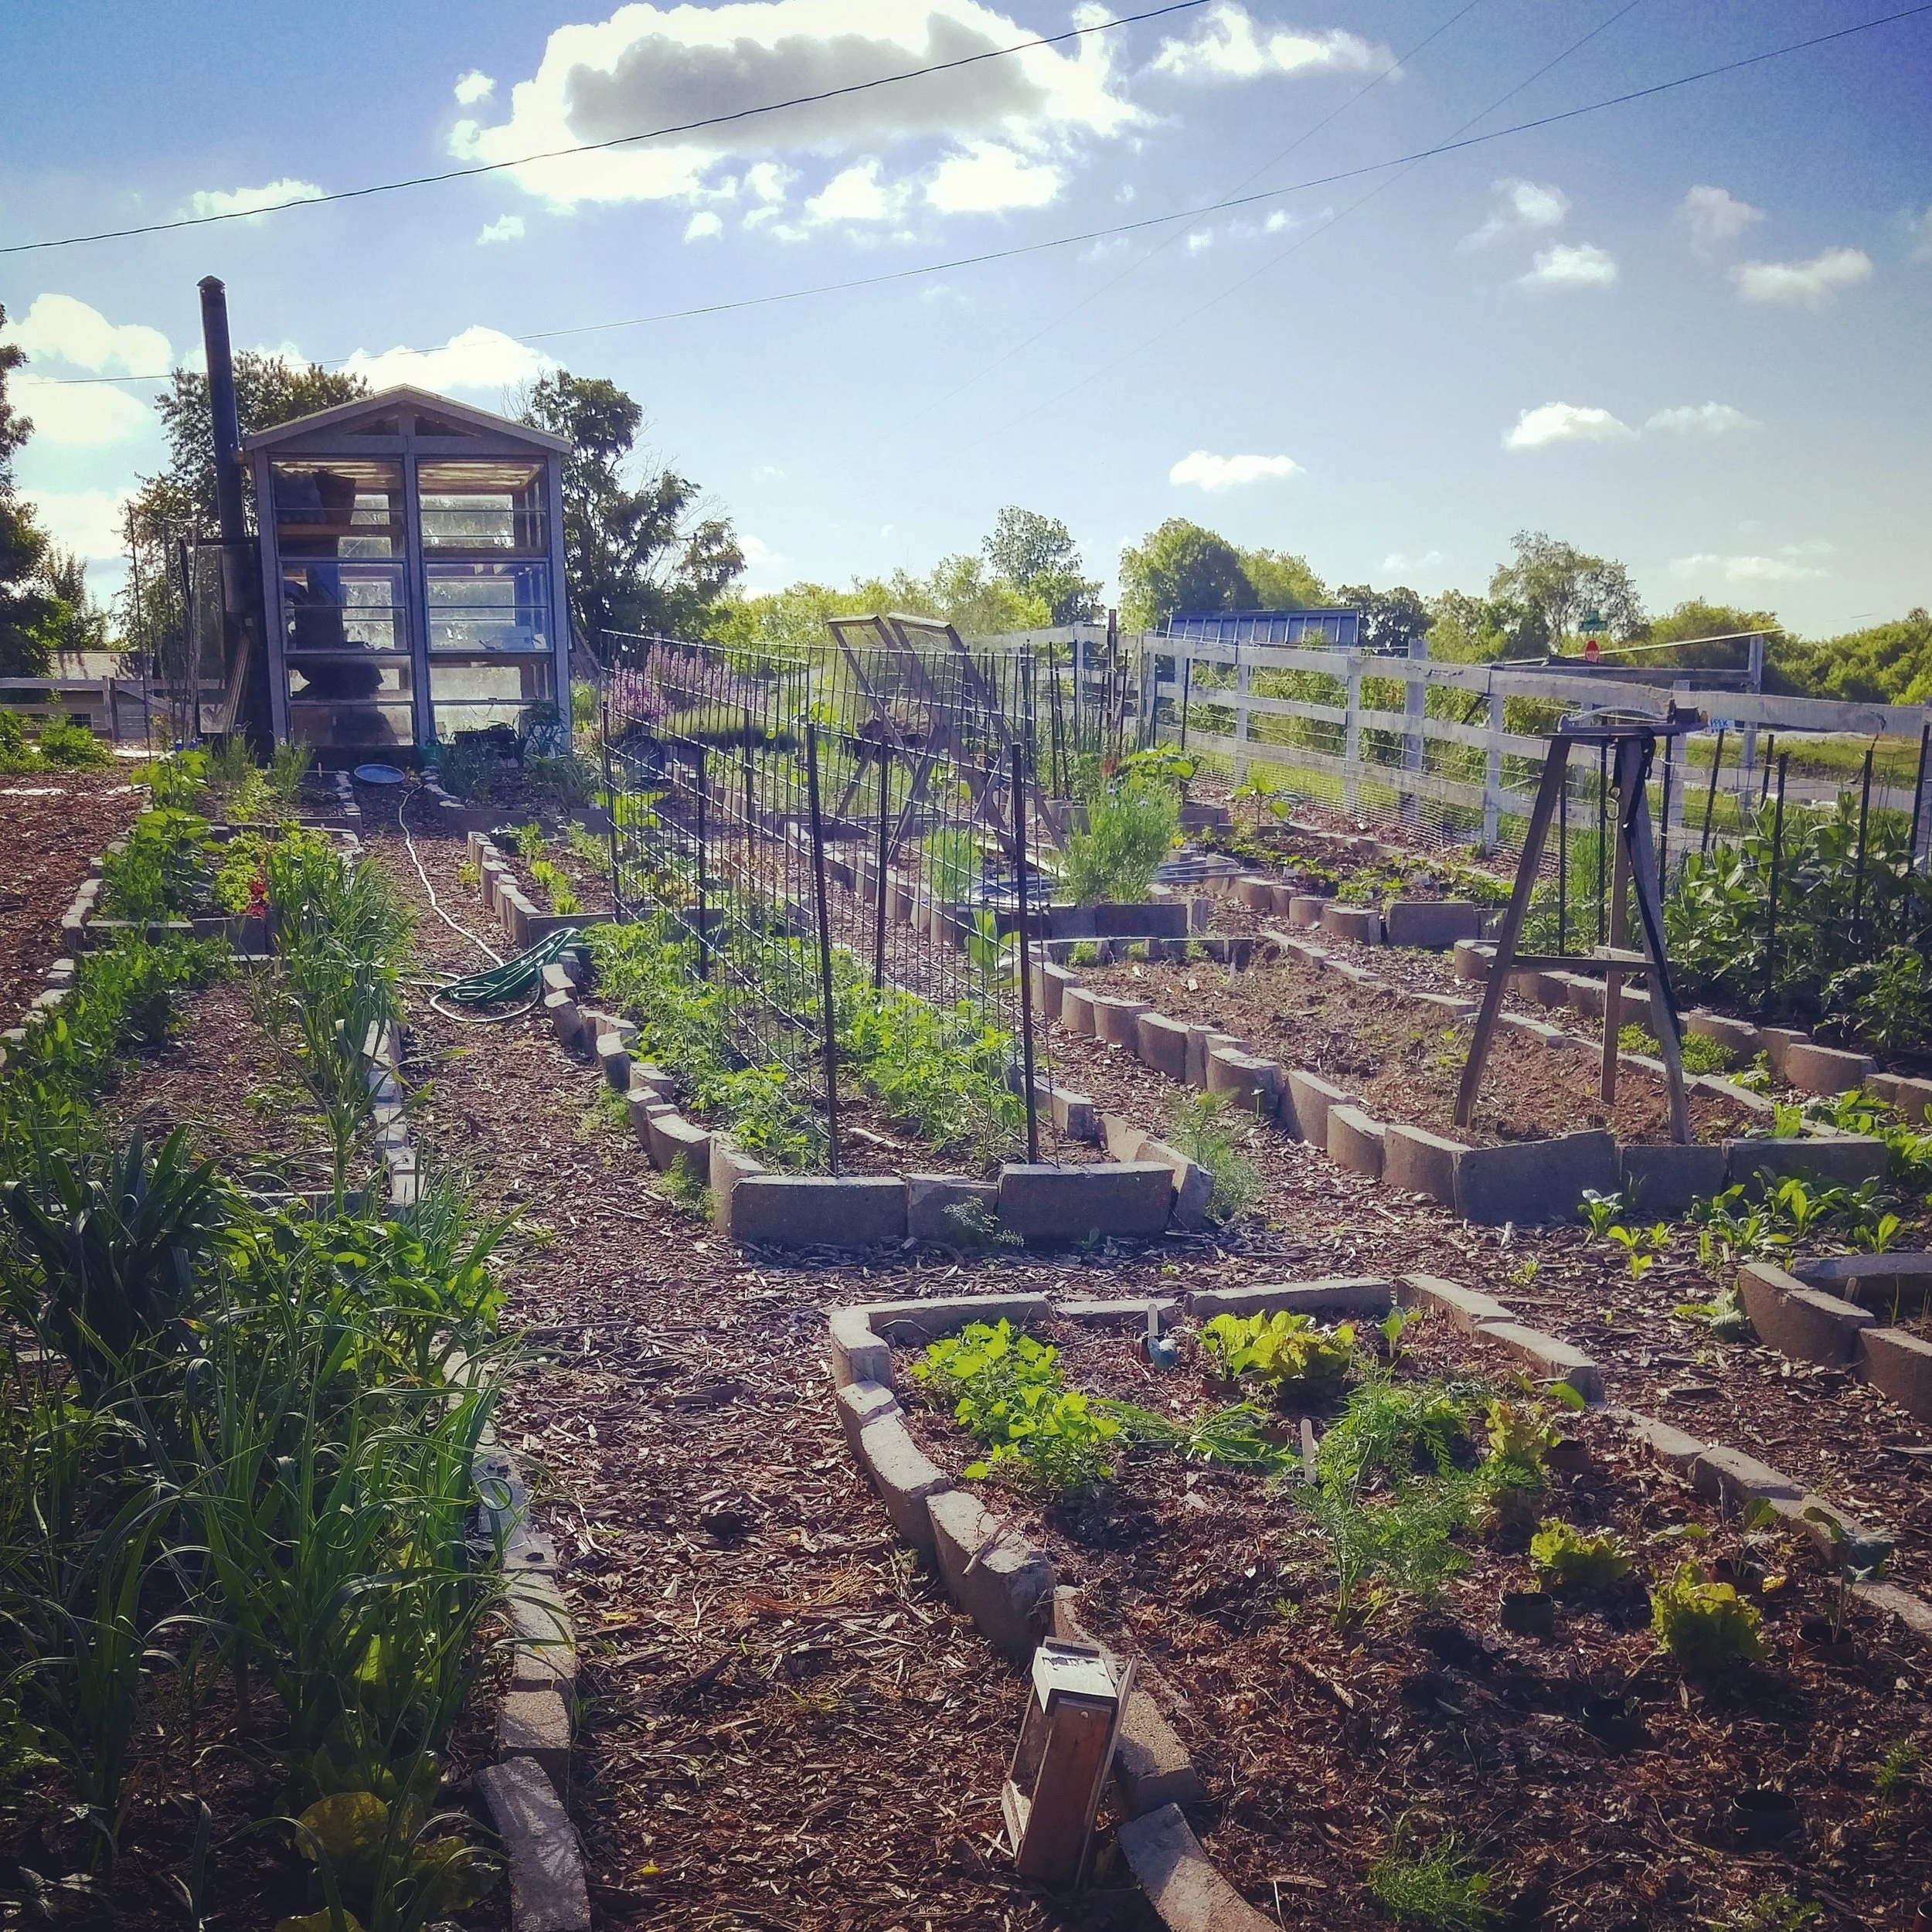
My happy place. This garden is where all the magic happens.
The raised beds are made from old silo blocks. My husband knocked down our ancient silo.
With a hammer.
And he didn't get crushed to death.
True story. We even have video footage. Remind me to post it someday!
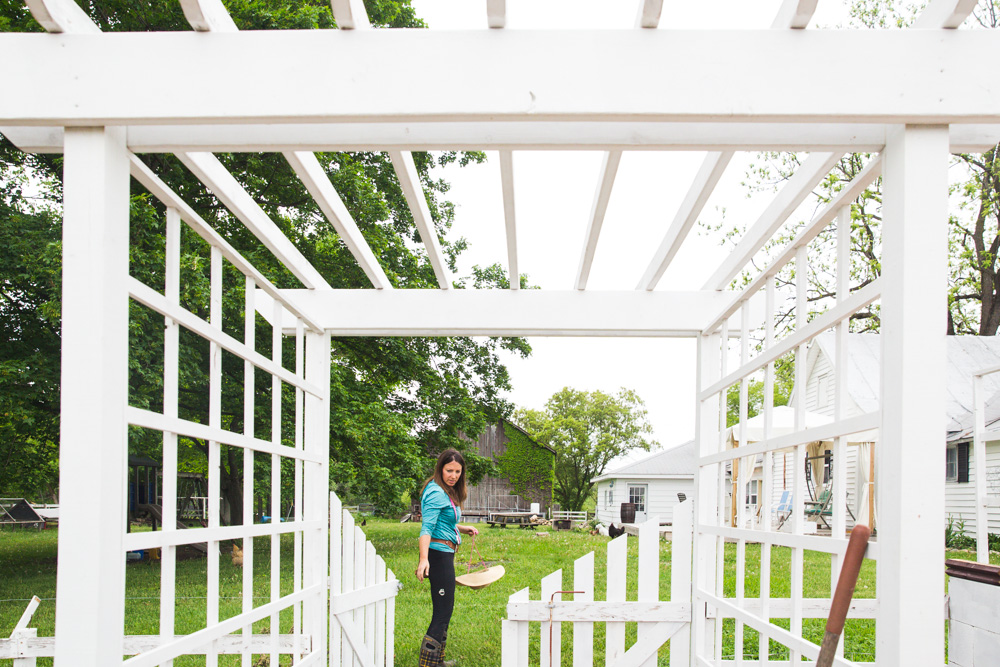
John built me this arbor last summer and I can't decide what to grow on it. Grapes? Roses? Wisteria?
Tell me what I should plant!
******************************************************************************
Another huge thanks for Lindsay for capturing these great images!
I can't wait until she comes back later this summer for "Part Two: Summer at Three Acre Farm". It will be amazing to see the transformation!
If you are looking for someone to tell your story, contact Lindsay. You'll be so glad you did.
*All photos used by permission from Lindsay Ritchie Photography. Be sure to check out her website, and follow her on Facebook and Instagram.
Free DIY All Natural Garden Fertilizer
A simple, quick and easy way to give your plants the nutrients they need to thrive!
I just love turning trash into treasure, don't you?
What a thrill to turn waste into something valuable! It makes me feel smart, thrifty and resourceful.
Today, I will share an easy, free way to nourish your garden plants and help them thrive. And guess what? You probably have everything you need already.
The magic ingredient is: EGG SHELLS.
Yes, those lovely, wonderful, valuable shells that you have been throwing in the trash make a fantastic natural fertilizer.
STOP!!! Don't throw them out anymore!
Why Use Egg Shells
Egg shells are a great source of calcium, which is essential for optimal plant growth. Many plants need a little extra calcium to really thrive, such as:
Tomatoes
Potatoes
Peppers
Eggplant
Broccoli
Cauliflower
Kale
Collard Greens
Cabbage
Preventing Blossom End Rot
If you have ever grown tomatoes, you may have struggled with a problem called "Blossom End Rot". You'll notice it primary after periods of heavy rainfall. The fruit will look perfect, except for an ugly black, rotten spot on the bottom ("blossom end") of the tomato.
Adding calcium to the soil can help alleviate Blossom End Rot, as the calcium helps to regulate the plant's water intake.
Nobody has figured out exactly what causes Blossom End Rot or how to completely prevent it, but consistent watering and added calcium seems to be the best solution.
DIY Calcium Fertilizer Instructions
Here's how to make the fertilizer. Easy, peasy!
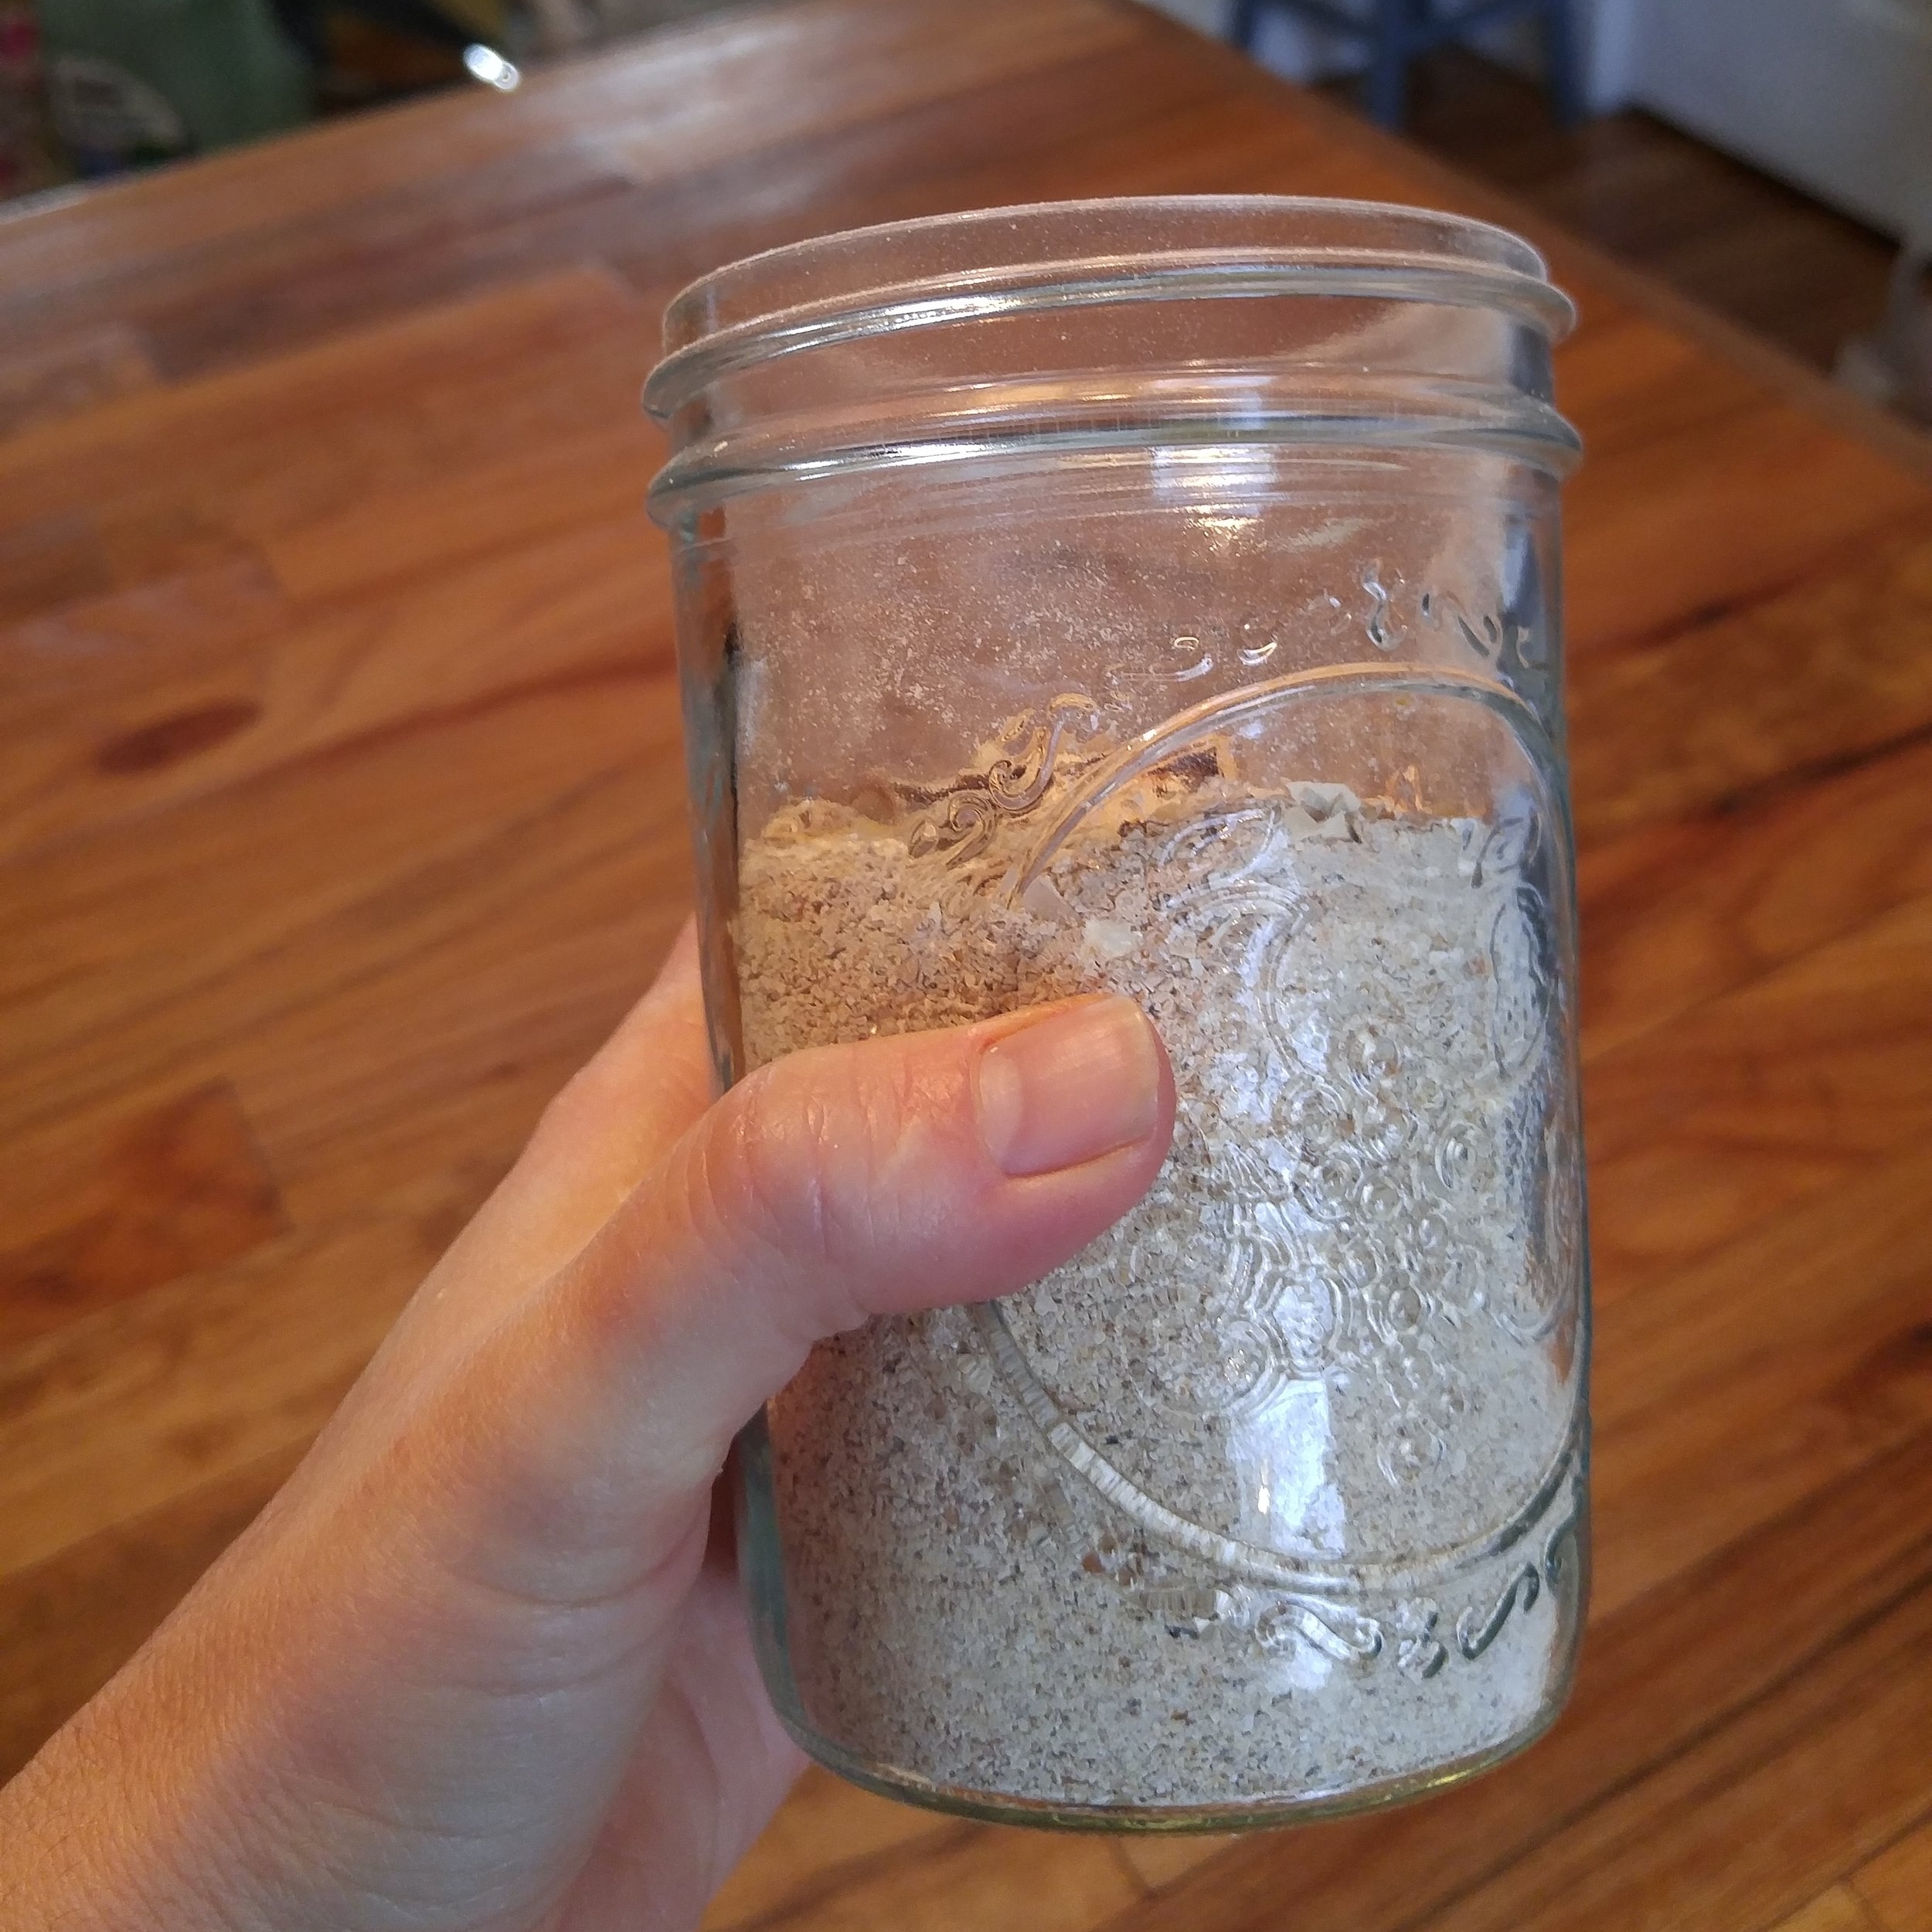
1. COLLECT THE SHELLS
I keep a bowl near the stove and throw all the egg shells in there (ummm... this bowl got a little full...).
They do not need to be washed out, but you certainly can. As you can see from the photo below, I don't wash mine, mostly because I am much too lazy ( I also do not wash the gunk/feathers off our fresh eggs before using them!).

2. DRY THE SHELLS.
Place the shells in the sunshine for a day or two. OR....
Bake the egg shells in the oven at 350 degrees for about 20-30 minutes, until nice and crispy.

3. GRIND THE SHELLS.
Place dried egg shells in a blender or food processer and grind until powdery. A few larger pieces is ok.
Alternatively, they could be crushed by hand - with a mortar and pestle, or placed in a Ziploc bag and rolled over with a rolling pin.


4. STORE THE POWDERED SHELLS.
Place the powder in jars or buckets and set aside until planting time!
Using Your Fertilizer
At planting time, simply sprinkle the powdered egg shells in the planting hole (about a tbsp. or so), place your plant in the hole and water thoroughly. Done!
If you are looking to purchase plants for your vegetable garden, be sure to check out our selection of heirloom vegetable plants, lovingly raised right on our farm. It the perfect way to bring home part of Three Acre Farm!
Trash to Treasure
Now that you know the secret to turning trash into treasure:
Be sure to spread the word!
Share this post to your DIY friends.
Ask your friends and family to save their eggshells for you.
I'd love hear what you are planting this year and if you've had problems you need help with. I'm here for you.
Bring on the questions!
-Lori